
User Manual


8
Fig.8
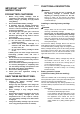
3. Insert the holder bolt till it stops. And then, return
the lock lever to its original position.
Fig.9
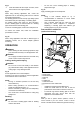
When using sanding application tool, mount the
application tool on the sanding pad so that it matches
the sanding pad direction.
The sanding pad has a hook and loop type fitting system
which allows easy and rapid fitting of a sanding paper.
As sanding papers have holes for dust extraction,
mount a sanding paper so that the holes in a sanding
paper match those in the sanding pad.
To remove a sanding paper, raise its end and peel it off.
To remove the holder bolt, follow the installation
procedures in reverse.
Fig.10
When using application tools with a different type of
installation section, use a correct adapter (optional
accessory).
OPERATION
WARNING:
• Before starting the tool and during operation, keep
your hand and face away from the application tool.
CAUTION:
• Do not apply excessive load to the tool which may
cause a motor lock and stop the tool.
Cutting, sawing and scraping
CAUTION:
• Do not move on the tool forcibly in the direction
(eg. towards either side) of tool application with no
cutting edge. It may damage the tool.
Fig.11
Put the application tool on the workpiece.
And then move the tool forward so that the application
tool movement does not slow down.
NOTE:
• Forcing or excessive pressure on the tool may
reduce efficiency.
• Before cutting operation, it is recommended to
preset the orbital stroke rate 4 - 6.
• Remove sawdust by drawing the tool adequately.
It increases work efficiency.
• The round saw is recommended for cutting long
straight line.
Sanding
CAUTION:
• Do not reuse a sanding paper used for sanding
metal to sand wood.
• Do not use a worn sanding paper or sanding
paper without grit.
Fig.12
Apply a sanding paper on the workpiece.
NOTE:
• Using a test material sample to try is
recommendable to determine a correct orbital
stroke rate suitable for your work.
• Use a sanding paper with the same grit until
sanding the whole workpiece is completed.
Replacing a sanding paper with different grit
sanding paper may not get a fine finish.
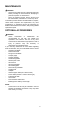
Dust extraction attachment
(optional accessory)
1
2
3
4
5
6
8
7
014561
•
Install dust nozzles and dust attachment.
• Install the nozzle band on the tool so that its
protrusions fit in the holes in the tool to secure it.
• Put the felt ring and the sanding pad on the dust
attachment and then secure them with the
application tool installation bolt.
Fig.13
When you wish to perform cleaner operation, connect a
vacuum cleaner to your tool. Connect a hose of vacuum
cleaner to the dust extraction attachment (optional accessory).
1. Nozzle band
2. Dust nozzle
3. Dust attachment
4. Felt ring
5. Pad
6. Holder bolt
7. Holes in the tool
8. Protrusions on the nozzle band