ENGLISH (Original instructions) INSTRUCTION MANUAL Cordless Hedge Trimmer UH200D 010965 IMPORTANT: Read Before Using.
ENGLISH (Original instructions) SPECIFICATIONS Model UH200D Blade length 200 mm Strokes per minute (min-1) 1,250 Overall length 460 mm Net weight 1.2 kg Rated voltage D.C. 10.8 V • Due to our continuing program of research and development, the specifications herein are subject to change without notice. • Specifications and battery cartridge may differ from country to country.
19. Disconnect the plug from the power source and/or the battery pack from the power tool before making any adjustments, changing accessories, or storing power tools. Such preventive safety measures reduce the risk of starting the power tool accidentally. 20. Store idle power tools out of the reach of children and do not allow persons unfamiliar with the power tool or these instructions to operate the power tool. Power tools are dangerous in the hands of untrained users. 21. Maintain power tools.
GEB062-5 14. CORDLESS HEDGE TRIMMER SAFETY WARNINGS 1. 2. 3. 4. 5. 6. 7. 8. 9. 10. 11. 12. 13. Keep all parts of the body away from the cutter blade. Do not remove cut material or hold material to be cut when blades are moving. Make sure the switch is off when clearing jammed material. A moment of inattention while operating the hedge trimmer may result in serious personal injury. Carry the hedge trimmer by the handle with the cutter blade stopped.
2. 3. 4. 5. 6. 7. 8. 9. 10. Never allow people unfamiliar with these instructions, people (including children) with reduced physical, sensory or mental capabilities, or lack of experience and knowledge to use the equipment. Local regulations can restrict the age of the operator. Use the equipment with the utmost care and attention. Operate the equipment only if you are in good physical condition. Perform all work calmly and carefully.
7. 8. 9. 10. 11. 12. 13. Should the cutting tool hit stones or other hard objects, immediately switch off the motor and inspect the cutting tool. Inspect the cutting tool at short regular intervals for damage (detection of hairline cracks by means of tapping-noise test). Before commencing cutting, the cutting tool must have reached full working speed. The cutting tool has to be equipped with the appropriate guard.
Overcharging shortens the battery service life. Charge the battery cartridge with room temperature at 10 C - 40 C (50 F - 104 F). Let a hot battery cartridge cool down before charging it. 3. Battery protection system The tool is equipped with a battery protection system. This system automatically cuts off power to the motor to extend battery life.
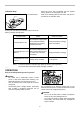
When the tool is also overloaded and has stopped during operation, the lamp lights up in red. Refer to the following table for the status and action to be taken for the indication lamp. Indication lamp 1 1. Indication lamp 010969 Running the tool allows the indication lamp to show the battery cartridge capacity status. Indication lamp The lamp blinks in red. Action to be taken Status This indicates the appropriate Recharge the battery cartridge time to replace the battery as soon as possible.
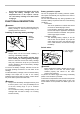
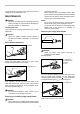
010879 010967 Hold the trimmer with one hand, depress the lock-off button and pull the switch trigger and then move it in front of your body. To cut a hedge side evenly, it helps to cut from the bottom upwards. 1. Trimming direction 2. Tilt the blades 3. Hedge surface to be trimmed 1 2 3 010968 Trim boxwood or rhododendron from the base toward the top for a nice appearance and good job.
To remove the chip receiver, loosen and remove the two clamping nuts and then take it out. • MAINTENANCE • CAUTION: Always be sure that the tool is switched off and the battery cartridge is removed before attempting to perform inspection or maintenance. NOTE: • Do not wipe off grease from the gear and crank. Failure to do so may cause damage to the tool. • For specific way of removing and installing shear blades refer to the reverse of a package for accessory shear blades.
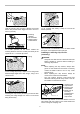
1. Screws 1 2 1 010893 Loosen two screws with a coin and similars and remove the shear blades. 1. Basic alignment line on the tool housing 2. Pins NOTE: • Do not remove the screws. Without removing the screws loosened, shear blades can be removed. 010905 Adjust the three detent pin position so that these three pins are aligned with the basic alignment line on the tool housing. 1. Crank 2. Shear blades 1 1 2 2 010894 Remove the crank from the shear blades.
1. Blade cover 1 010908 010912 Take out the blade cover from the old shear blades and fit it onto the new ones for easy handling during the replacement of blades. Press the undercover down and with the undercover pressed down turn the undercover clockwise until the symbol on the label is aligned with the symbol on the locking lever (the undercover is completely locked.). 1. Bent part of the base plate of shear blades 1. Groove in the undercover 2.
Store the tool in the place not exposed to water and rain. To maintain product SAFETY and RELIABILITY, repairs, carbon brush inspection and replacement, any other maintenance or adjustment should be performed by Makita Authorized Service Centers, always using Makita replacement parts. For cordless grass shear use This tool can be used as a grass shear by using the grass shear blade (optional accessory) and 2-way change set.
1. Shear blades 2. Base frame 3. Blade cover 1 3 1 2 3 2 010869 1. Crank 2. Undercover 3. Shear blades 010895 To install the grass shear blade, prepare the crank, undercover and new grass shear blade 1. Blade cover 2. Shear blades 1 010870 Slide the blade cover from the tool's side until the shear blade completely hides itself and then push in it lightly towards the tool from the front. To remove the blade cover, take the above installation procedure in reverse.
3 1 4 2 on the Place the undercover so that the symbol undercover is aligned with the symbol on the locking lever. 1. Recessed part of crank 2. Pins 3. Crank 4. Apply grease 010898 Fit the crank with its recessed part facing upwards onto the detent pins. At this time, apply a small amount of grease to the periphery of the crank using grease that the shear blades as optional accessory are provided with or that remains inside gear housing.
1 4 Installing or removing base frame 1. Undercover 2. Locking lever 3. Press 4. Turn 2 3 • • CAUTION: Before installing or removing base frame, be sure to install the blade cover. When installing or removing base frame, take care that your fingers are not be pinched between the tool and base frame. 010888 1. Undercover 2. Shear blade 3.
OPERATION • • • • WARNING: Keep hands away from blades. • CAUTION: Smear the blade before and once per hour during operation using machine oil or similars. Avoid operating the tool under the scorching sunlight as much as practicable. When operating the tool, be careful of your physical conditions. • 010874 Turn the tool on after adjusting the shearing height and hold it so that the foot of the tool rest on the ground. Then gently move the tool forward into the area to be cut.
Makita Corporation 884948A2 20 www.makita.