ENGLISH (Original instructions) INSTRUCTION MANUAL Hedge Trimmer UH4570 UH5570 UH6570 009277 DOUBLE INSULATION IMPORTANT: Read Before Using.
ENGLISH (Original instructions) SPECIFICATIONS Model UH4570 UH5570 UH6570 Blade length 450 mm 550 mm 650 mm Strokes per minute (min-1) 1,600 1,600 1,600 Overall length 862 mm 970 mm 1,042 mm Net weight 3.6 kg 3.7 kg 3.8 kg Safety class /II • Due to our continuing programme of research and development, the specifications herein are subject to change without notice. • Specifications may differ from country to country.
Designation of Machine: Hedge trimmer 3. Keep children and bystanders away while operating a power tool. Distractions can cause you to lose control. Electrical safety 4. Power tool plugs must match the outlet. Never modify the plug in any way. Do not use any adapter plugs with earthed (grounded) power tools. Unmodified plugs and matching outlets will reduce risk of electric shock. 5. Avoid body contact with earthed or grounded surfaces such as pipes, radiators, ranges and refrigerators.
27. 15. Do not overreach. Keep proper footing and balance at all times. This enables better control of the power tool in unexpected situations. 16. Dress properly. Do not wear loose clothing or jewellery. Keep your hair, clothing, and gloves away from moving parts. Loose clothes, jewellery or long hair can be caught in moving parts. 17. If devices are provided for the connection of dust extraction and collection facilities, ensure these are connected and properly used.
11. 12. 13. 14. 15. 16. 17. 18. 19. 20. 21. 22. 23. Work gloves of stout leather are part of the basic equipment of the hedge trimmer and must always be worn when working with it. Also wear sturdy shoes with anti-skid soles. Before starting work check to make sure that the trimmer is in good and safe working order. Ensure guards are fitted properly. Check cable for damage before starting work and replace if necessary. The hedge trimmer must not be used unless fully assembled.
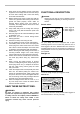
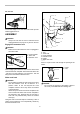
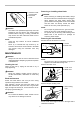
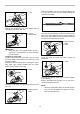
Far area cut 1 2 009282 To trim the hedge in far area with both hands pull the switch triggers A and C. 3 ASSEMBLY • 4 CAUTION: Always be sure that the tool is switched off and unplugged before carrying out any work on the tool. 5 Engage the extension cord • 6 7 CAUTION: Make sure that the extension cord is unplugged to the mains outlet. 1 2 1. Hook 2. Tool 3. Tool's cord 4. Hook complete 5. Extension cord 6. Holder 7. Waist cord hook 1. Hook complete 2. Tool's cord 3.
Arm cord hook (Accessory) CAUTION: Do not attach the holder of arm cord hook to other than the extension cord. Do not attach it in a position closer to the tool beyond the hook complete hooks. Failure to do so may cause an accident or personal injury. • Attach firmly one hook of the hook complete to the tool's cord and the other hook of hook complete to the extension cord. Working with the tool with a sole hook only attached may cause an accident and injury.
Installing or removing chip receiver (accessory) • CAUTION: Always be sure that the tool is switched off and unplugged before installing or removing chip receiver. NOTE: • When replacing the chip receiver, always wear gloves so that hands and face does not directly contact the blade. Failure to do so may cause personal injury. • Always be sure to remove the blade cover before installing the chip receiver. • The chip receiver receives cut-off leaves and alleviates collecting thrown-away leaves.
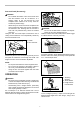
Removing or installing shear blade 1. Press the hooks on both sides 2. Unlock the hooks • 1 2 • 009293 • CAUTION: Before removing or installing shear blade, always be sure that the tool is switched off and unplugged. When replacing the shear blade, always wear gloves without removing blade cover so that hands and face does not directly contact the blade. Failure to do so may cause personal injury. NOTE: • Do not wipe off grease from the gear and crank. Failure to do so may cause damage to the tool.
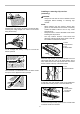
Take out the blade cover from the old shear blades and fit it onto the new ones for easy handling during the replacement of blades. 1. Crank 1 009298 Remove two screws from the shear blades and the shear blade unit will be taken out. 009302 2 1. Screws 2. Shear blade 1 Place the new shear blades on the tool so that the oval holes in the shear blades fit onto the crank. Overlap the holes in the shear blades with the screw holes in the tool and then secure them with two screws. 1.
Storage The hook hole in the bottom of the blade cover is convenient for hanging the tool from a nail or screw on the wall. 009305 Put the blade cover on the shear blades so that the blades are not exposed. Store the tool out of the reach of children carefully. Store the tool in the place not exposed to water and rain.
Makita Corporation Anjo, Aichi, Japan 884840E228 12