
Use and Care Manual

14 ENGLISH
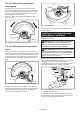
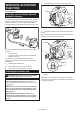
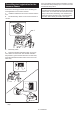
When installing the abrasive cut-off wheel:
11
44
23
► 1. Lock nut 2. Abrasive cut-off wheel (Thinner than
4mm (5/32")) 3. Abrasive cut-off wheel (4mm (5/32")
or thicker) 4. Inner ange
When installing the diamond wheel:
11
44
23
► 1. Lock nut 2. Diamond wheel (Thinner than 4mm
(5/32″)) 3. Diamond wheel (4mm (5/32″) or thicker)
4. Inner ange
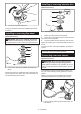
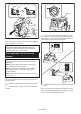
Operation with wire cup brush
Optional accessory
CAUTION: Check operation of brush by run-
ning tool with no load, insuring that no one is in
front of or in line with brush.
CAUTION:
Do not use brush that is damaged, or
which is out of balance. Use of damaged brush could increase
potential for injury from contact with broken brush wires.
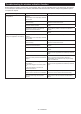
1
► 1. Wire cup brush
Remove the battery cartridge from the tool and place it
upside down allowing easy access to spindle.
Remove any accessories on spindle. Thread wire cup
brush onto spindle and tighten with supplied wrench.
NOTICE: Avoid applying too much pressure
which causes over bending of wires when using
brush. It may lead to premature breakage.
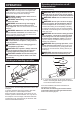
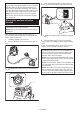
Operation with wire wheel brush
Optional accessory
CAUTION: Check operation of wire wheel
brush by running tool with no load, insuring that
no one is in front of or in line with the wire wheel
brush.
CAUTION: Do not use wire wheel brush that
is damaged, or which is out of balance. Use of
damaged wire wheel brush could increase potential
for injury from contact with broken wires.
CAUTION: ALWAYS use guard with wire
wheel brushes, assuring diameter of wheel ts
inside guard. Wheel can shatter during use and
guard helps to reduce chances of personal injury.
1
► 1. Wire wheel brush
Remove the battery cartridge from the tool and place it
upside down allowing easy access to spindle.
Remove any accessories on spindle. Thread wire wheel
brush onto spindle and tighten with the wrenches.
NOTICE: Avoid applying too much pressure
which causes over bending of wires when
using wire wheel brush. It may lead to premature
breakage.