INSTRUCTION MANUAL MANUAL DE INSTRUCCIONES Cordless Portable Band Saw Sierra de Banda Portátil Inalámbrica XBP03 IMPORTANT: Read Before Using. IMPORTANTE: Lea antes de usar.
ENGLISH (Original instructions) SPECIFICATIONS Model: Max. cutting capacity XBP03 Round workpiece 64 mm (2-1/2″) dia. Rectangular workpiece 64 mm x 64 mm (2-1/2″ x 2-1/2″) Blade speed Blade size 3.2 m/s (190 m/min)(630 ft/min) Length 835 mm (32-7/8″) Width 13 mm (1/2″) Thickness 0.5 mm (0.02″) Dimensions (L x W x H) without wheel cover 477 mm x 197 mm x 229 mm (18-3/4″ x 7-3/4″ x 9″) Rated voltage D.C. 18 V Net weight without wheel cover • • • 3.8 - 4.1 kg (8.3 - 9.
Power tools can produce electromagnetic fields (EMF) that are not harmful to the user. However, users of pacemakers and other similar medical devices should contact the maker of their device and/ or doctor for advice before operating this power tool. 4. Personal Safety 1. Stay alert, watch what you are doing and use common sense when operating a power tool. Do not use a power tool while you are tired or under the influence of drugs, alcohol or medication.
Service 1. Have your power tool serviced by a qualified repair person using only identical replacement parts. This will ensure that the safety of the power tool is maintained. 2. Never service damaged battery packs. Service of battery packs should only be performed by the manufacturer or authorized service providers. 3. Follow instruction for lubricating and changing accessories. 4. Do not modify or attempt to repair the appliance or the battery pack except as indicated in the instructions for use and care.
Tips for maintaining maximum battery life 1. 2. 3. 4. CAUTION: Always install the battery cartridge fully until the red indicator cannot be seen. If not, it may accidentally fall out of the tool, causing injury to you or someone around you. Charge the battery cartridge before completely discharged. Always stop tool operation and charge the battery cartridge when you notice less tool power. Never recharge a fully charged battery cartridge. Overcharging shortens the battery service life.
Overload protection NOTE: Do not apply impact to the lamp, which may cause damage or shorted service time to it. When the battery is operated in a manner that causes it to draw an abnormally high current, the tool automatically stops without any indication. In this situation, turn the tool off and stop the application that caused the tool to become overloaded. Then turn the tool on to restart. NOTE: Use a dry cloth to wipe the dirt off the lens of the lamp.
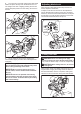
1 5. With pressing the middle part of the blade, position the band saw blade around one wheel. Moving the wheel to A side makes it easier to do so. 2 1 3 2 A ► 1 . Tighten 2. Loosen 3. Blade tightening lever To install the band saw blade: 1. Open the wheel cover. ► 1 . Wheel 2. Rubber tire 2. Turn the blade tightening lever clockwise until it stops to loosen the wheel. 6. Position the band saw blade on another wheel similarly. 3.
Apply the band saw blade to the suitable cutting position on the workpiece as illustrated. Installing hook Optional accessory CAUTION: Do not use the hook for other purpose than temporarily hanging the tool. Doing so may cause the hook come off from the tool and result in personal injury. Hook is useful for hanging the tool. Hang the tool on a pipe vice or other suitable, stable structure. To install the hook, set the hook alongside the groove and tighten it with two screws. 1 2 ► 1 . Hook 2.
2. Turn the tool on and wait until the band saw blade attains full speed. Gently lower the blade into the cut. The weight of the tool or slightly pressing the tool will supply adequate pressure for the cutting. Do not force the tool. Adjusting blade track When the band saw blade tends to slip out from the wheel, adjust the blade track. To adjust, insert the hex wrench into the adjustment hole as illustrated and make a quarter turn clockwise. After that, check if the band saw blade does not slip out.
MAKITA LIMITED WARRANTY MAINTENANCE Please refer to the annexed warranty sheet for the most current warranty terms applicable to this product. If annexed warranty sheet is not available, refer to the warranty details set forth at below website for your respective country. CAUTION: Always be sure that the tool is switched off and the battery cartridge is removed before attempting to perform inspection or maintenance. United States of America: www.makitatools.com Canada: www.makita.
ESPAÑOL (Instrucciones originales) ESPECIFICACIONES Modelo: Capacidad máxima de corte XBP03 Pieza de trabajo redonda 64 mm (2-1/2″) de diámetro Pieza de trabajo rectangular 64 mm x 64 mm (2-1/2″ x 2-1/2″) Velocidad de la cuchilla Tamaño de la cuchilla 3,2 m/s (190 m/min)(630 ft/min) Longitud 835 mm (32-7/8″) Anchura 13 mm (1/2″) Espesor 0,5 mm (0,02″) Dimensiones (La x An x Al) sin cubierta de la rueda 477 mm x 197 mm x 229 mm (18-3/4″ x 7-3/4″ x 9″) Tensión nominal 18 V c.c.
3. 4. 5. 6. 7. No exponga las herramientas eléctricas a la lluvia ni a condiciones húmedas. La entrada de agua en una herramienta eléctrica aumentará el riesgo de que se produzca una descarga eléctrica. No maltrate el cable. Nunca utilice el cable para transportar, jalar o desconectar la herramienta eléctrica. Mantenga el cable alejado del calor, aceite, objetos cortantes o piezas móviles. Los cables dañados o enredados aumentan el riesgo de sufrir una descarga eléctrica.
8. 9. Mantenga los mangos y superficies de asimiento secos, limpios y libres de aceite o grasa. Los mangos y superficies de asimiento resbalosos no permiten una manipulación segura ni el control de la herramienta en situaciones inesperadas. Cuando vaya a utilizar esta herramienta, evite usar guantes de trabajo de tela ya que éstos podrían atorarse. Si los guantes de trabajo de tela llegaran a atorarse en las piezas móviles, esto podría ocasionar lesiones personales.
Instrucciones importantes de seguridad para el cartucho de batería 1. 2. 3. 4. 5. 6. 7. 8. 9. 10. 11. 12. Antes de utilizar el cartucho de batería, lea todas las instrucciones e indicaciones de precaución en el (1) el cargador de batería, (2) la batería, y (3) el producto con el que se utiliza la batería. No desarme el cartucho de batería. Si el tiempo de operación se ha acortado en exceso, deje de operar de inmediato.
Para colocar el cartucho de batería, alinee la lengüeta sobre el cartucho de batería con la ranura en la carcasa y deslice en su lugar. Inserte por completo hasta que se fije en su lugar con un pequeño clic. Si puede ver el indicador rojo del lado superior del botón, esto indica que no ha quedado fijo por completo. PRECAUCIÓN: Introduzca siempre completamente el cartucho de batería hasta que el indicador rojo no pueda verse.
Iluminación de la luz delantera AVISO: Cuando abra la cubierta de la rueda, abra y libere ambos ganchos simultáneamente. Abrir solamente un gancho podría ocasionar agrietamiento en la cubierta de la rueda. PRECAUCIÓN: No mire a la luz ni vea a la fuente de luz directamente. Jale el gatillo interruptor para encender la luz. La luz continúa iluminándose mientras se está jalando el gatillo interruptor. La luz se apaga una vez que se suelta el gatillo interruptor. 1 1 2 ► 1 . Cubierta de la rueda 2.
Inserte el lado no serrado de la cuchilla de la sierra 4. de banda dentro del soporte superior y del soporte inferior. Asegúrese de que la cuchilla de la sierra de banda en el soporte superior e inferior toque los rodamientos inferiores. 1 Para extraer la cuchilla de la sierra de banda, siga el procedimiento de instalación en orden inverso. Ajuste de la posición de la placa de tope En la operación normal, proyecte la placa de tope hacia el lado A por completo.
Coloque la cuchilla de la sierra de banda en la posición de corte adecuada en la pieza de trabajo, tal y como se ilustra. OPERACIÓN PRECAUCIÓN: Siempre inserte completamente el cartucho de batería hasta que quede asegurado en su lugar. Si puede ver el indicador rojo del lado superior del botón, esto indica que no ha quedado completamente asegurado. Insértelo por completo hasta que el indicador rojo no pueda verse.
2. Encienda la herramienta y espere a que la cuchilla de la sierra de banda alcance su velocidad completa. Descienda suavemente la cuchilla en el corte. El peso de la herramienta o una ligera presión sobre la misma aplicará la presión idónea para el corte. No fuerce la herramienta. Ajuste de la pista de la cuchilla Cuando la cuchilla de la sierra de banda tiende a deslizarse fuera de la rueda, ajuste la pista de la cuchilla.
GARANTÍA LIMITADA DE MAKITA MANTENIMIENTO Ésta Garantía no aplica para México PRECAUCIÓN: Asegúrese siempre de que la herramienta esté apagada y el cartucho de batería extraído antes de intentar realizar una inspección o mantenimiento. AVISO: Nunca use gasolina, bencina, diluyente (tíner), alcohol o sustancias similares. Puede que esto ocasione grietas o descoloramiento.
< USA only > WARNING Some dust created by power sanding, sawing, grinding, drilling, and other construction activities contains chemicals known to the State of California to cause cancer, birth defects or other reproductive harm. Some examples of these chemicals are: • lead from lead-based paints, • crystalline silica from bricks and cement and other masonry products, and • arsenic and chromium from chemically-treated lumber.