INSTRUCTION MANUAL MANUAL DE INSTRUCCIONES Cordless Chain Saw Electrosierra Inalámbrica XCU05 XCU06 IMPORTANT: Read Before Using. IMPORTANTE: Lea antes de usar.
ENGLISH (Original instructions) SPECIFICATIONS Model: XCU05 XCU06 Overall length (without guide bar) 256 mm (10-1/8″) Rated voltage D.C. 18 V Net weight 2.8 - 3.3 kg (6.2 - 7.
WARNING: Use appropriate combination of the guide bar and saw chain. Otherwise personal injury may result. 6. SAFETY WARNINGS General power tool safety warnings 7. WARNING: Read all safety warnings, instructions, illustrations and specifications provided with this power tool. Failure to follow all instructions listed below may result in electric shock, fire and/or serious injury. Save all warnings and instructions for future reference.
9. Always wear protective goggles to protect your eyes from injury when using power tools.The goggles must comply with ANSI Z87.1 in the USA. It is an employer's responsibility to enforce the use of appropriate safety protective equipments by the tool operators and by other persons in the immediate working area. 9. Power tool use and care 1. Do not force the power tool. Use the correct power tool for your application.
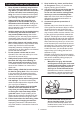
Cordless Chain saw safety warnings Keep all parts of the body away from the saw chain when the chain saw is operating. Before you start the chain saw, make sure the saw chain is not contacting anything. A moment of inattention while operating chain saws may cause entanglement of your clothing or body with the saw chain. 2. Always hold the chain saw with your right hand on the top handle and your left hand on the front handle.
Only use replacement bars and chains specified by the manufacturer. Incorrect replacement bars and chains may cause chain breakage and/ or kickback. • Follow the manufacturer’s sharpening and maintenance instructions for the saw chain. Decreasing the depth gauge height can lead to increased kickback. 14. Before starting work, check that the chain saw is in proper working order and that its condition complies with the safety regulations.
Vibration 1. Individuals with poor circulation who are exposed to excessive vibration may experience injury to blood vessels or the nervous system. Vibration may cause the following symptoms to occur in the fingers, hands or wrists: “Falling asleep” (numbness), tingling, pain, stabbing sensation, alteration of skin colour or of the skin.
Tips for maintaining maximum battery life 3. Charge the battery cartridge before completely discharged. Always stop tool operation and charge the battery cartridge when you notice less tool power. Never recharge a fully charged battery cartridge. Overcharging shortens the battery service life. 1. 2. 4. Charge the battery cartridge with room temperature at 10 °C - 40 °C (50 °F - 104 °F). Let a hot battery cartridge cool down before charging it.
Indicating the remaining battery capacity FUNCTIONAL DESCRIPTION Only for battery cartridges with the indicator CAUTION: Always be sure that the tool is switched off and the battery cartridge is removed before adjusting or checking function on the tool. 1 Installing or removing battery cartridge 2 CAUTION: Always switch off the tool before installing or removing of the battery cartridge. CAUTION: Hold the tool and the battery cartridge firmly when installing or removing battery cartridge.
Overload protection When the battery is operated in a manner that causes it to draw an abnormally high current, the tool automatically stops and the main power lamp blinks in green. In this situation, turn the tool off and stop the application that caused the tool to become overloaded. Then turn the tool on to restart. Overheat protection When the tool or battery is overheated, the tool stops automatically and the main power lamp lights up in red.
Switch action Checking the chain brake WARNING: For your safety, this tool is equipped with lock-off lever which prevents the tool from unintended starting. NEVER use the tool if it runs when you simply pull the switch trigger without pressing the lock-off lever. Return the tool to our authorized service center for proper repairs BEFORE further usage. CAUTION: Hold the chain saw with both hands when switching it on. Hold the top handle with your right hand, the front handle with your left.
To remove the saw chain, perform the following steps: Adjusting the chain lubrication You can adjust the oil pump feed rate with the adjusting screw using the universal wrench. The amount of oil can be adjusted in 3 steps. 1 1. Release the chain brake by pulling the front hand guard. 2. Loosen the chain adjusting screw, then the retaining nut. 2 1 ► 1 . Chain adjusting screw 2. Retaining nut ► 1 .
2. Loosen the retaining nut a bit to loosen the sprocket cover lightly. 4. Insert the protrusion on the sprocket cover to the chain saw body, and then close the cover so that the bolt and pins on the chain saw body meet their counterparts on the cover. 1 2 3 1 ► 1 . Retaining nut 4 ► 1 . Protrusion 2. Sprocket cover 3. Bolt 4. Pin 3. Lift up the guide bar tip slightly and adjust the chain tension. Turn the chain adjusting screw clockwise to tighten, turn it counterclockwise to loosen.
5. Tighten the retaining nut to secure the sprocket cover. OPERATION Lubrication Saw chain is automatically lubricated when the tool is in operation. Check the amount of remaining oil in the oil tank periodically through the oil inspection window. To refill the tank, lay the chain saw on its side and remove the oil tank cap. The proper amount of oil is 140 ml. After refilling the tank, make sure that the oil tank cap is tightened securely. 1 1 ► 1 .
If you cannot cut the timber right through with a single stroke: Apply light pressure to the handle and continue sawing and draw the chain saw back a little. WORKING WITH THE CHAIN SAW CAUTION: The first time user should, as a minimum practice, do cutting logs on a saw-horse or cradle. CAUTION: When sawing precut timber, use a safe support (saw horse or cradle). Do not steady the workpiece with your foot, and do not allow anyone else to hold or steady it. CAUTION: Secure round pieces against rotation.
Bucking A 1. Rest the chain saw body on the wood to be cut. B B A Limbing 2. With the saw chain running, saw into the wood while using the top handle to raise the saw and the front one to guide it. 3. Continue the cut by applying slight pressure to the top handle, easing the saw back slightly. NOTICE: When making several cuts, switch the chain saw off between cuts. CAUTION: If the upper edge of the bar is used for cutting, the chain saw may be deflected in your direction if the chain becomes trapped.
— NOTICE: Never use gasoline, benzine, thinner, alcohol or the like. Discoloration, deformation or cracks may result. To maintain product SAFETY and RELIABILITY, repairs, any other maintenance or adjustment should be performed by Makita Authorized or Factory Service Centers, always using Makita replacement parts. The best cutting results are obtained with following distance between cutting edge and depth gauge. • Chain blade 90PX : 0.65 mm (0.
— The file can be guided more easily if a file holder (optional accessory) is employed. The file holder has markings for the correct sharpening angle of 30° (align the markings parallel to the saw chain) and limits the depth of penetration (to 4/5 of the file diameter). 1 Cleaning the sprocket cover Chips and saw dust will accumulate inside of the sprocket cover. Remove the sprocket cover and saw chain from the tool then clean the chips and saw dust. 30 1/5 ► 1 .
Replacing the sprocket CAUTION: A worn sprocket will damage a new saw chain. Have the sprocket replaced in this case. Before fitting a new saw chain, check the condition of the sprocket. 2 1 ► 1 . Sprocket 2. Areas to be worn out Always fit a new locking ring when replacing the sprocket. 2 1 ► 1 . Locking ring 2. Sprocket NOTICE: Make sure that the sprocket is installed as shown in the figure. Storing the tool 1. Clean the tool before storing.
Instructions for periodic maintenance To ensure long life, prevent damage and ensure the full functioning of the safety features, the following maintenance must be performed regularly. Warranty claims can be recognized only if this work is performed regularly and properly. Failure to perform the prescribed maintenance work can lead to accidents! The user of the chain saw must not perform maintenance work which is not described in the instruction manual.
TROUBLESHOOTING Before asking for repairs, conduct your own inspection first. If you find a problem that is not explained in the manual, do not attempt to dismantle the tool. Instead, ask Makita Authorized Service Centers, always using Makita replacement parts for repairs. Malfunction status The chain saw does not start. Cause Action Battery cartridge is not installed. Install a charged battery cartridge. Battery problem (low voltage). Recharge the battery cartridges.
OPTIONAL ACCESSORIES CAUTION: These accessories or attachments are recommended for use with your Makita tool specified in this manual. The use of any other accessories or attachments might present a risk of injury to persons. Only use accessory or attachment for its stated purpose. If you need any assistance for more details regarding these accessories, ask your local Makita Service Center.
ESPAÑOL (Instrucciones originales) ESPECIFICACIONES Modelo: XCU05 XCU06 Longitud total (sin la barra de guía) 256 mm (10-1/8″) Tensión nominal 18 V c.c.
Tipo de cadena de la sierra Pieza dentada 90PX Número de dientes 6 Paso 3/8″ ADVERTENCIA: Utilice una combinación apropiada de la barra de guía y cadena de la sierra. De lo contrario, esto podría ocasionar una lesión personal. 2. ADVERTENCIAS DE SEGURIDAD Advertencias generales de seguridad para herramientas eléctricas ADVERTENCIA: Lea todas las advertencias de seguridad, instrucciones, ilustraciones y especificaciones suministradas con esta herramienta eléctrica.
2. 3. 4. 5. 6. 7. 8. 9. Use equipo de protección personal. Póngase siempre protección para los ojos. El equipo protector tal como máscara contra el polvo, zapatos de seguridad antiderrapantes, casco rígido y protección para oídos utilizado en las condiciones apropiadas reducirá el riesgo de lesiones. Impida el encendido accidental.
9. Cuando vaya a utilizar esta herramienta, evite usar guantes de trabajo de tela ya que éstos podrían atorarse. Si los guantes de trabajo de tela llegaran a atorarse en las piezas móviles, esto podría ocasionar lesiones personales. Uso y cuidado de la herramienta a batería 1. Recargue sólo con el cargador especificado por el fabricante. Un cargador que es adecuado para un solo tipo de batería puede generar riesgo de incendio al ser utilizado con otra batería. 2.
7. 8. 9. 10. 11. 12. 13. Cuando corte una rama que se encuentre tensionada, esté alerta a su liberación brusca. Al liberarse la tensión en las fibras de la madera, la rama tensionada puede golpear al operador y/o provocar la pérdida de control de la sierra eléctrica. Tenga extrema precaución al cortar matorrales y árboles jóvenes. El material tierno puede quedar atascado en la cadena de la sierra y ser lanzado hacia usted o hacerle perder el equilibrio.
14. Antes de comenzar el trabajo, verifique que la sierra eléctrica se encuentre en buen estado y que su condición cumpla con las normas de seguridad. Verifique en particular que: • El freno de la cadena funcione debidamente; • El freno de retención funcione debidamente; • La barra y la cubierta de la pieza dentada estén colocadas correctamente; • La cadena haya sido afilada y tensionada de acuerdo con los reglamentos. 15. No arranque la sierra eléctrica con la cubierta de la cadena instalada en ésta.
Vibración 1. Las personas con mala circulación que estén expuestas a una vibración excesiva podrían sufrir lesiones en los vasos sanguíneos o en el sistema nervioso. La vibración podría causar los siguientes síntomas en los dedos, manos o muñecas: “Adormecimiento” (entumecimiento), hormigueo, dolor, sensación punzante, alteración del color de la piel o de la piel.
Pegue o cubra con cinta adhesiva los contactos abiertos y empaque la batería de manera que ésta no pueda moverse dentro del paquete. 11. Siga las regulaciones locales relacionadas al desecho de las baterías. 12. Utilice las baterías únicamente con los productos especificados por Makita. Instalar las baterías en productos que no cumplan con los requisitos podría ocasionar un incendio, un calentamiento excesivo, una explosión o una fuga de electrolito. GUARDE ESTAS INSTRUCCIONES.
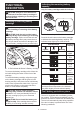
DESCRIPCIÓN DE LAS PIEZAS 1 2 3 4 5 6 12 13 11 10 9 8 7 14 18 15 16 17 1 Gatillo interruptor 2 Mango superior 3 Palanca de desbloqueo 4 Protector de mano delantero 5 Barra de guía 6 Cadena de la sierra 7 Receptor de la cadena 8 Tuerca de retención 9 Tornillo de ajuste de la cadena 10 Salida de astillas 11 Cartucho de batería 12 Lámpara de alimentación principal 13 Interruptor de alimentación principal 14 Tornillo de ajuste (para bomba de aceite) 15 Carabina 16 Mango delante
DESCRIPCIÓN DEL FUNCIONAMIENTO PRECAUCIÓN: Introduzca siempre completamente el cartucho de batería hasta que el indicador rojo no pueda verse. Si no, podría accidentalmente salirse de la herramienta y caer al suelo causando una lesión a usted o alguien a su alrededor. PRECAUCIÓN: Asegúrese siempre de que la herramienta esté apagada y el cartucho de batería haya sido extraído antes de realizar cualquier ajuste o comprobación en la herramienta. PRECAUCIÓN: No instale el cartucho de batería a la fuerza.
NOTA: Dependiendo de las condiciones de uso y la temperatura ambiente, la indicación podrá diferir ligeramente de la capacidad real. 1 2 Sistema de protección para la herramienta/batería La herramienta está equipada con un sistema de protección de la herramienta/batería. Este sistema corta en forma automática el suministro de energía al motor para prolongar la vida útil de la herramienta y la batería.
NOTA: Usted puede utilizar la herramienta en el modo Aumento de torsión por un máximo de 30 segundos. Dependiendo de las condiciones de uso, este modo cambia al modo normal en menos de 30 segundos. NOTA: Si la lámpara de alimentación principal parpadea en amarillo al oprimir el interruptor de alimentación principal durante unos segundos, el modo Aumento de torsión no está disponible. En este caso, siga los pasos a continuación.
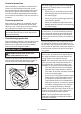
2. Empuje el protector de mano delantero hacia adelante con el dorso de su mano. Asegúrese de que la sierra eléctrica se detenga de inmediato. 3 2 Ajuste de la lubricación de la cadena Usted puede ajustar el caudal de alimentación de la bomba de aceite con el tornillo de ajuste usando la llave universal. La cantidad de aceite puede ajustarse en 3 pasos. 1 1 2 ► 1 . Tornillo de ajuste 3 Carabina (punto de fijación de la cuerda) Usted puede colgar la herramienta fijando la cuerda a la carabina.
3. Coloque el otro extremo de la cadena de la sierra alrededor de la pieza dentada, luego fije la barra de guía al cuerpo de la sierra eléctrica, alineando el orificio en la barra de guía con el pasador en el cuerpo de la sierra eléctrica. Extracción o instalación de la cadena de la sierra PRECAUCIÓN: La cadena de la sierra y la barra de guía siguen estando calientes justo después de la operación. Permita que se enfríen lo suficiente antes de realizar cualquier trabajo en la herramienta.
5. Apriete la tuerca de retención para asegurar la cubierta de la pieza dentada y luego aflójela un poco para ajustar la tensión. 3. Levante ligeramente la punta de la barra de guía y ajuste la tensión de la cadena. Gire el tornillo de ajuste de la cadena en el sentido de las manecillas del reloj para apretar la cadena, y gírelo en sentido inverso al de las manecillas del reloj para aflojar la cadena.
Tope de picos Accesorio opcional Al cortar ramas gruesas, es recomendable usar el tope de picos. Para instalar el tope de picos, siga los pasos a continuación: Después del reabastecimiento, sostenga la sierra eléctrica lejos del árbol. Póngala en marcha y espere hasta que la lubricación en la cadena de la sierra sea adecuada. 1. Retire la cubierta de la pieza dentada, la cadena de la sierra y la barra de guía. 2.
Si no es posible cortar la madera completamente con una sola pasada: Presione levemente sobre el mango y continúe cortando haciendo retroceder la sierra eléctrica un poco. OPERACIÓN DE LA SIERRA ELÉCTRICA PRECAUCIÓN: El usuario sin experiencia deberá, como práctica mínima, cortar leña sobre un caballete o base. PRECAUCIÓN: Al aserrar madera precortada, utilice un apoyo seguro (como un caballete o base).
Aserrado A 1. Apoye el cuerpo de la sierra eléctrica sobre la madera que va a cortar. B B A Desmembrado 2. Con la cadena de la sierra en marcha, corte la madera usando el mango superior para levantar la sierra y el mango delantero para guiarla. 3. Continúe el corte aplicando una leve presión sobre el mango superior, alivianando ligeramente la parte trasera de la sierra. AVISO: Cuando realice varios cortes, apague la sierra eléctrica entre corte y corte.
MANTENIMIENTO 1 2 2 1 PRECAUCIÓN: Asegúrese siempre de que la herramienta esté apagada y el cartucho de batería extraído antes de intentar realizar una inspección o mantenimiento. PRECAUCIÓN: Siempre use guantes cuando realice cualquier trabajo de inspección o mantenimiento. 3 AVISO: Nunca use gasolina, bencina, diluyente (tíner), alcohol o sustancias similares. Puede que esto ocasione grietas o descoloramiento. ► 1 . Longitud de la parte cortadora 2.
Lima y guiado del limado — Use una lima redonda especial (accesorio opcional) para cadenas de la sierra para afilar la cadena. Las limas redondas comunes no son apropiadas. — El diámetro de la lima redonda para cada cadena de la sierra es: • Cuchilla de la cadena 90PX: 4,5 mm (3/16″) — La lima sólo deberá embonar en la parte cortadora en la pasada hacia adelante. Levante la lima para alejarla de la parte cortadora en la pasada de regreso. — Afile la parte cortadora más pequeña primero.
Limpieza de la cubierta de la pieza dentada En el interior de la cubierta de la pieza dentada se acumularán astillas y aserrín. Retire la cubierta de la pieza dentada y la cadena de la sierra de la herramienta y luego limpie las astillas y el aserrín. Reemplazo de la pieza dentada PRECAUCIÓN: Una pieza dentada desgastada dañará una cadena nueva de la sierra. En este caso, reemplace la pieza dentada. Antes de instalar una nueva cadena de la sierra, verifique la condición de la pieza dentada.
Instrucciones para el mantenimiento periódico Para asegurar una vida útil prolongada, prevenga el daño y asegure un funcionamiento total de las funciones de seguridad, efectuando el siguiente programa de mantenimiento de forma periódica. Las reclamaciones de garantía podrán ser reconocidas solamente si este programa de mantenimiento es realizado periódicamente y como corresponde.
RESOLUCIÓN DE PROBLEMAS Antes de solicitar alguna reparación, primero realice una inspección por su cuenta. Si detecta algún problema que no esté explicado en el manual, no intente desensamblar la herramienta. En vez de esto, solicite la reparación a un centro de servicio autorizado de Makita, usando siempre piezas de repuesto Makita. Estado de la avería La sierra eléctrica no arranca. Causa Solución El cartucho de batería no está instalado. Instale un cartucho de batería cargado.
Estado de la avería Causa Solución Vibración anormal: ¡Detenga la máquina de inmediato! La barra de guía o la cadena de Ajuste la barra de guía o la tenla sierra están sueltas. sión de la cadena de la sierra. Avería de la herramienta. Solicite la reparación en el centro de servicio autorizado de su región. El modo Aumento de torsión no está disponible después de reemplazar el cartucho de batería con uno completamente cargado.
< USA only > WARNING Some dust created by power sanding, sawing, grinding, drilling, and other construction activities contains chemicals known to the State of California to cause cancer, birth defects or other reproductive harm. Some examples of these chemicals are: • lead from lead-based paints, • crystalline silica from bricks and cement and other masonry products, and • arsenic and chromium from chemically-treated lumber.