INSTRUCTION MANUAL MANUAL DE INSTRUCCIONES Cordless Backpack Vacuum Cleaner Aspiradora de mochila a batería XCV09 IMPORTANT: Read Before Using. IMPORTANTE: Lea antes de usar.
ENGLISH (Original instructions) SPECIFICATIONS Model: Capacity XCV09 Filter bag 2.0 L (0.53 gal.) Dust bag 1.5 L (0.40 gal.) 1.8 m3/min (64 cu.ft/min) Maximum air volume (With hose ø28 mm) Vacuum 110 hPa Dimensions (L x W x H) (excluding the harness) 230 mm x 185 mm x 373 mm (9″ x 7-1/4″ x 14-3/4″) Rated voltage D.C. 36 V Net weight • • • 3.8 - 4.5 kg (8.5 - 9.9 lbs) Due to our continuing program of research and development, the specifications herein are subject to change without notice.
7. 8. 9. 10. 11. 12. 13. 14. 15. 16. 17. 18. 19. Do not put any object into openings. Do not use with any opening blocked; keep free of dust, lint, hair, and anything that may reduce air flow. Keep hair, loose clothing, fingers, and all parts of body away from openings and moving parts. Turn off all controls before removing the battery cartridge. Use extra care when cleaning on stairs.
Hot substances that are burning or smoking (cigarettes, matches, incense sticks, candles, hot ashes), sparks and metal dust generated by cutting or grinding metal, etc. • Flammable material (toner, paint, spray, etc.) • Foam like carpet cleaning agent, etc. (they may cause explosion or fire) • Explosive or pyrophoric substances (nitroglycerin, aluminum, magnesium, titanium, zinc, red phosphorus, yellow phosphorus, celluloid, etc.
7. 8. 9. 10. 11. 12. Do not incinerate the battery cartridge even if it is severely damaged or is completely worn out. The battery cartridge can explode in a fire. Be careful not to drop or strike battery. Do not use a damaged battery. The contained lithium-ion batteries are subject to the Dangerous Goods Legislation requirements. For commercial transports e.g. by third parties, forwarding agents, special requirement on packaging and labeling must be observed.
Overheat protection Switch box position When the tool is overheated, the tool stops automatically. Let the tool cool down before turning the tool on again. The switch box can be hooked on either side of the lower belt. Arrange the cord so that the switch box comes to your desired side. To prevent the cord from being damaged, pass the cord through the hook as illustrated. Overdischarge protection When the battery capacity becomes low, the tool stops automatically.
Shoulder belts Switch action You can change the suction power in three steps: normal (1), high (2), and max (3). To start vacuuming, press button once. When you change the suction power, press the button while the vacuum cleaner is running. The suction power switches in order normal (1) , high (2) , and max (3). To turn off the vacuum cleaner, press button. 1 2 ► 1 . Strap 2.
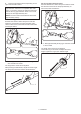
Hose band ASSEMBLY Hose band can be used for holding the hose or free nozzle. To secure the hose to the vacuum cleaner body, pass the hose band through the slot on the body. You can attach the hose band on either side. CAUTION: Always be sure that the tool is switched off and the battery cartridge is removed before carrying out any work on the tool. Assembling hose 1 2 Insert the hose cuff into the vacuum cleaner body and turn it clockwise. 1 2 3 ► 1 . Hose band 2. Slot 3.
For the ring-type extension wand Shoulder the vacuum cleaner body then twist and insert the extension wand into the bent pipe assembly. To disconnect, twist and extract it. 2. Follow the procedures below, depending on the type of the extension wand : NOTE: The slide-type extension wand and the ringtype extension wand are not compatible with each other. If you want to change the slide-type extension wand to the ring-type extension wand or vice versa, change the bent pipe assembly also.
For the aluminum bending pipe / aluminum straight pipe (Only for the model with ø38 mm hose and front cuff 38) Shoulder the vacuum cleaner body then twist and insert the pipe into the front cuff. To disconnect, twist and extract it. Supplied hose diameter Hose end type Action Replace the hose with the one for dust extraction (ø28 mm, with front cuff). ø38 mm 4 with snap-on part Attach the joint 22-38 or the front cuff 24. 2 1 3 with front cuff 38 NOTE: Always use a suitable front cuff.
2. Connect the front cuff to the tool's extraction outlet. Attaching bent pipe assembly Optional accessory NOTE: You don't need to perform this procedure if your model comes with the bent pipe assembly attached to the hose. 1 NOTE: There are two types of bent pipe assembly; the one for slide-type extension wand and the one for ring-type extension wand. If you prepare the bent pipe assembly, choose the one for your desired extension wand type.
1. Unlock the latch by lifting the bottom side. Push the grooved area to lift the front latching side. Pull the latch to open the lid. When using the dust bag, insert the brim of the dust bag into the slit. 1 1 2 2 3 ► 1 . Slit 2. Brim 3. Dust bag ► 1 . Hook 2. Lid 2. Insert the filter bag into the slit on the upper side of the room as illustrated. 3. Align the hole of the filter bag with the hose cuff and push the cardboard portion to the end.
During the operation, hook the switch box on the D-ring or the lower belt. The hook can be slanted for lighting forward when hooked on the lower belt. OPERATION WARNING: Operators shall be adequately instructed on the use of the vacuum cleaner. WARNING: This vacuum cleaner is not suitable for picking up hazardous dust. CAUTION: This cleaner is for dry use only. CAUTION: This cleaner is for indoor use only. CAUTION: Always insert the battery cartridge all the way until it locks in place.
NOTICE: Periodically check the filter bag if it is full. Continuous use with the filter bag full results in reduced suction power. NOTICE: Do not use an used filter bag. The filter bag is designed for single use. Using filter bag repeatedly may cause clogging of the filter and results in damage to the cleaner. If you want to use the bag repeatedly, use a dust bag. 2. Beat the dust off from the filter. The filter can be washed with water. Rinse away the dust and particles on the filter every 1 or 2 month.
Clearing the clog When clearing the clog, remove the hose or the extension wand, or the bent pipe assembly to check inside. OPTIONAL ACCESSORIES Removing/attaching the snap-on type bent pipe assembly To remove, pull the bent pipe assembly while pressing both of the tab on the hose end. To attach, insert the hose end into the bent pipe assembly. Make sure that the tabs on the hose end snap into the holes on the bent pipe assembly.
ESPAÑOL (Instrucciones originales) ESPECIFICACIONES Modelo: Capacidad XCV09 Bolsa del filtro 2,0 L (0,53 gal.) Bolsa recolectora de polvo 1,5 L (0,40 gal.) 1,8 m3/min (64 cu.ft/min) Volumen de aire máximo (Con manguera de ø28 mm) Aspiradora 110 hPa Dimensiones (La x An x Al) (sin incluir el arnés) 230 mm x 185 mm x 373 mm (9″ x 7-1/4″ x 14-3/4″) Tensión nominal 36 V c.c.
6. 7. 8. 9. 10. 11. 12. 13. 14. 15. 16. 17. 18. No manipule el aparato con las manos mojadas. No introduzca ningún objeto en las aberturas. No lo utilice con ninguna abertura bloqueada; manténgalo libre de polvo, pelusa, cabello y cualquier objeto que pueda reducir el flujo de aire. Mantenga el cabello, la ropa holgada, los dedos y todas las partes del cuerpo lejos de las aberturas y piezas móviles. Apague todos los controles antes de retirar el cartucho de batería.
REGLAS DE SEGURIDAD ADICIONALES 1. 2. Lea cuidadosamente este manual de instrucciones y el manual de instrucciones del cargador antes de usar el aparato. No aspire los siguientes elementos: • Líquidos inflamables (queroseno, gasolina, disolventes como bencina, diluyentes, etc.) • Sustancias calientes que están ardiendo o echando humo (cigarrillos, cerillas, palitos de incienso, velas, cenizas calientes), chispas y polvo metálico generados por el corte o el lijado de metales, etc.
Instrucciones importantes de seguridad para el cartucho de batería 1. 2. 3. 4. 5. 6. 7. 8. 9. Antes de utilizar el cartucho de batería, lea todas las instrucciones e indicaciones de precaución en el (1) el cargador de batería, (2) la batería, y (3) el producto con el que se utiliza la batería. No desarme el cartucho de batería. Si el tiempo de operación se ha acortado en exceso, deje de operar de inmediato. Podría correrse el riesgo de sobrecalentamiento, posibles quemaduras e incluso explosión.
Sistema de protección para la herramienta/batería DESCRIPCIÓN DEL FUNCIONAMIENTO PRECAUCIÓN: Asegúrese siempre de que la herramienta esté apagada y el cartucho de batería haya sido extraído antes de realizar cualquier ajuste o comprobación en la herramienta. Instalación o extracción del cartucho de batería La herramienta está equipada con un sistema de protección para la herramienta/batería.
Luces indicadoras Iluminadas Apagadas Ajuste de las correas Capacidad restante Lo apretado de las correas para hombro y las correas superior e inferior puede ser ajustado. Introduzca sus brazos a través de las correas para hombro primero y luego fije las correas inferior y superior. Para apretar, jale el extremo de la correa tal como se ilustra. Para aflojar, jale el extremo del sujetador. Parpadeando 75% a 100% 50% a 75% Correa inferior 25% a 50% 0% a 25% 1 2 Cargar la batería.
Gancho de sujeción Luz LED Siempre agarre el gancho de sujeción cuando manipule el cuerpo de la aspiradora. 1 La luz LED se encuentra instalada en la cabeza de la caja del interruptor para facilitar las operaciones en lugares oscuros. Oprima el botón para encender la luz. Para apagarla, oprima el botón nuevamente. ► 1 . Gancho de sujeción Accionamiento del interruptor La potencia de succión puede cambiarse a tres niveles: normal (1), alto (2) y máximo (3).
Para sujetar la boquilla amplia en la correa inferior, pase la abrazadera de la manguera a través del bucle en la correa inferior. Ensamble de la manguera Inserte la boca de la manguera en el cuerpo de la aspiradora y gírela en el sentido de las manecillas del reloj. 1 2 1 2 ► 1 . Boca de la manguera 2. Cuerpo de la aspiradora Ensamble de la boquilla y el tubo ► 1 . Abrazadera de la manguera 2.
2. Siga los procedimientos a continuación dependiendo del tipo de tubo de extensión: NOTA: El tubo de extensión de tipo corredera y el tubo de extensión de tipo anillo no son compatibles entre sí. Si desea cambiar el tubo de extensión de tipo corredera por el tubo de extensión de tipo anillo o viceversa, cambie todo el conjunto de tubo curvo.
Para el tubo curvo/recto de aluminio (Solo para el modelo con manguera de ø38 mm y boca delantera 38) Cárguese al hombro el cuerpo de la aspiradora y a continuación inserte girando el tubo en la boca delantera. Para desconectar, extráigalo girándolo. Diámetro de la manguera suministrada Tipo de extremo de manguera Solución Reemplace la manguera por la de extracción de polvo (ø28 mm, con boca delantera).
Al utilizar la manguera de extracción de polvo de ø28 mm Al utilizar manguera de ø38 mm con boca delantera 38 1. Acople la boca delantera a la manguera de extracción de polvo. Cuando conecte la boca delantera, asegúrese de que quede bien atornillada en la manguera. 1. Inserte girando la junta o la boca delantera a la pieza de entrada de la manguera, dependiendo de la herramienta que se vaya a conectar. 2. Conecte la boca delantera a la salida de extracción de la herramienta. 2.
2. Inserte la bolsa del filtro en la hendidura en la parte superior del compartimiento tal como se ilustra. 2 1 1 3 ► 1 . Manguera 2. Conjunto de tubo curvo 3. Manguito 2 Instalación de la bolsa del filtro/ bolsa recolectora de polvo Accesorio opcional PRECAUCIÓN: No use una bolsa del filtro dañada. Siempre utilice la aspiradora con la bolsa del filtro instalada correctamente.
1. Cargue en su hombro el cuerpo de la aspiradora y fije las correas superior e inferior. Ajuste lo apretado según sea necesario. 3. Alinee el orificio de la bolsa del filtro con la boca de la manguera y empuje la parte de cartón hasta el tope. Asegúrese de que la arandela de goma en la bolsa del filtro esté por encima del reborde en la boca de la manguera. 1 1 2 3 2. Oprima el botón para comenzar a aspirar.
3. Reemplace la bolsa del filtro cuando esté llena. Abra la tapa y extraiga la bolsa del filtro. Jale la tira en el lado de la abertura para cerrar la bolsa del filtro y desechar la bolsa del filtro completa. MANTENIMIENTO PRECAUCIÓN: Asegúrese siempre de que la herramienta esté apagada y el cartucho de batería extraído antes de intentar realizar una inspección o mantenimiento. AVISO: Nunca use gasolina, bencina, diluyente (tíner), alcohol o sustancias similares.
3. Para instalar el filtro, inserte el lado sin la lengüeta en el soporte y luego empuje el filtro hacia abajo hasta que la lengüeta quede asegurada por la varilla. 1 Desatascamiento Para reparar los atascamientos, extraiga la manguera o el tubo de extensión o el conjunto de tubo curvo para comprobar su interior. Extracción/acoplamiento del conjunto de tubo curvo de fijación a presión Para extraerlo, tire del conjunto de tubo curvo mientras oprime ambas lengüetas del extremo de la manguera.
ACCESORIOS OPCIONALES PRECAUCIÓN: Estos accesorios o aditamentos están recomendados para utilizarse con su herramienta Makita especificada en este manual. El empleo de cualquier otro accesorio o aditamento puede conllevar el riesgo de lesiones personales. Utilice los accesorios o aditamentos solamente para su fin establecido. Si necesita cualquier ayuda para más detalles en relación con estos accesorios, pregunte a su centro de servicio local Makita.
< USA only > WARNING Some dust created by power sanding, sawing, grinding, drilling, and other construction activities contains chemicals known to the State of California to cause cancer, birth defects or other reproductive harm. Some examples of these chemicals are: • lead from lead-based paints, • crystalline silica from bricks and cement and other masonry products, and • arsenic and chromium from chemically-treated lumber.