
Use and Care Manual


9 ENGLISH
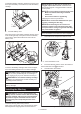
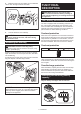
4. Make sure that only the marking on the cardboard
can be seen through the slit of the holder.
1
2
► 1. Marking 2. Slit
5. Lock the dust box cover certainly.
CAUTION: Be careful not to pinch your n-
gers when hooking the latch, and when closing
the dust box cover.
Removing the lter bag
CAUTION: Handle the lter bag softly.
Otherwise foreign objects are blown into eyes, it may
result in personal injury.
Replace the lter bag when it becomes full or clogged.
Open the dust box cover and open the latch, then take
out the lter bag.
Pull the strip on the side of the opening to shut the lter
bag and dispose of the lter bag in whole.
2
1
► 1. Latch 2. Strip
NOTICE: Do not use a used lter bag. The lter
bag is designed for single use. Using lter bag repeat-
edly may cause clogging of the lter and results in
damage to the appliance.
FUNCTIONAL
DESCRIPTION
CAUTION: Always be sure that the appli-
ance is switched o and the battery cartridge is
removed before adjusting or checking function on
the appliance.
Tool / battery protection system
The tool is equipped with a tool/battery protection sys-
tem. This system automatically cuts o power to the
motor to extend tool and battery life. The tool will auto-
matically stop during operation if the tool or battery is
placed under one of the following conditions:
Overload protection
When the tool is operated in a manner that causes it to
draw an abnormally high current, the tool automatically
stops without any indication. In this situation, turn the
tool o and stop the application that caused the tool to
become overloaded. Then turn the tool on to restart.
Overheat protection
On Blinking
When the tool is overheated, the tool stops automati-
cally, and the battery indicator blinks about 60 seconds.
In this situation, let the tool cool down before turning the
tool on again.
Overdischarge protection
When the battery capacity becomes low, the tool stops
automatically. If the product does not operate even
when the switches are operated, remove the batteries
from the tool and charge the batteries.
Indicating the remaining battery
capacity
Only for battery cartridges with the indicator
1
2
► 1. Indicator lamps 2. Check button