
Use and Care Manual


6 ENGLISH
Indicator lamps Remaining
capacity
Lighted Off Blinking
75% to 100%
50% to 75%
25% to 50%
0% to 25%
Charge the
battery.
The battery
may have
malfunctioned.
NOTE: Depending on the conditions of use and the
ambient temperature, the indication may differ slightly
from the actual capacity.
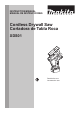
Switch action
1
► 1. Switch trigger
CAUTION: Before installing the battery car-
tridge into the tool, always check to see that the
switch trigger actuates properly and returns to
the "OFF" position when released.
To start the tool, simply pull the switch trigger. Tool
speed is increased by increasing pressure on the switch
trigger. Release the switch trigger to stop.
The trigger can be locked off to prevent it from being
pulled accidentally. To lock the trigger off, press the
button from the side with
marking. To unlock, press
the button from the side with marking.
1
► 1. Lock-off button
CAUTION: Always lock the tool off when
carrying or suspending the operation.
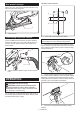
Adjusting depth of cut
The cutting depth corresponds with the scale on the
blade. Loosen the screw on the blade holder until the
blade can move freely. Align the scale on the blade with
the bottom line of the blade holder. Then tighten the
screws.
1
2
3
► 1. Cutting depth 2. Bottom line of the blade holder
3. Scale on the blade
The maximum cutting depth depends on the type of
the saw blade. Always use the saw blade designed for
cutting the working material.
Type of saw blade Max. cutting depth
For drywall 30 mm (1-3/16″)
For wood 15 mm (9/16″)
LED light
CAUTION: Do not look in the light or see the
source of light directly.
Pull the switch trigger to light up the lamp. The lamp
keeps on lighting while the switch trigger is being pulled.
The lamp goes out approximately 10 seconds after
releasing the trigger.