INSTRUCTION MANUAL MANUAL DE INSTRUCCIONES Cordless Impact Driver Atornillador de Impacto Inalámbrico XDT14 IMPORTANT: Read Before Using. IMPORTANTE: Lea antes de usar.
ENGLISH (Original instructions) SPECIFICATIONS Model: Fastening capacities No load speed (RPM) Impacts per minute XDT14 Machine screw 4 mm - 8 mm (5/32" - 5/16") Standard bolt 5 mm - 16 mm (3/16" - 5/8") High tensile bolt 5 mm - 14 mm (3/16" - 9/16") Hard impact mode 0 - 3,600 /min Medium impact mode 0 - 2,100 /min Soft impact mode 0 - 1,100 /min T mode 0 - 3,600 /min Hard impact mode 0 - 3,800 /min Medium impact mode 0 - 2,600 /min Soft impact mode 0 - 1,100 /min T mode 0 - 2,600 /
2. 3. 4. 5. 6. 7. Use personal protective equipment. Always wear eye protection. Protective equipment such as dust mask, non-skid safety shoes, hard hat, or hearing protection used for appropriate conditions will reduce personal injuries. Prevent unintentional starting. Ensure the switch is in the off-position before connecting to power source and/or battery pack, picking up or carrying the tool.
Tips for maintaining maximum battery life revolutions or reciprocation per minute number of blow Important safety instructions for battery cartridge 1. 2. 3. 4. 5. 6. 7. 8. 9. 10. 11. Charge the battery cartridge before completely discharged. Always stop tool operation and charge the battery cartridge when you notice less tool power. Never recharge a fully charged battery cartridge. Overcharging shortens the battery service life.
Overload protection CAUTION: Always install the battery cartridge fully until the red indicator cannot be seen. If not, it may accidentally fall out of the tool, causing injury to you or someone around you. When the battery is operated in a manner that causes it to draw an abnormally high current, the tool automatically stops without any indication. In this situation, turn the tool off and stop the application that caused the tool to become overloaded. Then turn the tool on to restart.
NOTE: The tool automatically stops if you keep pulling the switch trigger for about 6 minutes. NOTE: To confirm the lamp status, pull the trigger. When the lamp lights up by pulling the switch trigger, the lamp status is ON. When the lamp does not come on, the lamp status is OFF. Electric brake NOTE: When the tool is overheated, the light flashes for one minute, and then the LED display goes off. In this case, cool down the tool before operating again. This tool is equipped with an electric brake.
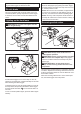
Changing the impact force 2 3 T S H T S H 1 T T S S H H 4 6 T S H 5 ► 1. Changed in four steps 2. Hard 3. Medium 4. Soft 5. T mode 6. Button You can change the impact force in four steps: hard, medium, soft, and T mode. This allows a tightening suitable to the work. Every time the button is pressed, the number of blows changes in four steps. “T” is a special mode for fastening self drilling screws.
ASSEMBLY NOTE: If the driver bit is not inserted deep enough into the sleeve, the sleeve will not return to its original position and the driver bit will not be secured. In this case, try re-inserting the bit according to the instructions above. CAUTION: Always be sure that the tool is switched off and the battery cartridge is removed before carrying out any work on the tool. NOTE: When it is difficult to insert the driver bit, pull the sleeve and insert it into the sleeve as far as it will go.
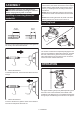
Proper fastening torque for standard bolt N•m (ft•lbs) 140 (101) NOTE: When fastening M8 or smaller screw, carefully adjust pressure on the switch trigger so that the screw is not damaged. M16(5/8") NOTE: Hold the tool pointed straight at the screw. M14(9/16") 120 (87) NOTE: If the impact force is too strong or you tighten the screw for a time longer than shown in the figures, the screw or the point of the driver bit may be overstressed, stripped, damaged, etc.
This Warranty gives you specific legal rights, and you may also have other rights which vary from state to state. Some states do not allow the exclusion or limitation of incidental or consequential damages, so the above limitation or exclusion may not apply to you. Some states do not allow limitation on how long an implied warranty lasts, so the above limitation may not apply to you.
ESPAÑOL (Instrucciones originales) ESPECIFICACIONES Modelo: Capacidades de apriete Velocidad sin carga (rpm) Impactos por minuto XDT14 Tornillo de máquina 4 mm - 8 mm (5/32" - 5/16") Tornillo estándar 5 mm - 16 mm (3/16" - 5/8") Tornillo de alta resistencia 5 mm - 14 mm (3/16" - 9/16") Modo de impacto duro 0 r/min - 3 600 r/min Modo de impacto medio 0 r/min - 2 100 r/min Modo de impacto suave 0 r/min - 1 100 r/min Modo T 0 r/min - 3 600 r/min Modo de impacto duro 0 ipm - 3 800 ipm Modo d
4. 5. 6. No maltrate el cable. Nunca utilice el cable para transportar, jalar o desconectar la herramienta eléctrica. Mantenga el cable alejado del calor, aceite, objetos cortantes o piezas móviles. Los cables dañados o enredados aumentan el riesgo de sufrir una descarga eléctrica. Cuando utilice una herramienta eléctrica en exteriores, utilice un cable de extensión apropiado para uso en exteriores.
Servicio 1. Haga que una persona calificada repare la herramienta eléctrica utilizando sólo piezas de repuesto idénticas. Esto asegura que se mantenga la seguridad de la herramienta eléctrica. 2. Siga las instrucciones para la lubricación y cambio de accesorios. 3. Mantenga las agarraderas secas, limpias y sin aceite o grasa. Advertencias de seguridad para el atornillador de impacto inalámbrico 1. 2. 3. 4. 5. 6. Instrucciones importantes de seguridad para el cartucho de batería 1. 2. 3.
PRECAUCIÓN: Utilice únicamente baterías originales de Makita. El uso de baterías no originales de Makita, o de baterías alteradas, puede ocasionar que las baterías exploten causando un incendio, lesiones personales y daños. Asimismo, esto invalidará la garantía de Makita para la herramienta y el cargador Makita. 1 Consejos para alargar al máximo la vida útil de la batería 1. 2. 3. 4. Cargue el cartucho de batería antes de que se descargue completamente.
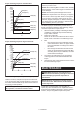
Luces indicadoras Iluminadas Apagadas Capacidad restante 1 Parpadeando 75% a 100% 50% a 75% 25% a 50% 0% a 25% Cargar la batería. ► 1. Marca de estrella La batería pudo haber funcionado mal. Accionamiento del interruptor NOTA: Dependiendo de las condiciones de uso y la temperatura ambiente, la indicación podrá diferir ligeramente de la capacidad real. Sistema de protección para la herramienta/batería 1 La herramienta está equipada con un sistema de protección de la herramienta/batería.
Accionamiento del conmutador de inversión de giro 1 A ► 1. Luz 1 T S H B ► 1. Palanca del interruptor de inversión PRECAUCIÓN: Confirme siempre la dirección de rotación antes de la operación. PRECAUCIÓN: Utilice el conmutador de inversión solamente después de que la herramienta haya parado completamente. Si cambia la dirección de rotación antes de que la herramienta haya parado podría dañarla.
Cambio de la fuerza de impacto 2 3 T S H T S H 1 T T S S H H 4 6 T S H 5 ► 1. Cambio a cuatro niveles 2. Alta 3. Media 4. Baja 5. Modo T 6. Botón La fuerza de impacto puede cambiarse a cuatro niveles: duro, medio, suave y modo T. Esto permite un apriete adecuado para el trabajo. Cada vez que el botón es oprimido, el número de percusiones cambia a cuatro niveles. El modo “T” es especial para la inserción de tornillos de autoperforación.
Para quitar la punta de destornillador, jale el mandril en dirección de la flecha y jale la punta de destornillador hacia afuera. MONTAJE PRECAUCIÓN: Asegúrese siempre de que la herramienta esté apagada y el cartucho de batería haya sido extraído antes de realizar cualquier trabajo en la misma.
Torsión de apriete apropiada para un tornillo estándar NOTA: Utilice la broca apropiada para la cabeza del tornillo/perno que desee utilizar. NOTA: Cuando inserte tornillos de 8 mm o un tornillo más pequeño, ajuste cuidadosamente la presión sobre el gatillo interruptor para evitar que el tornillo se dañe. 2 N•m (ft•lbs) 140 N•m (101 ft•lbs) 16 mm(5/8") NOTA: Sujete la herramienta dirigida en línea recta al tornillo.
ACCESORIOS OPCIONALES PRECAUCIÓN: Estos accesorios o aditamentos están recomendados para utilizarse con su herramienta Makita especificada en este manual. El empleo de cualquier otro accesorio o aditamento puede conllevar el riesgo de lesiones personales. Utilice los accesorios o aditamentos solamente para su fin establecido. Esta garantía le concede derechos legales específicos y usted podrá tener también otros derechos que varían de un estado a otro.
< USA only > WARNING Some dust created by power sanding, sawing, grinding, drilling, and other construction activities contains chemicals known to the State of California to cause cancer, birth defects or other reproductive harm. Some examples of these chemicals are: • lead from lead-based paints, • crystalline silica from bricks and cement and other masonry products, and • arsenic and chromium from chemically-treated lumber.
INSTRUCTION MANUAL MANUAL DE INSTRUCCIONES Cordless Driver Drill Atornillador Taladro Inalámbrico XFD11 IMPORTANT: Read Before Using. IMPORTANTE: Lea antes de usar.
ENGLISH (Original instructions) SPECIFICATIONS Model: XFD11 Drilling capacities Steel Fastening capacities Wood screw 13 mm (1/2") Wood 36 mm (1-7/16") 6 mm x 75 mm (1/4" x 2-15/16") Machine screw No load speed (RPM) M6 (1/4") High (2) 0 - 1,700 /min Low (1) 0 - 500 /min Overall length 162 mm (6-3/8") Rated voltage D.C. 18 V Standard battery cartridge Net weight • • • BL1815N, BL1820B BL1830, BL1830B, BL1840B, BL1850B, BL1860B 1.3 kg (2.8 lbs) 1.5 kg (3.
6. 7. Service 1. Have your power tool serviced by a qualified repair person using only identical replacement parts. This will ensure that the safety of the power tool is maintained. 2. Follow instruction for lubricating and changing accessories. 3. Keep handles dry, clean and free from oil and grease. Dress properly. Do not wear loose clothing or jewellery. Keep your hair, clothing, and gloves away from moving parts. Loose clothes, jewellery or long hair can be caught in moving parts.
2. Important safety instructions for battery cartridge 1. 2. 3. 4. 5. 6. 7. 8. 9. 10. 11. Before using battery cartridge, read all instructions and cautionary markings on (1) battery charger, (2) battery, and (3) product using battery. Do not disassemble battery cartridge. If operating time has become excessively shorter, stop operating immediately. It may result in a risk of overheating, possible burns and even an explosion.
Overdischarge protection Indicating the remaining battery capacity When the battery capacity is not enough, the tool stops automatically. In this case, remove the battery from the tool and charge the battery. Only for battery cartridges with "B" at the end of the model number NOTE: Overheat protection (for battery) will work only with batteries with star marking. 1 1 2 ► 1. Indicator lamps 2. Check button ► 1.
This tool has a reversing switch to change the direction of rotation. Depress the reversing switch lever from the A side for clockwise rotation or from the B side for counterclockwise rotation. When the reversing switch lever is in the neutral position, the switch trigger cannot be pulled. Lighting up the front lamp Speed change 1 ► 1. Lamp CAUTION: Do not look in the light or see the source of light directly. 1 Pull the switch trigger to light up the lamp.
Adjusting the fastening torque 1 2 3 ► 1. Adjusting ring 2. Graduation 3. Arrow The fastening torque can be adjusted in 21 levels by turning the adjusting ring. Align the graduations with the arrow on the tool body. You can get the minimum fastening torque at 1 and maximum torque at marking. The clutch will slip at various torque levels when set at the number 1 to 20. The clutch does not work at the marking.
Installing driver bit holder Screwdriving operation Optional accessory CAUTION: Adjust the adjusting ring to the proper torque level for your work. CAUTION: Make sure that the driver bit is inserted straight in the screw head, or the screw and/or driver bit may be damaged. 1 Place the point of the driver bit in the screw head and apply pressure to the tool. Start the tool slowly and then increase the speed gradually. Release the switch trigger as soon as the clutch cuts in.
• • • • • Using the tool as a hand screwdriver Drill bits Driver bits Driver bit holder Hook Makita genuine battery and charger NOTE: Some items in the list may be included in the tool package as standard accessories. They may differ from country to country. MAKITA LIMITED ONE YEAR WARRANTY Warranty Policy Every Makita tool is thoroughly inspected and tested before leaving the factory.
ESPAÑOL (Instrucciones originales) ESPECIFICACIONES Modelo: XFD11 Capacidades de taladrado Acero Capacidades de apriete Tornillo para madera 13 mm (1/2") Madera 36 mm (1-7/16") 6 mm x 75 mm (1/4" x 2-15/16") Tornillo de máquina Velocidad sin carga (rpm) 6 mm (1/4") Alta (2) 0 - 1 700 r/min Baja (1) 0 - 500 r/min Longitud total 162 mm (6-3/8") Tensión nominal 18 V c.c.
2. 3. 4. 5. 6. 7. cansado o bajo la influencia de drogas, alcohol o medicamentos. Un momento de distracción mientras opera las herramientas eléctricas puede terminar en una lesión grave. Use equipo de protección personal. Póngase siempre protección para los ojos. El equipo protector tal como máscara contra el polvo, zapatos de seguridad antiderrapantes, casco rígido y protección para oídos utilizado en las condiciones apropiadas reducirá el riesgo de lesiones. Impida el encendido accidental.
3. 4. 5. 6. 7. 8. 9. Sujete la herramienta eléctrica por las superficies de agarre aisladas al realizar una operación en la que el sujetador pueda entrar en contacto con cables ocultos. Si el sujetador entra en contacto con un cable con corriente, las piezas metálicas expuestas de la herramienta eléctrica se cargarán también de corriente y el operario puede recibir una descarga. Asegúrese siempre de que pisa sobre suelo firme.
2. 3. 4. No cargue nunca un cartucho de batería que esté completamente cargado. La sobrecarga acortará la vida de servicio de la batería. Cargue el cartucho de batería a una temperatura ambiente de 10 °C - 40 °C (50 °F - 104 °F). Si un cartucho de batería está caliente, déjelo enfriar antes de cargarlo. Cargue el cartucho de batería si no va a utilizarlo durante un período prolongado (más de seis meses).
Protección contra sobrecarga Cuando la herramienta/batería se esté utilizando de una manera que cause que consuma una cantidad de corriente inusualmente alta, la herramienta se detendrá automáticamente sin que haya indicación alguna. En este caso, apague la herramienta y detenga la aplicación que causó que la herramienta se sobrecargara. Luego encienda la herramienta para reiniciarla.
Accionamiento del conmutador de inversión de giro A Cambio de velocidad B 1 1 ► 1. Palanca de cambio de velocidad ► 1. Palanca del interruptor de inversión PRECAUCIÓN: Coloque siempre la palanca de cambio de velocidad exactamente en la posición correcta. Si usted utiliza la herramienta con la palanca de cambio de velocidad puesta a medias entre la posición “1” y “2”, la herramienta puede dañarse. PRECAUCIÓN: Confirme siempre la direc- ción de rotación antes de la operación.
La torsión de apriete puede ajustarse en 21 niveles girando el anillo de ajuste. Alinee las graduaciones con la flecha en el cuerpo de la herramienta. Puede conseguir una fijación de torsión mínima en 1 y una torsión máxima en la . marca El embrague se deslizará entre los diferentes niveles de torsión cuando esté ajustado en los números 1 a 20. El embrague no funciona en la marca .
Coloque el portabrocas en la protuberancia en la base de la herramienta o ya sea del lado derecho o izquierdo y asegúrelo con un tornillo. Cuando no utilice la punta de destornillador, manténgala dentro del portabrocas. Las puntas de destornillador de 45 mm de largo (1-3/4") se pueden guardar ahí. Operación de taladrado Primero, gire el anillo de ajuste de tal forma que la flecha apunte hacia la marca . Después proceda como sigue.
Si necesita cualquier ayuda para más detalles en relación con estos accesorios, pregunte a su centro de servicio local Makita. • Brocas de taladro • Puntas de destornillador • Portabrocas • Gancho • Batería y cargador originales de Makita Uso de la herramienta como atornillador manual NOTA: Algunos de los artículos en la lista pueden incluirse en el paquete de la herramienta como accesorios estándar. Éstos pueden variar de país a país. GARANTÍA LIMITADA DE UN AÑO DE MAKITA Apague la herramienta.
19
< USA only > WARNING Some dust created by power sanding, sawing, grinding, drilling, and other construction activities contains chemicals known to the State of California to cause cancer, birth defects or other reproductive harm. Some examples of these chemicals are: • lead from lead-based paints, • crystalline silica from bricks and cement and other masonry products, and • arsenic and chromium from chemically-treated lumber.