
Use and Care Manual


10 ENGLISH
123
4
5
5
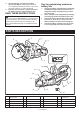
► 1. Hex bolt 2. Outer ange (black) 3. Abrasive cut-
o wheel / diamond wheel 4. Inner ange (silver)
5. Arrow (rotation direction of the wheel)
To install the wheel, follow the removal procedure in
reverse.
BE SURE TO TIGHTEN THE HEX BOLT SECURELY.
CAUTION: Always install the wheel so that
the arrow on it points in the same direction as
the arrow on the wheel guard. Otherwise the wheel
rotates in reverse, it may cause personal injury.
CAUTION: Only use the wheel that are
marked with a speed equal or higher than the
speed marked on the tool.
NOTE: If an inner ange is removed by chance,
install the inner ange so that taller protrusion faces
the tool side as shown in the gure.
1
2
3
4
5
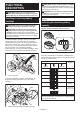
► 1. Hex bolt 2. Outer ange (black) 3. Abrasive cut-
o wheel / diamond wheel 4. Inner ange (silver)
5. Protrusion (taller)
Connecting to water supply
1. Prepare a water hose.
2. Remove the nut on the coupling sleeve and pass
the water hose through the nut. Insert the end of the
hose into the coupling sleeve and then tighten the nut.
1
2
3
► 1. Water hose 2. Nut of the coupling sleeve
3. Coupling sleeve
3. Connect the water hose to the water supply.
When connecting to a water faucet, use a suitable tting
such as hose band or water tap joint.
1
2
3
► 1. Hose band 2. Water tap joint 3. Water hose
NOTE: The tting depends on the shape of the faucet
to which you connect. Prepare a suitable commercial-
ly-bought tting.
NOTE: If you use a water tap joint, prepare another
coupling sleeve and attach it to the other end of the
hose.
NOTE: When using a water pump, follow the instruc-
tions of your water pump to connect the water hose.