INSTRUCTION MANUAL MANUAL DE INSTRUCCIONES Cordless Cleaner Aspiradora Inalámbrica XLC02 IMPORTANT: Read Before Using. IMPORTANTE: Lea antes de usar.
ENGLISH (Original instructions) SPECIFICATIONS Model XLC02 Capacity 650 mL Continuous use (With battery BL1830) Approx. 20 min Overall length 999 mm (39-5/16") Net weight 1.2 kg (2.7 lbs) Rated voltage 1.5 kg (3.2 lbs) D.C. 18 V Standard battery cartridges BL1815 / BL1815N / BL1820 / BL1820B BL1830 / BL1830B / BL1840 / BL1840B / BL1850 / BL1850B / BL1860B • Due to our continuing program of research and development, the specifications herein are subject to change without notice.
17. 18. 19. Recharge only with the charger specified by the manufacturer. A charger that is suitable for one type of battery pack may create a risk of fire when used with another battery pack. When battery pack is not in use, keep it away from other metal objects, like paper clips, coins, keys, nails, screws or other small metal objects, that can make a connection from one terminal to another. Shorting the battery terminals together may cause burns or a fire.
6. 7. 8. 9. 10. 11. Do not store the tool and battery cartridge in locations where the temperature may reach or exceed 50 °C (122 °F). Do not incinerate the battery cartridge even if it is severely damaged or is completely worn out. The battery cartridge can explode in a fire. Be careful not to drop or strike battery. Do not use a damaged battery. The contained lithium-ion batteries are subject to the Dangerous Goods Legislation requirements. For commercial transports e.g.
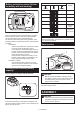
Battery protection system (Lithiumion battery with star marking) Indicator lamps Lighted 1 Off Remaining capacity Blinking 75% to 100% 50% to 75% 25% to 50% 0% to 25% Charge the battery. The battery may have malfunctioned. ► 1 . Star marking Lithium-ion batteries with a star marking are equipped with a protection system. This system automatically cuts off power to the tool to extend battery life.
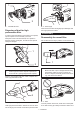
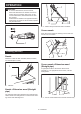
Type of filter Normal filter 1 2 3 2 1 ► 1 . Capsule 2. Suction inlet NOTE: • Dust may spill out when capsule is opened, so be sure to set a garbage bag beneath capsule. ► 1 . Capsule 2. Prefilter 3. Filter Remove accumulated dust from inside of capsule and off of prefilter. High performance filter 1 1 2 2 ► 1 . Prefilter 2. Capsule ► 1 . Capsule 2. High performance filter Twist prefilter in direction of arrow to unfasten securing lip from cleaner unit and then pull off prefilter.
1 1 2 ► 1 . Prefilter 2. Filter ► 1 . Securing lip Clean out the fine dust and lightly tap to dislodge dust from high performance filter. Disposing of dust for high performance filter Reassembly In order to drop dust sticking on the filter in the capsule, tap the capsule 4 or 5 times with your hand. Now point suction inlet downwards, turn capsule in direction of arrow in diagram, and disconnect capsule slowly and straight.
NOTE: • Always remove dust ahead of time, as suction power will be reduced if there is too much dust in cleaner. • Always be sure to check that both filter and prefilter are loaded correctly prior to using cleaner. If they are not loaded correctly, dust will get into the motor housing, and cause motor failure. If the following examples occur, filter and prefilter are not loaded correctly. Reload them correctly to rectify problem.
Example 4: Prefilter's securing lip is not firmly locked into groove of cleaner housing 1 3 1 2 ► 1 . O Mark ► 1 . Groove of cleaner housing 2. Prefilter 3. Securing lip 1 Reassembly for high performance filter 2 Connect high performance filter. At this time, make sure to twist high performance filter so that securing lip is firmly locked into cleaner unit. 1 2 ► 1 . Handle 2.
OPERATION • 1 CAUTION: To connect attachments, such as nozzle, twist-insert attachment in direction of arrow to ensure secure connection during use. To disconnect attachment, twist-extract also in direction of arrow. If attachment is twisted in the opposite direction, when being connected or disconnected, capsule may become loose. 3 2 ► 1 . Cleaner body 2. Extension wand 3. Nozzle Corner nozzle Fit on the corner nozzle for cleaning corners and crevices of a car or furniture. 1 ► 1 .
From time to time wipe off the outside (cleaner body) of the cleaner using a cloth dampened in soapy water. Clean out also the suction opening, dust bag/dust pack mounting area and the dust stopper. Cleaning without nozzle You can pick up powder and dust without nozzle. • CAUTION: Never use gasoline, benzine, thinner, alcohol or the like. Discoloration, deformation or cracks may result.
OPTIONAL ACCESSORIES • CAUTION: These accessories or attachments are recommended for use with your Makita tool specified in this manual. The use of any other accessories or attachments might present a risk of injury to persons. Only use accessory or attachment for its stated purpose. If you need any assistance for more details regarding these accessories, ask your local Makita Service Center.
ESPAÑOL (Instrucciones originales) ESPECIFICACIONES Modelo XLC02 Capacidad 650 ml Uso continuo (con batería BL1830) Aprox. 20 min Longitud total 999 mm (39-5/16") Peso neto 1,2 kg (2,7 lbs) Tensión nominal 1,5 kg (3,2 lbs) 18 V c.c.
16. 17. 18. 19. Use las herramientas eléctricas solamente con los paquetes de baterías designados específicamente para ellas. El uso de otros paquetes de baterías puede generar riesgo de lesiones e incendio. Recargue sólo con el cargador especificado por el fabricante. Un cargador que es adecuado para un solo tipo de paquete de baterías puede generar riesgo de incendio al ser utilizado con otro paquete de baterías.
Instrucciones importantes de seguridad para el cartucho de batería 1. 2. 3. 4. 5. 6. 7. 8. 9. 10. Antes de utilizar el cartucho de batería, lea todas las instrucciones e indicaciones de precaución en el (1) el cargador de batería, (2) la batería, y (3) el producto con el que se utiliza la batería. No desarme el cartucho de batería. Si el tiempo de operación se ha acortado en exceso, deje de operar de inmediato. Podría correrse el riesgo de sobrecalentamiento, posibles quemaduras e incluso explosión.
• DESCRIPCIÓN DEL FUNCIONAMIENTO • • PRECAUCIÓN: Asegúrese siempre de que la herramienta esté apagada y el cartucho de batería extraído antes de realizar cualquier ajuste o comprobación en la herramienta. Tenga la precaución de que su(s) dedo(s) no quede(n) atrapado(s) entre la aspiradora y la batería como se ilustra en el diagrama al momento de colocar la batería. Puede que su(s) dedo(s) al atraparse resulte(n) lesionado(s). No emplee fuerza al colocar el cartucho de batería.
Indicación de la capacidad restante de la batería Accionamiento del interruptor Únicamente para cartuchos de batería con el indicador 1 1 2 ► 1 . Gatillo interruptor ► 1 . Luces indicadoras 2. Botón de verificación • Oprima el botón de verificación en el cartucho de la batería para que indique la capacidad restante de la batería. Las luces indicadoras se iluminarán por algunos segundos.
Filtro de alto rendimiento 1 1 2 2 ► 1 . Prefiltro 2. Cápsula Enrosque el prefiltro en la dirección de la flecha para desabrochar el reborde de fijación de la unidad de la aspiradora y luego saque el prefiltro. ► 1 . Cápsula 2. Filtro de alto rendimiento Eliminación del polvo • • 2 PRECAUCIÓN: Vacíe la aspiradora antes de que se llene, o la fuerza de succión se debilitará. Asegúrese de vaciar el polvo en el interior de la misma aspiradora.
Reensamble Reensamble del filtro normal 1 Coloque el filtro hasta que se encuentre completamente en su lugar en la unidad de la aspiradora. 2 ► 1 . Cápsula 2. Entrada de succión NOTA: • Es posible que se derrame polvo al abrir la cápsula, por lo que deberá asegurarse de colocar una bolsa de basura por debajo de la cápsula. 1 Elimine el polvo acumulado en el interior de la cápsula y del filtro de alto rendimiento. ► 1 .
Ejemplos de problemas Ejemplo 1: Sólo se ha cargado el prefiltro (sin el filtro). Conecte la cápsula. Alinee el símbolo O en la cápsula con el símbolo O en el mango y luego enrosque con firmeza la cápsula en dirección de la flecha hasta que quede fija. 1 ► 1 . Prefiltro Ejemplo 2: Sólo se ha cargado el filtro (sin el prefiltro). 1 1 ► 1 . Símbolo O ► 1 . Filtro 1 Ejemplo 3: El filtro ha sido cargado en un estado descascado. 2 ► 1 . Mango 2.
1 3 1 2 ► 1 . Ranura de la carcasa de la aspiradora 2. Prefiltro 3. Reborde de fijación ► 1 . Símbolo O 1 Reensamble del filtro de alto rendimiento 2 Conecte el filtro de alto rendimiento. En este momento, asegúrese de enroscar el filtro de alto rendimiento de tal manera que el reborde de fijación quede firmemente bloqueado en la unidad de la aspiradora. 1 2 ► 1 . Mango 2.
1 2 1 ► 1 . Reborde de fijación 2. Ranura de la carcasa de la aspiradora ► 1 . Boquilla Boquilla + Tubo de extensión (tubo recto) OPERACIÓN • El tubo de extensión se coloca entre la boquilla y la aspiradora en sí. Esta configuración resulta conveniente para aspirar el suelo mientras se está de pie en postura recta. PRECAUCIÓN: Para conectar los aditamentos, como la boquilla, inserte enroscando el aditamento en dirección de la flecha para asegurar una conexión firme durante la operación.
Boquilla de esquina + Tubo de extensión (tubo recto) Limpieza Utilice esta configuración para espacios estrechos donde la aspiradora en sí no quepa, o en lugares elevados difíciles de alcanzar. 1 2 De vez en vez, limpie el exterior (cuerpo) de la aspiradora usando un paño húmedo y agua enjabonada. Limpie también la abertura de succión, bolsa recolectora del polvo, el área donde ésta va puesta y el tope para el polvo. 3 ► 1 . Boquilla de esquina 2. Tubo de extensión 3.
Cosas a verificar antes de solicitar un servicio de reparación Síntoma Poco poder de succión No funciona Área a ser investigada Método de arreglo ¿Se ha llenado de polvo la cápsula? Vacíe la cápsula del polvo acumulado. ¿Se ha tapado el filtro? Sacuda el polvo o lave el filtro. ¿Se ha agotado la batería? Recargue la batería. ¿Se ha agotado la batería? Recargue la batería. NOTA: • No intente reparar la aspiradora usted mismo(a).
< USA only > WARNING Some dust created by power sanding, sawing, grinding, drilling, and other construction activities contains chemicals known to the State of California to cause cancer, birth defects or other reproductive harm. Some examples of these chemicals are: • lead from lead-based paints, • crystalline silica from bricks and cement and other masonry products, and • arsenic and chromium from chemically-treated lumber.