INSTRUCTION MANUAL MANUAL DE INSTRUCCIONES Cordless Lawn Mower Cortadora de Cesped XML03 IMPORTANT: Read Before Using. IMPORTANTE: Lea antes de usar.
ENGLISH (Original instructions) SPECIFICATIONS Model: XML03 Mowing width (blade diameter) 460 mm (18″) No load speed 2,500 /min Maximum speed 3,300 /min Part number of replacement mower blade Dimensions (L x W x H) 199367-2 during operation L: 1,455 mm to 1,680 mm (57-1/4″ to 66″) W: 532 mm (21″) H: 960 mm to 1,265 mm (37-3/4″ to 49-3/4″) when stored (without grass basket) L: 1,010 mm to 1,125 mm (39-3/4″ to 44-1/4″) W: 532 mm (21″) H: 535 mm to 715 mm (21″ to 28-1/8″) Rated voltage D.C.
9. 10. 11. 12. 13. 14. 15. 16. 17. 18. 19. 20. 21. 22. 23. Stay Alert - Watch what you are doing. Use common sense. Do not operate lawn mower when you are tired. Do not operate machine while under the influence of alcohol or drugs. A moment of inattention while operating the mower may result in serious personal injury.
3. Battery tool use and care • Prevent unintentional starting. Ensure the switch is in the off-position before connecting to battery pack, picking up or carrying the machine. Carrying the machine with your finger on the switch or energizing machine that have the switch on invites accidents. • Disconnect the battery pack from the machine before making any adjustments, changing accessories, or storing machine. Such preventive safety measures reduce the risk of starting the machine accidentally.
10. WARNING: Use of this product can create dust containing chemicals which may cause respiratory or other illnesses. Some examples of these chemicals are compounds found in pesticides, insecticides, fertilizers and herbicides. Your risk from these exposures varies, depending on how often you do this type of work.
2. Align the hole in the lower handle with the hole in the upper handle, then insert the bolts from inside, then attach washer B from outside, and then tighten the thumb nuts. Installing the handle NOTICE: When installing handles, position the cords so that they are not caught by anything between the handles. If the cord is damaged, the mower switch may not work. 1. Attach the lower handle so that the holes in the handle fit in the protrusions on the mower body.
2. Hook the grass basket on the rod of the mower body as shown in the figure. Removing the mulching attachment 1. Open the rear cover. 1 2 3 1 ► 1 . Rod 2. Guard 3. Grass basket ► 1 . Rear cover NOTICE: Make sure that the guard on the grass 2. Remove the mulching attachment while holding down the lever. basket is facing downward. Otherwise, the grass basket may not catch all of cut-off grass. Attaching the mulching attachment 1. Open the rear cover, and then remove the grass basket.
2. Align the tongue on the battery cartridge with the slot on the mower then slide the cartridge until it locks in place with a little click. FUNCTIONAL DESCRIPTION 1 Installing or removing battery cartridge CAUTION: Always switch off the tool before installing or removing of the battery cartridge. CAUTION: Hold the tool and the battery cartridge firmly when installing or removing battery cartridge.
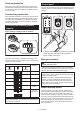
Overheat protection Control panel When the tool or battery is overheated, the tool stops automatically and the main power lamp lights up in red. In this case, let the tool and battery cool before turning the tool on again. The control panel has the main power switch, the mode switching button, and the indicator of remaining battery capacity. 1 Overdischarge protection 2 3 When the battery capacity is not enough, the tool stops automatically and the main power lamp blinks in red.
Indicating the remaining battery capacity Press the check button to indicate the remaining battery capacities. The battery indicators correspond to each battery. Battery indicator status On Off Remaining battery capacity NOTE: If the lock key is not inserted, the power lamp blinks in green when you pull the switch lever. 5. Release the switch button as soon as the motor starts running. The mower will continue to run until you release the switch lever. 6. Release the switch lever to stop the motor.
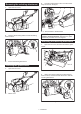
Adjusting the handle height OPERATION CAUTION: Before removing the bolts, hold the upper handle firmly. Otherwise, the handle may fall and cause an injury. Mowing WARNING: Before mowing, clear away sticks and stones from mowing area. Furthermore, clear away any weeds from mowing area in advance. The handle height can be adjusted in three levels. 1. Loosen the thumb nuts of the lower handle, and then remove the bolts, washer, and thumb nuts.
1 NOTE: Mowing long grass to a short length all at once may cause the grass to die. The cut grass may also block up inside of the mower body. 2 Emptying the grass basket 3 WARNING: To reduce a risk of accident, regularly check the grass basket for any damage or weakened strength. Replace the grass basket if necessary. 3 1. Release the switch lever. 2. Remove the lock key. 3. Open the rear cover and take out the grass basket by holding the handle. ► 1 . Mowing width 2. Overlapping area 3.
2. Maintenance Loosen the thumb nuts and fold the upper handle. 1. Remove the lock key and battery cartridges, and then close the battery cover. 1 2. Put the mower on its side and clean grass clippings accumulated on the underside of mower deck. 3. Pour water toward the bottom of the machine to which the blade is attached. 2 NOTICE: Do not wash the machine with high pressure water. 4. Check all nuts, bolts, knobs, screws, fasteners etc. for tightness. 2 5.
3. Turn the bolt counterclockwise with the wrench. 1 2 3 ► 1 . Mower blade 2. Wrench 3. Lumber 4. Remove the bolt, washer, mower blade in order. 1 2 3 ► 1 . Mower blade 2. Washer 3. Bolt Installing the mower blade To install the mower blade, take the removal procedure in reverse. WARNING: Install the blade carefully. It has a top/bottom facing. Place the blade so that the rotational direction arrow faces outward. WARNING: Tighten the bolt clockwise firmly to secure the blade.
TROUBLESHOOTING Before asking for repairs, conduct your own inspection first. If you find a problem that is not explained in the manual, do not attempt to dismantle the tool. Instead, ask Makita Authorized Service Centers, always using Makita replacement parts for repairs. State of abnormality Probable cause (malfunction) Remedy Mower does not start. Two battery cartridges are not installed. Install the charged battery cartridges. Battery problem (under voltage) Recharge the battery cartridge.
ESPAÑOL (Instrucciones originales) ESPECIFICACIONES Modelo: XML03 Amplitud de corte del césped (diámetro de la cuchilla) 460 mm (18″) Velocidad sin carga 2 500 r/min Velocidad máxima 3 300 r/min Número de pieza de la cuchilla de repuesto de la cortadora de césped Dimensiones (La x An x Al) 199367-2 durante la operación Largo: 1 455 mm a 1 680 mm (57-1/4″ a 66″) Ancho: 532 mm (21″) Alto: 960 mm a 1 265 mm (37-3/4″ a 49-3/4″) durante el almacenamiento (sin el canasto para césped) Largo: 1 010 mm
6. 7. 8. 9. 10. 11. 12. 13. 14. 15. 16. 17. Use el aparato indicado - No utilice la cortadora de césped para cualquier trabajo excepto para el que fue diseñada. No fuerce la cortadora de césped - Ésta hará el trabajo mejor y de forma más segura a la velocidad para la que fue diseñada. No utilice el aparato donde no alcance Mantenga los pies sobre suelo firme y el equilibrio en todo momento. No pode cerca de declives, zanjas o diques. Podría perder su equilibrio o su estabilidad al pisar.
34. 35. 36. 37. 38. 39. 40. 41. 42. 43. Revise el canasto para césped con frecuencia para ver si presenta desgaste o deterioro. Al almacenar el equipo, asegúrese siempre de vaciar el canasto para césped. Por seguridad, reemplace un canasto para césped desgastado con un repuesto nuevo de fábrica. Verifique con frecuencia los componentes del canasto para césped y el protector de descarga y reemplace con las piezas de repuesto recomendadas por el fabricante en caso necesario.
No cargue la batería bajo la lluvia ni en lugares mojados. No utilice la máquina cuando exista riesgo de ser alcanzado por un rayo. Cuando utilice la máquina sobre suelo embarrado, inclinaciones mojadas o superficies resbalosas, tenga cuidado al pisar. Evite trabajar en un entorno deficiente donde sea probable que aumente la fatiga del usuario. No utilice la máquina cuando las condiciones climáticas no sean buenas y la visibilidad sea limitada.
6. 7. 8. 9. 10. 11. 12. No guarde la herramienta ni el cartucho de batería en lugares donde la temperatura pueda alcanzar o exceder los 50°C (122°F). Nunca incinere el cartucho de batería incluso en el caso de que esté dañado seriamente o ya no sirva en absoluto. El cartucho de batería puede explotar si se tira al fuego. Tenga cuidado de no dejar caer ni golpear la batería. No use una batería dañada.
2. Alinee el orificio del mango inferior con el orificio del mango superior, a continuación inserte los pernos por el interior, luego acople la arandela B por el exterior, y por último apriete las tuercas de mano. Extracción del accesorio de mantillo 1. Abra la cubierta posterior. 1 6 2 3 1 5 4 ► 1 . Cubierta posterior 2. Retire el accesorio de mantillo mientras presiona la palanca hacia abajo. 1 ► 1 . Mango superior 2. Orificio 3. Arandela B 4. Tuerca de mano 5. Mango inferior 6.
2. Enganche el canasto para césped en la barra del cuerpo de la cortadora de césped tal como se muestra en la figura. 1 2 DESCRIPCIÓN DEL FUNCIONAMIENTO 3 Instalación o extracción del cartucho de batería PRECAUCIÓN: Apague siempre la herramienta antes de instalar o extraer el cartucho de batería. PRECAUCIÓN: Sujete la herramienta y el cartucho de la batería con firmeza al colocar o quitar el cartucho de batería.
2. Alinee la lengüeta sobre el cartucho de batería con la ranura en la cortadora de césped y luego deslice el cartucho hasta que quede asegurado en su lugar y se escuche un clic. 1 Sistema de protección para la herramienta/batería La herramienta está equipada con un sistema de protección de la herramienta/batería. Este sistema corta en forma automática el suministro de energía al motor para prolongar la vida útil de la herramienta y la batería.
Luces indicadoras Iluminadas Apagadas Interruptor de alimentación principal Capacidad restante ADVERTENCIA: Siempre apague el interruptor de alimentación principal cuando no lo vaya a utilizar. Parpadeando 75% a 100% Para encender la máquina, oprima el interruptor de alimentación principal. La luz indicadora de alimentación principal se iluminará en verde. Para apagar la máquina, oprima nuevamente el interruptor de alimentación principal.
Accionamiento del interruptor Ajuste de la altura de corte del césped ADVERTENCIA: Antes de insertar el cartucho de batería, compruebe siempre que la palanca interruptora se acciona debidamente y que regresa a la posición original una vez que la suelta. Usar una herramienta con un interruptor que no funciona adecuadamente puede ocasionar la pérdida del control y lesiones personales graves.
Ajuste de la altura del mango OPERACIÓN PRECAUCIÓN: Antes de retirar los pernos, sujete firmemente el mango superior. De lo contrario, el mango podría caerse y causar una lesión. Corte del césped La altura del mango se puede ajustar en tres niveles. Afloje las tuercas de mano del mango inferior, y luego 1. retire los pernos, las arandelas y las tuercas de mano. ADVERTENCIA: Antes de cortar el césped, despeje las ramas y piedras del área de podado.
1 3 NOTA: Cortar césped largo para lograr que quede corto en una sola pasada puede causar que el césped se marchite. Además de que el césped podado puede causar una obstrucción en el interior del cuerpo de la cortadora de césped. 2 Vaciado del canasto para césped 3 ADVERTENCIA: Para reducir el riesgo de accidentes, revise regularmente el canasto para césped para ver si no hay daños o ha perdido resistencia. Reemplace el canasto para césped en caso necesario. ► 1 . Amplitud de corte del césped 2.
Mantenimiento Almacenamiento 1. Retire la llave de cierre y los cartuchos de batería, y luego cierre la cubierta de la batería. 2. Coloque de lado la cortadora de césped y elimine los residuos de césped que se hayan acumulado en la parte interna de la carcasa de la cortadora de césped. 3. Vierta agua sobre la parte inferior de la máquina a la que está acoplada la cuchilla. Almacene la cortadora de césped en interiores en un lugar fresco, seco y bajo llave.
4. Retire el perno, la arandela y la cuchilla de la cortadora de césped en orden. Extracción o instalación de la cuchilla de la cortadora de césped ADVERTENCIA: Retire siempre la llave de cierre y el cartucho de batería al extraer o instalar la cuchilla. El no retirar la llave de cierre y el cartucho de batería puede ocasionar lesiones graves. ADVERTENCIA: La cuchilla continuará moviéndose por inercia durante algunos segundos tras haber soltado el interruptor.
RESOLUCIÓN DE PROBLEMAS Antes de solicitar alguna reparación, primero realice una inspección por su cuenta. Si detecta algún problema que no esté explicado en el manual, no intente desensamblar la herramienta. En vez de esto, solicite la reparación a un centro de servicio autorizado de Makita, usando siempre piezas de repuesto Makita. Estado de la anomalía Causa probable (avería) Remedio La cortadora de césped no arranca. No se han instalado dos cartuchos de batería.
Makita Corporation 3-11-8, Sumiyoshi-cho, Anjo, Aichi 446-8502 Japan www.makita.