
Use and Care Manual


7 ENGLISH
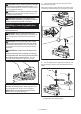
Adjusting the orbital stroke rate
1
► 1. Dial
The orbital stroke rate is adjustable. To change the
orbital stroke rate, turn the dial between 1 and 6. The
higher the number is, the higher the orbital stroke
rate is. Preset the dial to the number suitable for your
workpiece.
NOTE: The dial cannot be turned directly from 1 to 6
or from 6 to 1. Forcing the dial may damage the tool.
When changing the dial direction, always turn the dial
moving it through each intermediate number.
Lighting up the front lamp
CAUTION: Do not look in the light or see the
source of light directly.
Slide the slide switch toward the "I (ON)" position to
light up the front lamp. The lamp keeps on lighting while
the switch is the "I (ON)" position.
The front lamp goes out 10 seconds after sliding switch
toward the "O (OFF)" position.
1
► 1. Front lamp
NOTE: When the overheat protection or the protec-
tion lock function is working, the front lamp blinks for
about 1 minutes. Refer the section for the tool / bat-
tery protection system.
Electronic function
The tool is equipped with the electronic functions for
easy operation.
Constant speed control
The speed control function provides the constant orbital
stroke rate regardless of load conditions.
Soft start feature
Soft start feature reduces starting reaction.
Accidental re-start preventive
function
When installing the battery cartridge while the slide
switch in the "I (ON)" position, the tool does not start.
To start the tool, rst slide the slide switch toward the
"O (OFF)" position and then slide it toward the "I (ON)"
position.
ASSEMBLY
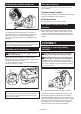
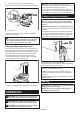
Installing or removing battery
cartridge
CAUTION: Always switch o the tool before
installing or removing of the battery cartridge.
CAUTION: Hold the tool and the battery car-
tridge rmly when installing or removing battery
cartridge. Failure to hold the tool and the battery
cartridge rmly may cause them to slip o your hands
and result in damage to the tool and battery cartridge
and a personal injury.
2
1
3
► 1. Red indicator 2. Button 3. Battery cartridge
To remove the battery cartridge, slide it from the tool
while sliding the button on the front of the cartridge.
To install the battery cartridge, align the tongue on the
battery cartridge with the groove in the housing and slip
it into place. Insert it all the way until it locks in place
with a little click. If you can see the red indicator as
shown in the gure, it is not locked completely.