INSTRUCTION MANUAL MANUAL DE INSTRUCCIONES Cordless Grease Gun Pistola Engrasadora Inalámbrica XPG01 IMPORTANT: Read Before Using. IMPORTANTE: Lea antes de usar.
ENGLISH (Original instructions) SPECIFICATIONS Model: XPG01 Rated voltage Grease capacity (with A-type barrel) Grease capacity (with B-type barrel) D.C. 18 V Cartridge 410 g (14.5 oz) Bulk 455 g (16.0 oz) Cartridge 450 g (15.9 oz) Bulk 570 g (20.1 oz) Maximum operating pressure Maximum flow rate 69 MPa (10,000 psi) Slow speed mode 145 ml/min (5.0 fl oz/min) Auto speed mode 290 ml/min (10.0 fl oz/min) Applicable grease type NLGI No.0 - No.
5. 6. 7. When operating a power tool outdoors, use an extension cord suitable for outdoor use. Use of a cord suitable for outdoor use reduces the risk of electric shock. If operating a power tool in a damp location is unavoidable, use a ground fault circuit interrupter (GFCI) protected supply. Use of a GFCI reduces the risk of electric shock. Power tools can produce electromagnetic fields (EMF) that are not harmful to the user.
Service 1. Have your power tool serviced by a qualified repair person using only identical replacement parts. This will ensure that the safety of the power tool is maintained. 2. Never service damaged battery packs. Service of battery packs should only be performed by the manufacturer or authorized service providers. 3. Follow instruction for lubricating and changing accessories. 4. Do not modify or attempt to repair the appliance or the battery pack except as indicated in the instructions for use and care.
16. 17. 18. Tips for maintaining maximum battery life Do not allow chips, dust, or soil stuck into the terminals, holes, and grooves of the battery cartridge. It may result in poor performance or breakdown of the tool or battery cartridge. Unless the tool supports the use near high-voltage electrical power lines, do not use the battery cartridge near high-voltage electrical power lines. It may result in a malfunction or breakdown of the tool or battery cartridge. Keep the battery away from children. 1.
Overheat protection FUNCTIONAL DESCRIPTION When the tool or battery is overheated, the tool stops automatically and the lamp blinks. In this case, let the tool and battery cool before turning the tool on again. CAUTION: Always be sure that the tool is switched off and the battery cartridge is removed before adjusting or checking function on the tool. Overdischarge protection When the battery capacity is not enough, the tool stops automatically.
Switch action Selecting the speed mode CAUTION: Before installing the battery cartridge into the tool, always check to see that the switch trigger actuates properly and returns to the "OFF" position when released. NOTICE: Change the speed mode only after the tool comes to a complete stop. The tool employs the speed mode changing knob.
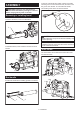
To lock the rod handle fully pulled, pull the rod handle until the groove on the rod can be seen, and then hook the groove onto the slot. To unlock the rod handle, unhook the groove so the rod moves forward. ASSEMBLY CAUTION: Always be sure that the tool is switched off and the battery cartridge is removed before carrying out any work on the tool. Removing or installing barrel 2 To remove the barrel, screw it as illustrated. 1 1 ► 1 . Groove 2.
1. Shoulder strap 2. WARNING: Never use the strap hole for lan- yard (tether strap). Doing so may result in serious injury because the strap hole is not intended for a safety device for fall prevention. Remove the barrel from the tool then fully pull the rod handle and lock it. Remove the plastic cap of the grease cartridge and insert the grease cartridge into the barrel. WARNING: When carrying the tool, keep holding the tool even if when using the shoulder strap.
Filling grease in the barrel from a bulk container (commercially-bought) 1. 2. Remove the barrel from the tool. Dip the tip of the barrel in the grease and then pull the rod handle. The grease is pumped up into the barrel. You can also fill grease into the barrel using a filler pump (commercially-bought) attached to the bulk container. 1. Remove the filler port plug. Attach a loader fitting (commercially-bought) to the filler port. 2.
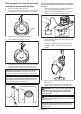
1. Ejection of air If air remains in the flow path of the grease, the tool cannot pour grease accurately. Eject the air before each use and also when the tool seems to work improperly due to air. 1. To eject air from inside of the tool, loosen the valve for air drain. Air comes out from the hole for air drain. 2. Fasten the valve when you see the grease coming out of the hole. 2. Wipe the adapter and the grease nipple before connecting. Push the adapter straight at the grease nipple.
Replacing of the flexible hose CAUTION: Do not take hand off from the rod handle. Otherwise the grease pops out vigorously. Loosen and remove the old flexible hose with a wrench as illustrated and then tighten the new flexible hose securely. NOTICE: Keep dust away from inside of the barrel. Dust may get clogged in the tool. NOTICE: Clean the inside of the barrel once every three months.
4. Install B-type barrel. 1 5 Cartridge barrel 2 You can see the grease cartridge through the hole on the cartridge barrel. 4 3 ► 1 . Joint 2. Rubber packing 3. Tab 4. Groove 5. Screw When using the cartridge barrel, transfer the piston parts from the corresponding barrel to the cartridge barrel. Changing the barrel from B-type to A-type 1. 2. Remove B-type barrel. Unscrew and remove the joint. 1 2 2 ► 1 . Piston parts 2.
2. Pull the the rod handle and lock it. Angle adapter When attaching the angle adapter, push the adapter of the tool straight to the angle adapter. 1 3. Remove the empty grease cartridge from the barrel. Lock on adapter ► 1 . Angle adapter CAUTION: Be careful not to pinch the finger in the lock on adapter. MAKITA LIMITED WARRANTY CAUTION: Wear the protective goggles. When removing the lock on adapter from the grease nipple, the grease may spout out of the tool and cause an injury.
ESPAÑOL (Instrucciones originales) ESPECIFICACIONES Modelo: XPG01 Tensión nominal 18 V c.c.
Seguridad eléctrica 1. Las clavijas de conexión de las herramientas eléctricas deberán encajar perfectamente en la toma de corriente. No modifique nunca la clavija de conexión de ninguna forma. No utilice ninguna clavija adaptadora con herramientas eléctricas que tengan conexión a tierra (puesta a tierra). La utilización de clavijas no modificadas y que encajen perfectamente en la toma de corriente reducirá el riesgo de que se produzca una descarga eléctrica. 2.
6. 7. 8. 9. Mantenga las herramientas de corte limpias y filosas. Si recibe un mantenimiento adecuado y tiene los bordes afilados, es probable que la herramienta se atasque menos y sea más fácil controlarla. Utilice la herramienta eléctrica, los accesorios y las brocas de acuerdo con estas instrucciones, considerando las condiciones laborales y el trabajo a realizar. Si utiliza la herramienta eléctrica para realizar operaciones distintas de las indicadas, podrá presentarse una situación peligrosa.
9. 10. Símbolos A continuación se muestran los símbolos utilizados para la herramienta. volts o voltios corriente directa o continua libras por pulgada cuadrada megapascales 11. Instrucciones importantes de seguridad para el cartucho de batería 1. 2. 3. 4. 5. 6. 7. 8. 12. Antes de utilizar el cartucho de batería, lea todas las instrucciones e indicaciones de precaución en el (1) el cargador de batería, (2) la batería, y (3) el producto con el que se utiliza la batería.
Consejos para alargar al máximo la vida útil de la batería 3. Cargue el cartucho de batería antes de que se descargue completamente. Pare siempre la operación y cargue el cartucho de batería cuando note menos potencia en la herramienta. No cargue nunca un cartucho de batería que esté completamente cargado. La sobrecarga acortará la vida de servicio de la batería. 1. 2. 4. 5. Cargue el cartucho de batería a una temperatura ambiente de 10 °C - 40 °C (50 °F - 104 °F).
Sistema de protección para la herramienta/batería DESCRIPCIÓN DEL FUNCIONAMIENTO PRECAUCIÓN: Asegúrese siempre de que la herramienta esté apagada y el cartucho de batería haya sido extraído antes de realizar cualquier ajuste o comprobación en la herramienta. Instalación o extracción del cartucho de batería La herramienta está equipada con un sistema de protección de la herramienta/batería.
Luces indicadoras Iluminadas Apagadas 1 Capacidad restante 2 1 Parpadeando 75% a 100% 3 50% a 75% A B 25% a 50% 0% a 25% Cargar la batería. ► 1 . Gatillo interruptor 2. Botón de bloqueo 3. Botón de bloqueo del gatillo La batería pudo haber funcionado mal. Iluminación de la luz delantera PRECAUCIÓN: No mire a la luz ni vea a la fuente de luz directamente. NOTA: Dependiendo de las condiciones de uso y la temperatura ambiente, la indicación podrá diferir ligeramente de la capacidad real.
Selección del modo de velocidad MONTAJE AVISO: Cambie el modo de velocidad única- mente después de que la herramienta se haya detenido por completo. La herramienta emplea la perilla de cambio de modo de velocidad. Gire la perilla de modo que la flecha en la perilla apunte hacia uno de los dos modos a continuación; 1 Modo de baja velocidad: Despacha grasa a una velocidad baja y constante.
Para bloquear el mango de la barra jalado por completo, tire del mango de la barra hasta que se vea la ranura de la barra, y luego enganche la ranura en la hendidura. Para desbloquear el mango de la barra, desenganche la ranura para que la barra se mueva hacia adelante. Correa para hombro ADVERTENCIA: Nunca utilice el orificio para la correa como cordel de seguridad (correa de amarre).
Existen las siguientes formas de suministrar grasa: 4. Libere el mango de la barra. 5. Expulse el aire que quede en la trayectoria de flujo de la grasa. (Consulte la sección para expulsión de aire.) Instalación del cartucho de grasa (comprado comercialmente) en el depósito AVISO: (Para depósito tipo A solamente) Utilice el cartucho de grasa, cuyo reborde puede engancharse sobre la superficie de extremo del depósito.
5. Expulse el aire que quede en la trayectoria de flujo de la grasa. (Consulte la sección para expulsión de aire.) 3. Ponga a funcionar la bomba de suministro. La barra del mango de la barra se empujará hacia afuera conforme el depósito se va llenando con grasa. 4. Desconecte el aditamento para cargador del aditamento de la bomba de suministro. Expulse el aire que quede en la trayectoria de flujo de la grasa. (Consulte la sección para expulsión de aire.
2. Sujete la válvula cuando vea que sale grasa del orificio. 2. Jale del gatillo interruptor para surtir la grasa. 3. Cuando termine de surtir la grasa, retire el adaptador de la boquilla de engrase. Incline el adaptador un poco para liberar la presión interna y luego retire el adaptador de la boquilla de engrase. Limpie la grasa del adaptador y de la boquilla de engrase. 1 ► 1 . Válvula ADVERTENCIA: Utilice gafas protectoras cuando expulse el aire.
PRECAUCIÓN: No quite la mano del mango de la barra. De lo contrario la grasa saldrá expulsada vigorosamente. AVISO: Mantenga el polvo alejado del interior Reemplazo de la manguera flexible Afloje y retire la manguera flexible vieja con una llave de apriete como se ilustra y luego apriete firmemente la nueva manguera flexible. del depósito. El polvo puede quedar obstruido en la herramienta. AVISO: Limpie el interior del depósito una vez cada tres meses.
4. Instale el depósito tipo B. 1 5 Depósito del cartucho 2 Usted puede ver el cartucho de grasa a través del orificio en el depósito del cartucho. 4 3 ► 1 . Junta 2. Empaque de goma 3. Lengüeta 4. Ranura 5. Tornillo Cuando utilice el depósito del cartucho, transfiera las piezas del pistón del depósito correspondiente al depósito del cartucho. Cambio del depósito de tipo B a tipo A 1. 2. Retire el depósito tipo B. Desatornille y retire la junta. 1 2 2 ► 1 . Piezas del pistón 2.
2. Tire del mango de la barra y bloquéelo. Adaptador angular Al conectar el adaptador angular, empuje el adaptador de la herramienta de forma recta al adaptador angular. 1 3. Retire el cartucho de grasa vacío del depósito. Adaptador de bloqueo ► 1 . Adaptador angular PRECAUCIÓN: Tenga cuidado de no pellizcar el dedo en el adaptador de bloqueo. PRECAUCIÓN: Use las gafas protectoras.
< USA only > WARNING Some dust created by power sanding, sawing, grinding, drilling, and other construction activities contains chemicals known to the State of California to cause cancer, birth defects or other reproductive harm. Some examples of these chemicals are: • lead from lead-based paints, • crystalline silica from bricks and cement and other masonry products, and • arsenic and chromium from chemically-treated lumber.