INSTRUCTION MANUAL MANUEL D'INSTRUCTION MANUAL DE INSTRUCCIONES Cordless Hammer Driver Drill Perceuse Percussion-Visseuse sans Fil Rotomartillo Atornillador Inalámbrico XPH01 XPH02 011491 IMPORTANT: Read Before Using. IMPORTANT: Lire avant usage. IMPORTANTE: Leer antes de usar.
ENGLISH (Original instructions) SPECIFICATIONS Model Concrete Capacities XPH01 XPH02 13 mm (1/2") 13 mm (1/2") Steel 13 mm (1/2") 13 mm (1/2") Wood 38 mm (1-1/2") 38 mm (1-1/2") 6 mm x 75 mm (1/4" x 2-15/16") Wood screw 10 mm x 89 mm (3/8" x 3-1/2") Machine screw M6 (1/4") M6 (1/4") High (2) 0 - 1,500 /min 0 - 1,500 /min No load speed (RPM) Blows per minute Low (1) 0 - 400 /min 0 - 400 /min High (2) 0 - 22,500 /min 0 - 22,500 /min Low (1) Overall length Net weight 0 - 6,000 /min
tool for operations different from those intended could result in a hazardous situation. Battery tool use and care 24. Recharge only with the charger specified by the manufacturer. A charger that is suitable for one type of battery pack may create a risk of fire when used with another battery pack. 25. Use power tools only with specifically designated battery packs. Use of any other battery packs may create a risk of injury and fire. 26.
6. 7. 8. 9. 10. Hold the tool firmly. Keep hands away from rotating parts. Do not leave the tool running. Operate the tool only when hand-held. Do not touch the bit or the workpiece immediately after operation; they may be extremely hot and could burn your skin. Some material contains chemicals which may be toxic. Take caution to prevent dust inhalation and skin contact. Follow material supplier safety data. 5.
• Overloaded: The tool is operated in a manner that causes it to draw an abnormally high current. In this situation, release the trigger switch on the tool and stop the application that caused the tool to become overloaded. Then pull the trigger switch again to restart. If the tool does not start, the battery is overheated. In this situation, let the battery cool before pulling the trigger switch again. Low battery voltage: The remaining battery capacity is too low and the tool will not operate.
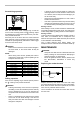
Pull the switch trigger to light up the lamp. The lamp keeps on lighting while the switch trigger is being pulled. The lamp goes out 10 -15 seconds after releasing the trigger. To change the speed, first switch off the tool and then slide the speed change lever to the "2" side for high speed or "1" side for low speed. Be sure that the speed change lever is set to the correct position before operation. Use the right speed for your job. NOTE: • Use a dry cloth to wipe the dirt off the lens of the lamp.
ASSEMBLY • OPERATION CAUTION: Always be sure that the tool is switched off and the battery cartridge is removed before carrying out any work on the tool. CAUTION: Always insert the battery cartridge all the way until it locks in place. If you can see the red part on the upper side of the button, it is not locked completely. Insert it fully until the red part cannot be seen. If not, it may accidentally fall out of the tool, causing injury to you or someone around you.
A stuck bit can be removed simply by setting the reversing switch to reverse rotation in order to back out. However, the tool may back out abruptly if you do not hold it firmly. • Always secure small workpieces in a vise or with a similar hold-down device. • If the tool is operated continuously until the battery cartridge has discharged, allow the tool to rest for 15 minutes before proceeding with a fresh battery.
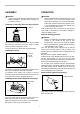
To maintain product SAFETY and RELIABILITY, repairs, any other maintenance or adjustment should be performed by Makita Authorized or Factory Service Centers, always using Makita replacement parts. 1. Rear cover 2. Screw 1 2 OPTIONAL ACCESSORIES CAUTION: These accessories or attachments are recommended for use with your Makita tool specified in this manual. The use of any other accessories or attachments might present a risk of injury to persons.
MAKITA LIMITED ONE YEAR WARRANTY Warranty Policy Every Makita tool is thoroughly inspected and tested before leaving the factory. It is warranted to be free of defects from workmanship and materials for the period of ONE YEAR from the date of original purchase. Should any trouble develop during this one year period, return the COMPLETE tool, freight prepaid, to one of Makita’s Factory or Authorized Service Centers.
FRANÇAIS (Mode d’emploi original) SPÉCIFICATIONS Modèle Béton Capacités XPH01 XPH02 13 mm (1/2") 13 mm (1/2") Acier 13 mm (1/2") 13 mm (1/2") Bois 38 mm (1-1/2") 38 mm (1-1/2") 6 mm x 75 mm (1/4" x 2-15/16") Vis à bois 10 mm x 89 mm (3/8" x 3-1/2") Vis de mécanique M6 (1/4") M6 (1/4") Grande (2) 0 - 1 500 /min 0 - 1 500 /min Vitesse à vide (T/MIN) Nombre de frappes par minute Réduite (1) 0 - 400 /min 0 - 400 /min Grande (2) 0 - 22 500 /min 0 - 22 500 /min Réduite (1) Longueur tot
Utilisation et entretien des outils électriques 17. Ne forcez pas l'outil électrique. Utilisez l'outil électrique adéquat suivant le type de travail à effectuer. Si vous utilisez l'outil électrique adéquat et respectez le régime pour lequel il a été conçu, il effectuera un travail de meilleure qualité et de façon plus sécuritaire. 18. N'utilisez pas l'outil électrique s'il n'est pas possible de mettre sa gâchette en position de marche et d'arrêt.
25. N'utilisez un outil électrique qu'avec le bloc-piles conçu spécifiquement pour cet outil. Il y a risque de blessure ou d'incendie si un autre bloc-piles est utilisé. 26. Lorsque vous n'utilisez pas le bloc-piles, rangez-le à l'écart des objets métalliques tels que trombones, pièces de monnaie, clés, clous, vis ou autres petits objets métalliques qui risquent d'établir une connexion entre les bornes. La mise en court-circuit des bornes de batterie peut causer des brûlures ou un incendie. 27.
ENC007-8 2. CONSIGNES DE SÉCURITÉ IMPORTANTES 3. POUR LA BATTERIE 1. Avant d'utiliser la batterie, lisez toutes les instructions et précautions relatives (1) au chargeur de batterie, (2) à la batterie, et (3) à l'outil utilisant la batterie. 2. Ne démontez pas la batterie. 3. Cessez immédiatement l'utilisation si le temps de fonctionnement devient excessivement court. Il y a risque de surchauffe, de brûlures, voire d'explosion. 4.
L'outil s’arrête automatiquement pendant l'utilisation lorsque l'outil et/ou la batterie sont dans l’une des situations suivantes : • En surcharge : L'outil est utilisé d’une manière entraînant une consommation anormale de courant. Dans cette situation, relâchez la gâchette et arrêtez l'activité qui entraîne une surcharge de l'outil. Puis appuyez de nouveau sur la gâchette pour redémarrer. Si l’outil ne démarre pas, la batterie est en surchauffe.
ATTENTION: Evitez de regarder directement le faisceau lumineux ou sa source. Appuyez sur la gâchette pour allumer la lampe. La lampe demeure allumée tant que la pression sur la gâchette est maintenue. La lampe s'éteint de 10 à 15 secondes après la libération de la gâchette. ATTENTION: Réglez toujours le levier de changement de vitesse à fond sur la position voulue.
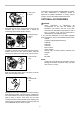
Réglage du couple de serrage 1 2 3 Installation du crochet 1. Bague de changement de mode d'action 2. Bague de réglage 3. Graduation 4. Flèche 1 2 4 1. Rainure 2. Crochet 3. Vis 3 011496 011498 Le couple de serrage est réglable sur l'une ou l'autre de 16 positions, en tournant la bague de réglage de sorte que ses graduations soient alignées sur la flèche du bâti de l'outil.
Placez la pointe de l'embout dans la tête de vis et appliquez une pression sur l'outil. Faites démarrer l'outil à vitesse réduite puis augmentez graduellement la vitesse. Relâchez la gâchette dès que l'engrenage s'active. Perçage avec martelage ATTENTION: Une force de torsion énorme et soudaine s'exerce sur l'outil et le foret lors du perçage du trou, lorsque ce dernier est bouché par des copeaux et particules ou lorsque le foret frappe contre les armatures d'une structure en béton armé.
Perçage du bois Quand vous percez dans du bois, vous obtiendrez de meilleurs résultats avec des forets en bois munies d'une vis-guide. Celle-ci rend le perçage plus aisé en tirant le foret à l'intérieur de la pièce. Perçage du métal Pour éviter que l’embout ne glisse lorsque vous commencez à percer un trou, faites une encoche à l’aide d’un pointeau et d’un marteau à l’endroit où le trou doit être percé. Placez la pointe de l’embout dans l’encoche et commencez le perçage.
ACCESSOIRES EN OPTION GARANTIE LIMITÉE D’UN AN MAKITA Politique de garantie Chaque outil Makita est inspecté rigoureusement et testé avant sa sortie d’usine. Nous garantissons qu’il sera exempt de défaut de fabrication et de vice de matériau pour une période d’UN AN à partir de la date de son achat initial. Si un problème quelconque devait survenir au cours de cette période d’un an, veuillez retourner l’outil COMPLET, port payé, à une usine ou à un centre de service après-vente Makita.
ESPAÑOL (Instrucciones originales) ESPECIFICACIONES Modelo Concreto XPH01 XPH02 13 mm (1/2") 13 mm (1/2") Acero 13 mm (1/2") 13 mm (1/2") Madera 38 mm (1-1/2") 38 mm (1-1/2") Tornillo para madera 10 mm x 89 mm (3/8" x 3-1/2") 6 mm x 75 mm (1/4" x 2-15/16") Tornillo de máquina M6 (1/4") M6 (1/4") Alta (2) 0 - 1 500 r/min 0 - 1 500 r/min Capacidades Velocidad sin carga (r.p.m.
Mantenimiento y uso de la herramienta eléctrica 17. No fuerce la herramienta eléctrica. Utilice la herramienta eléctrica correcta para su aplicación. La herramienta eléctrica adecuada hará un trabajo mejor a la velocidad para la que ha sido fabricada. 18. No utilice la herramienta eléctrica si el interruptor no la enciende y apaga. Cualquier herramienta eléctrica que no pueda ser controlada con el interruptor es peligrosa y debe ser reemplazada. 19.
25. Utilice las herramientas eléctricas solamente con las baterías designadas específicamente para ellas. La utilización de cualquier otra batería puede crear un riesgo de heridas o incendio. 26. Cuando no se esté usando el cartucho de la batería, manténgalo alejado de otros objetos metálicos, como sujetapapeles (clips), monedas, llaves, clavos, tornillos u otros objetos pequeños de metal los cuales pueden actuar creando una conexión entre las terminales de la batería.
ENC007-8 2. INSTRUCCIONES IMPORTANTES DE SEGURIDAD 3. PARA CARTUCHO DE BATERÍA 1. Antes de utilizar el cartucho de batería, lea todas las instrucciones e indicaciones de precaución sobre (1) el cargador de baterías, (2) la batería, y (3) el producto con el que se utiliza la batería. 2. No desarme el cartucho de batería. 3. Si el tiempo de operación se ha acortado en exceso, deje de operar de inmediato. Podría correrse el riesgo de sobrecalentamiento, posibles quemaduras e incluso explosión. 4.
Las baterías de ión de litio con una marca de estrella están equipadas con un sistema de protección. Este sistema corta en forma automática el suministro de energía a la herramienta para prolongar la vida útil de la batería. La herramienta se detendrá automáticamente durante el funcionamiento si la herramienta y/o la batería se someten a una de las siguientes condiciones: • Sobrecarga: La herramienta se está utilizando de una manera que causa que consuma una cantidad de corriente inusualmente alta.
Iluminación de la lámpara delantera Cambio de velocidad 1. Lámpara 1 1. Palanca de cambio de velocidad 1 011503 011495 PRECAUCIÓN: • No mire a la luz ni vea la fuente de luz directamente. Apriete el interruptor de gatillo para encender la lámpara. La lámpara seguirá encendida mientras el gatillo esté siendo apretado. La lámpara se apaga 10-15 segundos después de soltarse el gatillo. PRECAUCIÓN: Ponga siempre la palanca de cambio de velocidad completamente en la posición correcta.
• PRECAUCIÓN: Ponga siempre el anillo correctamente en la marca del modo que desee. Si utiliza la herramienta con el anillo puesto a medias entre las marcas de modo, la herramienta podrá dañarse. Instalación del gancho 1 1. Ranura 2. Gancho 3. Tornillo Ajuste de la torsión de apriete 1 2 3 1. Anillo de cambio del modo de acción 2. Anillo de ajuste 3. Graduación 4. Flecha 2 El gancho resulta útil para colgar temporalmente la herramienta.
Ponga la punta de atornillar sobre la cabeza del tornillo y aplique presión en la herramienta. Haga funcionar la herramienta despacio y después aumente la velocidad gradualmente. Suelte el gatillo interruptor en cuanto el embrague patine.
Taladrado en Madera Cuando taladre en madera, los mejores resultados se obtendrán con brocas para madera equipadas con un tornillo guía. El tornillo guía facilita el taladrado tirando de la broca hacia el interior de la pieza de trabajo. Taladrado en metal Para evitar que la broca resbale al comenzar a hacer un orificio, haga una cavidad con un martillo de golpe central sobre el punto a ser taladrado. Coloque la punta de la broca en la cavidad y comience a taladrar.
ACCESORIOS OPCIONALES GARANTÍA LIMITADA MAKITA DE UN AÑO Ésta Garantía no aplica para México PRECAUCIÓN: Estos accesorios o acoplamientos están recomendados para utilizarse con su herramienta Makita especificada en este manual. El empleo de cualquier otro accesorio o aditamento puede conllevar el riesgo de lesiones personales. Use los accesorios o aditamentos sólo para los propósitos para los que fueron diseñados.
< USA only > WARNING Some dust created by power sanding, sawing, grinding, drilling, and other construction activities contains chemicals known to the State of California to cause cancer, birth defects or other reproductive harm. Some examples of these chemicals are: • lead from lead-based paints, • crystalline silica from bricks and cement and other masonry products, and • arsenic and chromium from chemically-treated lumber.