
Use and Care Manual


7 ENGLISH
Selecting the action mode
CAUTION: Always set the ring correctly to
your desired mode mark. If you operate the tool
with the ring positioned halfway between the
mode marks, the tool may be damaged.
CAUTION: When you change the position
from " " to other modes, it may be a little dif-
culty to slide the action mode changing ring. In
this case, switch on and run the tool for a second
at the " " position, then stop the tool and slide
the ring to your desired position.
1
2
4
3
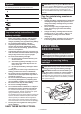
►1.Actionmodechangingring2.Adjustingring
3. Graduation 4.Arrow
Thistoolhasthreeactionmodes.
•
Drilling mode (rotation only)
•
Hammer drilling mode (rotation with
hammering)
•
Screwdriving mode (rotation with clutch)
Selectonemodesuitableforyourwork.Turnthe
action mode changing ring and align the mark that you
selected with the arrow on the tool body.
Adjusting the fastening torque
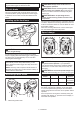
1
2
4
3
►1.Actionmodechangingring2.Adjustingring
3. Graduation 4.Arrow
Thefasteningtorquecanbeadjustedin20levelsbyturningtheadjustingring.Alignthegraduationswiththearrow
on the tool body. You can get the minimum fastening torque at 1 and maximum torque at 20.
Before actual operation, drive a trial screw into your material or a piece of duplicate material to determine which
torquelevelisrequiredforaparticularapplication.Thefollowingshowstheroughguideoftherelationshipbetween
the screw size and graduation.
Graduation 1 2 3 4 5 6 7 8 9 10 11 12 13 14 15 16 17 18 19 20
Machine screw M4 M5 M6
Wood
screw
Soft wood
(e.g. pine)
– ɸ3.5 x 22 ɸ4.1x 38 –
Hard wood
(e.g. lauan)
– ɸ3.5 x 22 ɸ4.1x 38 –