
Use and Care Manual


21 ENGLISH
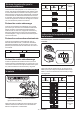
State of abnormality Probable cause (malfunction) Remedy
The vacuum cleaner does not run
along with the switch operation of
the tool.
The wireless unit is not installed into
the tool.
The wireless unit is improperly installed
into the tool.
Install the wireless unit correctly.
The terminal of the wireless unit and/or
the slot is dirty.
Gently wipe off dust and dirt on the terminal of the
wireless unit and clean the slot.
The wireless activation button on the
tool has not been pushed.
Push the wireless activation button briey and make
sure that the wireless activation lamp is blinking
in blue.
The stand-by switch on the vacuum
cleaner is not set to "AUTO".
Set the stand-by switch on the vacuum cleaner to
"AUTO".
More than 10 tools are registered to the
vacuum cleaner.
Perform the tool registration again.
If more than 10 tools are registered to the vacuum
cleaner, the tool registered earliest will be cancelled
automatically.
The vacuum cleaner erased all tool
registrations.
Perform the tool registration again.
No power supply Supply the power to the tool and the vacuum
cleaner.
The tool and vacuum cleaner is away
from each other (out of the transmission
range).
Get the tool and vacuum cleaner closer each other.
The maximum transmission distance is approxi-
mately 10 m however it may vary according to the
circumstances.
Radio disturbance by other appliances
which generate high-intensity radio
waves.
Keep the tool and vacuum cleaner away from the
appliances such as Wi-Fi devices and microwave
ovens.
The vacuum cleaner runs while the
tool's switch trigger is not pulled.
Other users are using the wireless
activation of the vacuum cleaner with
their tools.
Turn off the wireless activation button of the other
tools or cancel the tool registration of the other
tools.
MAINTENANCE
CAUTION: Always be sure that the tool is
switched off and the battery cartridge is removed
before attempting to perform inspection or
maintenance.
CAUTION: Clean out the guard to ensure
there is no accumulated sawdust which may
impede the operation of the guarding system. A
dirty guarding system may limit the proper operation
which could result in serious personal injury. The
most effective way to accomplish this cleaning is with
compressed air. If the dust is being blown out of
the guard, be sure the proper eye and breathing
protection is used.
NOTICE: Never use gasoline, benzine, thinner,
alcohol or the like. Discoloration, deformation or
cracks may result.
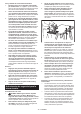
Adjusting 0°-cut and 45°-cut accuracy
NOTICE: Do not engage the levers for -1° bevel
angle when adjusting 0°-cut accuracy.
NOTICE: Do not engage the lever for 48° bevel
angle when adjusting 45°-cut accuracy.
These adjustments have been made at the factory. But if they
are off, you can adjust them as the following procedures.
1. Slightly loosen the clamping screws on the front
and rear of the tool.
2. Adjust the blade angle.
1
1
0°
45°
► 1. Triangular rule