INSTRUCTION MANUAL MANUEL D'INSTRUCTION MANUAL DE INSTRUCCIONES Cordless Grass Trimmer Coupe Herbe Sans Fil Cortador Inalámbrico de Pasto XRU09 015384 IMPORTANT: Read Before Using. IMPORTANT: Lire avant usage. IMPORTANTE: Leer antes de usar.
ENGLISH (Original instructions) SPECIFICATIONS Model XRU09 Type of handle Loop handle No load speed (RPM) 5,000 / 6,500 /min Overall length 1,754 mm (69") Nylon cord diameter 2.0 - 2.3 mm (0.08" - 0.09") Applicable cutting tool Nylon cutting head Nylon cutting head Cutting diameter 350 mm (13-3/4") 350 mm (13-3/4") Net weight 4.0 kg (8.8 lbs) Rated voltage 4.5 kg (9.9 lbs) D.C. 36 V Standard battery cartridge(s) Warning: Use only the battery(ies) described.
Personal protective equipment 1. 2. Electrical and battery safety Dress Properly. The clothing worn should be functional and appropriate, i.e. it should be tightfitting but not cause hindrance. Do not wear loose clothing or jewelry. They can be caught in moving parts. Use of thick leather gloves and substantial footwear is recommended when working outdoors. Wear protective hair covering to contain long hair.
3. 4. 5. 6. 14. Never drag the tool on the ground when moving from place to place, the tool may become damaged if moved in this manner. 15. Always remove the battery cartridge from the tool: − whenever leaving the tool unattended; − before clearing a blockage; − before checking, cleaning or working on the tool; − whenever the tool starts vibrating abnormally; − whenever transporting the tool. 16. Always ensure that the ventilation openings are kept clear of debris. 17.
USG001-2 A battery short can cause a large current flow, overheating, possible burns and even a breakdown. 6. Do not store the tool and battery cartridge in locations where the temperature may reach or exceed 50 ゚ C (122 ゚ F). 7. Do not incinerate the battery cartridge even if it is severely damaged or is completely worn out. The battery cartridge can explode in a fire. 8. Be careful not to drop or strike battery. 9. Do not use a damaged battery. 10.
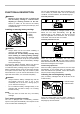
PARTS DESCRIPTION 1 2 3 7 8 4 5 6 9 1 Battery cartridge 2 Lock-off lever 3 Switch trigger 4 Power lamp 5 Main power button 6 Reverse button 7 Hanger 8 Grip 9 Protector (cutting tool guard) 015789 6
The tool will automatically stop during operation if the tool or battery is placed under one of the following conditions. In some conditions, the indicators light up. Overload protection FUNCTIONAL DESCRIPTION • WARNING: Always be sure that the tool is switched off and the battery cartridge is removed before adjusting or checking function on the tool. Failure to switch off and remove the battery cartridge may result in serious personal injury from accidental start-up.
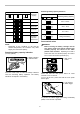
Remaining battery capacity indication Indicator lamps Remaining capacity Lighted Off Battery indicator status Blinking On Off Blinking Remaining battery capacity 75% to 100% 50 % - 100 % 50% to 75% 25% to 50% 20 % - 50 % 0% to 25% 0 % - 20 % Charge the battery. Charge the battery The battery may have malfunctioned. 015452 Power switch action 015658 NOTE: • Depending on the conditions of use and the ambient temperature, the indication may differ slightly from the actual capacity.
To start the tool, grasp the rear handle (the lock-off lever is released by the grasp) and then pull the switch trigger. To stop the tool, release the switch trigger. Once the tool is stopped, the rotation returns to regular direction when you start the tool again. If you tap the reverse button while the tool's head is still rotating, the tool comes to stop and to be ready for reverse rotation. • • NOTE: • The tool is automatically turned off after the tool is left one minute without any operations.
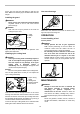
Fit the grip onto the pipe and tighten it with two hex bolts. Make sure that the grip is located further than the hanger. Hex wrench storage 1. Hex wrench Installing the guard • • WARNING: Never use the tool without the guard illustrated in place. Failure to do so can cause serious personal injury. 1 CAUTION: Take care not to injure yourself on the cutter for cutting the nylon cord. 015399 When not in use, store the hex wrench as shown in the figure to keep it from being lost. 1. Cutter 2.
Replacing the nylon cord • • WARNING: Use nylon cord with diameter specified in “SPECIFICATIONS” only. Never use heavier line, metal wire, rope or the like. Use recommended nylon cord only, otherwise it may cause damage to the tool and result in serious personal injury. Make sure that the cover of the nylon cutting head is secured to the housing properly as described below. Failure to properly secure the cover may cause the nylon cutting head to fly apart resulting in serious personal injury.
TROUBLE SHOOTING Before asking for repairs, first, conduct your own inspection. If you find a problem that is not explained in the manual, do not attempt to dismantle the tool. Instead, ask Makita Authorized or Factory Service Centers, always using Makita replacement parts. Malfunction status Motor does not run. Motor stops running after a little use. It does not reach maximum RPM.
OPTIONAL ACCESSORIES • MAKITA LIMITED ONE YEAR WARRANTY Warranty Policy Every Makita tool is thoroughly inspected and tested before leaving the factory. It is warranted to be free of defects from workmanship and materials for the period of ONE YEAR from the date of original purchase. Should any trouble develop during this one year period, return the COMPLETE tool, freight prepaid, to one of Makita’s Factory or Authorized Service Centers.
FRANÇAIS (Mode d’emploi original) SPÉCIFICATIONS Modèle XRU09 Type de poignée Poignée arceau Vitesse à vide (RPM) 5 000 / 6 500 /min Longueur totale 1 754 mm (69") Diamètre du fil de nylon 2,0 - 2,3 mm (0,08" - 0,09") Outil de coupe adapté Tête à fils de nylon Tête à fils de nylon Diamètre de coupe 350 mm (13-3/4") 350 mm (13-3/4") Poids net 4,0 kg (8,8 lbs) Tension nominale 4,5 kg (9,9 lbs) C.C. 36 V Batterie(s) standard Avertissement : Utilisez seulement la/les batterie(s) décrite(s).
Utilisation normale de l’outil 1. 2. Utilisez l’outil correctement. Le coupe herbe sans-fil est seulement conçu pour couper l'herbe et les mauvaises herbes fines. Il ne doit pas être utilisé à toute autre fin comme le dressage de bordures ou encore pour tailler les haies. Cela représente un risque de blessure. N’utilisez que les accessoires et fixations recommandés par le fabricant. En utilisant tout autre accessoire ou fixation, vous augmentez les risques de blessure. 010821 6.
6. 7. 8. 9. 4. Ne jetez pas la/les batterie(s) dans le feu. L’élément pourrait exploser. Vérifiez la réglementation de votre région pour savoir s’il existe des directives particulières qui s’appliquent à l’élimination des batteries. N’ouvrez pas et n’endommagez pas la/les batterie(s). L’électrolyte qui s’échappe est corrosif et peut provoquer des dommages aux yeux ou à la peau. Il peut être toxique s’il est ingéré. Ne rechargez pas la batterie sous la pluie ou dans des endroits mouillés.
USG001-2 − − avant de le débloquer; avant d’examiner l’outil, de le nettoyer ou d’effectuer des travaux; − chaque fois que l’outil vibre de façon anormale; − lorsque l’outil est transporté. 16. Assurez-vous toujours que les orifices de ventilation ne présentent pas de débris. 17. Maintenez l’outil électrique uniquement par les surfaces isolées, car la lame pourrait être en contact avec des câblages cachés.
2. (3) Évitez d'exposer la batterie à l'eau ou à la pluie. Un court-circuit de la batterie pourrait provoquer un fort courant, une surchauffe, parfois des brûlures et même une panne. 6. Ne rangez pas l'outil ou la batterie dans des endroits où la température risque d'atteindre ou de dépasser 50 ゚ C (122 ゚ F). 7. Ne jetez pas la batterie au feu même si elle est sérieusement endommagée ou complètement épuisée. La batterie peut exploser au contact du feu. 8. Prenez garde d'échapper ou de heurter la batterie.
DESCRIPTION DES PIÈCES 1 2 3 7 8 4 5 6 9 Levier de sécurité 1 Batterie 2 3 Gâchette 4 Témoin d’alimentation 5 Bouton d’alimentation principale 6 Bouton inverseur 7 Étrier de fixation 8 Poignée 9 Protecteur (gaine de protection de l’outil de coupe) 015789 19
L’outil s’arrête automatiquement pendant l’utilisation lorsque l’outil ou la batterie est dans l’une des situations suivantes. Dans certaines conditions, les indicateurs s’allument. Protection contre les surcharges DESCRIPTION DU FONCTIONNEMENT • AVERTISSEMENT: Assurez-vous toujours que l’outil est éteint et que la batterie est retirée avant d'effectuer un réglage ou de vérifier quelque chose sur l’outil.
Indication de la puissance résiduelle de la batterie Témoins Capacité résiduelle Allumé ARRÊT État de l’indicateur de batterie Clignotement MARCHE ARRÊT Clignotement Puissance restante de la batterie 75 % à 100 % 50 % à 100 % 50 % à 75 % 25 % à 50 % 20 % à 50 % 0 % à 25 % 0 % à 20 % Chargez la batterie. La batterie peut avoir présenté un défaut de fonctionnement.
Pour démarrer l’outil, saisissez la poignée arrière (le levier de sécurité est déverrouillé par la saisie), puis tirez la gâchette. Pour arrêter l’outil, relâchez la gâchette. NOTE: • Lorsque l’outil fonctionne en marche inverse, celui-ci ne fonctionnera que pendant un court moment avant d’être automatiquement éteint. • Une fois l’outil arrêté, il fonctionnera de nouveau dans le sens habituel au prochain démarrage.
Installation du manche 2 1 4 1. Poignée 2. Boulon hexagonal 3. Couvercle 4. Fixation 5. Étrier de fixation 1 3 2 3 5 4 015392 Insérez la clé hexagonale dans l’orifice du carter du moteur, puis serrez la rondelle d'appui à l’aide de la clé hexagonale jusqu'à ce qu'elle se bloque. Placez la tête à fils de nylon directement sur l’arbre fileté et serrez-la en la tournant dans le sens inverse des aiguilles d’une montre. Retirez la clé hexagonale.
1. 80 à 100 mm 1 015394 013823 ENTRETIEN Coupez une longueur de fil de nylon de 3 m (10 pi). Pliez la ligne de coupe en deux moitiés, dont l’une sera plus longue de 80 à 100 mm (3 à 4") que l’autre. AVERTISSEMENT: Assurez-vous toujours que l’outil est hors tension et la batterie retirée avant d'effectuer une inspection ou un entretien sur l’outil. Si vous ne respectez pas cette précaution, vous risquez de graves blessures dues à un démarrage accidentel.
Montez la bobine sur le couvercle, de sorte que les rainures et les saillies de la bobine correspondent à celles du couvercle. Enfin, retirez les extrémités du fil de nylon de leur position temporaire et engagez-les dans les œillets pour que le fil de nylon sorte du couvercle. 015398 Alignez la saillie de la partie inférieure du couvercle avec les encoches des œillets. Puis enfoncez à fond le couvercle sur le boîtier pour le fixer. Assurez-vous que les ergots de verrouillage sont bien fixés au couvercle.
DÉPANNAGE Avant de demander la réparation, commencez par mener votre propre inspection. Si vous rencontrez un problème non recensé dans ce manuel, ne démontez pas l’outil, cela est imprudent. Demandez plutôt de l’aide à une usine ou un centre de service après-vente Makita agréé, et utilisez toujours des pièces de remplacement Makita. État du dysfonctionnement Cause La batterie n'est pas installée. Le moteur ne s'allume pas. Le moteur démarre et s'arrête aussitôt.
ACCESSOIRES EN OPTION • GARANTIE LIMITÉE D’UN AN MAKITA Politique de garantie Chaque outil Makita est inspecté rigoureusement et testé avant sa sortie d’usine. Nous garantissons qu’il sera exempt de défaut de fabrication et de vice de matériau pour une période d’UN AN à partir de la date de son achat initial. Si un problème quelconque devait survenir au cours de cette période d’un an, veuillez retourner l’outil COMPLET, port payé, à une usine ou à un centre de service après-vente Makita.
ESPAÑOL (Instrucciones originales) ESPECIFICACIONES Modelo XRU09 Tipo de mango Redondo Velocidad sin carga (RPM) 5 000 / 6 500 r/min Longitud total 1 754 mm (69") Diámetro del cordón de nailon 2,0 mm - 2,3 mm (0,08" - 0,09") Pieza cortadora aplicable Cabeza cortadora de nailon (nylon) Cabeza cortadora de nailon (nylon) Diámetro de corte 350 mm (13-3/4") 350 mm (13-3/4") Peso neto 4,0 kg (8,8 lbs) Tensión nominal 4,5 kg (9,9 lbs) 36 V c.c.
Uso intencionado de la herramienta 1. 2. Utilice la herramienta adecuada. La desbrozadora inalámbrica a batería está diseñada sólo para cortar césped y maleza ligera. No deberá usarse para ningún otro propósito como el reborde o podar cercos de setos, lo cual puede que resulte en lesiones. Use solamente los accesorios y aditamentos que se recomienden por el fabricante. El uso de cualquier otro accesorio o aditamento puede que aumente el riesgo de lesiones. 010821 6. Equipo de protección personal 1. 2.
6. 7. 8. 9. 4. No arroje la(s) batería(s) al fuego, puede que la pila produzca una explosión. Consulte con las regulaciones de la localidad para indicaciones sobre el manejo de estos desechos. No abra ni mutile la(s) batería(s). El electrolito liberado es una sustancia corrosiva y puede que cause daños a la piel y los ojos. Esta sustancia puede ser tóxica si llega a ser ingerida. No recargue la batería bajo la lluvia ni en lugares mojados.
13. 14. 15. 16. 17. Salvo en caso de emergencia, nunca deje caer ni arroje la herramienta al suelo ya que podría dañarse severamente. Nunca arrastre la herramienta por el suelo al moverla de un lugar a otro, ya que con ello podría dañarse.
4. En caso de que ingresen electrolitos en sus ojos, enjuáguelos bien con agua limpia y consulte de inmediato a un médico. Podría perder la visión. 5. No cortocircuite el cartucho de batería: (1) No toque las terminales con ningún material conductor. (2) Evite guardar el cartucho de batería en un cajón junto con otros objetos metálicos, tales como clavos, monedas, etc. (3) No exponga la batería de cartucho a la lluvia o nieve.
DESCRIPCIÓN DE LAS PIEZAS 1 2 3 7 8 4 5 6 9 Palanca de desbloqueo 1 Cartucho de batería 2 3 Gatillo interruptor 4 Luz indicadora de encendido 5 Botón de alimentación principal 6 Botón de reversa 7 Colgador 8 Empuñadura 9 Protector (protector de la pieza cortadora) 015789 33
NOTA: • La herramienta no funciona con solo un cartucho de batería. DESCRIPCIÓN DEL FUNCIONAMIENTO • Sistema de protección de la herramienta / batería ADVERTENCIA: Asegúrese siempre de que la herramienta esté apagada y el cartucho de batería extraído antes de realizar cualquier ajuste o revisión en la herramienta. No seguir esta indicación de apagar y extraer el cartucho de batería de la herramienta puede que resulte en graves lesiones personales debido al arranque accidental.
Presione el botón de revisión para que los indicadores de la batería muestren la capacidad restante de las baterías. Los indicadores de la batería corresponden a cada batería. Indicador de la capacidad restante de la batería Indicación de la capacidad restante de la batería (Solo para cartuchos de batería con una "B" al final del número de modelo.) 1. Luces indicadoras 2.
1 1. Botón de reversa 1. Palanca de desbloqueo 2. Gatillo interruptor 1 2 015388 015791 Para evitar que el gatillo interruptor sea jalado accidentalmente, se proporciona una palanca de bloqueo. Para arrancar la herramienta, sujete el manto trasero (la palanca de desbloqueo se libera con la sujeción) y luego jale el gatillo interruptor. Para parar la herramienta, suelte el gatillo interruptor. Esta herramienta cuenta con un botón de reversa que invierte la dirección de rotación.
Alinee la prensa de sujeción en el tubo con el protector. Luego apriételos con los pernos. NOTA: Si el cordón de nailon (nylon) no reacciona con el ligero golpeteo de la cabeza, retracte/reemplace el cordón de nailon (nylon) siguiendo los procedimientos descritos en "Mantenimiento".
• OPERACIÓN Manejo correcto de la herramienta Postura correcta • • ADVERTENCIA: Posicione siempre la herramienta sobres su costado derecho. Posicionar correctamente la podador permite un óptimo control y reducirá el riesgo de graves lesiones a la persona causados por algún retroceso brusco. Tenga extremo cuidado en mantener control sobre la herramienta durante este momento. No deje que la herramienta se desvíe hacia usted ni hacia otra persona alrededor.
013825 Embobine todo, dejando alrededor de 100 mm (4”) de los cordones, dejando los extremos temporalmente enganchados a través de la mueca en el costado del carrete. 013826 Coloque el carrete en la carcasa de tal forma que los dientes y protuberancias sobre encajen como corresponda. Y ahora desenganche los extremos del cordón de su posición temporal e introdúzcalos por los ojales para que salgan de la cubierta.
RESOLUCIÓN DE PROBLEMAS Antes de solicitar algún servicio de reparación, primera realice su propia inspección. No desmantele la herramienta de manera compulsiva si detecta algún problema que no se explica en este manual. En su lugar, consulte con un centro de servicio o de manufactura autorizado de Makita, usando siempre piezas de repuesto Makita. Condición del funcionamiento defectuoso El motor no se activa. El motor deja de correr al poco tiempo de estar activo. No se alcanza el nivel máximo de RPM.
ACCESORIOS OPCIONALES • GARANTÍA LIMITADA MAKITA DE UN AÑO Ésta Garantía no aplica para México ADVERTENCIA: No coloque una cuchilla distinta a esta herramienta y solo use los accesorios o aditamentos recomendados como se indica en este manual. El uso de una cuchilla distinta o de cualquier otro accesorio o aditamento puede que resulte en graves lesiones a la persona. Política de garantía Cada herramienta Makita es inspeccionada y probada exhaustivamente antes de salir de fábrica.
Makita Corporation 3-11-8, Sumiyoshi-cho, Anjo, Aichi 446-8502 Japan 885501-944 44 www.makita.
DC18RD Two Port Multi Fast Charger Chargeur Rapide 2 Batteries Multi-Cargador Rápido de Dos Puertos IMPORTANT: Read Before Using. IMPORTANT : Lire ce qui suit avant d’utiliser cet outil. IMPORTANTE: Leer antes de usar. Symbols The followings show the symbols used for the charger and battery. Be sure that you understand their meaning before use. Symboles Nous donnons ci-dessous les symboles utilisés pour le chargeur et la batterie.
• Cooling abnormality • Problème de refroidissement • Anormalidad en la carga • Do not short batteries. • Ne jamais court-circuiter les bornes d’une batterie. • No provoque un cortocircuito en las baterías.
ENGLISH SPECIFICATIONS Model DC18RD Input A.C. 120 V 50 – 60 Hz / 50/60 Hz Output Weight For MAKITA Battery D.C. 7.2 V / 7.2 V – 18 V For USB Device D.C. 5 V / D.C. 1.5 A 1.9 kg (4.127 lbs) • Manufacturer reserves the right to change specifications without notice. • Note: Specifications may differ from country to country. • Weight according to EPTA-Procedure 01/2003. IMPORTANT SAFETY INSTRUCTIONS CAUTION: 1. 2. 3. 4. 5. 6. 7. 8. 9. 10. 11. 12. 13. 14. 15. 16. 17. 18.
Changing melody sound of completed charging 1. 2. 3. 4. 5. 6. Insert the battery cartridge into the charging port that you want to change the melody sound of completed charging. It brings out the last preset brief melody sound of completed charging. Removing and re-inserting it within five seconds after this action makes the melody sound change. Every time removing and re-inserting it within another five seconds after this, the melody sound changes in order.
Using with USB device This charger works as an external power supply for USB device. 1. Open the cover of the USB power supply port. Connect the USB cable to the USB power supply port and USB device. 2. Plug the charger into a power source. 3. After charging, unplug the charger. Note: • The charger may not supply power to some USB devices. • Before connecting USB device to the charger, always backup your data of USB device. Otherwise your data may lose by any possibility.
FRANÇAIS SPÉCIFICATIONS Modèle DC18RD Entrée C.A. 120 V 50 – 60 Hz / 50/60 Hz Sortie Poids Pour les batteries MAKITA C.C. 7,2 V / 7,2 V – 18 V Pour le dispositif USB C.C. 5 V / C.C. 1,5 A 1,9 kg (4,127 lbs) • Le fabricant se réserve le droit de modifier sans avertissement les spécifications. • Remarque : Les spécifications peuvent varier selon les pays. • Poids selon la procédure EPTA 01/2003. LES CONSIGNES DE SECURITE IMPORTANTES ATTENTION : 1. 2. 3. 4. 5. 6. 7. 8. 9. 10. 11. 12. 13. 14. 15.
Chargement des batteries MAKITA Ce chargeur permet de charger deux batteries simultanément. 1. Branchez le chargeur sur une source de courant alternatif dont la tension est adaptée. Le témoin de charge clignote en vert de manière répétée. 2. Insérer la batterie dans le chargeur jusqu’à ce qu’elle s’arrête, ajustée sur le guide du chargeur. Le couvre-bornes du chargeur peut être ouvert en insérant la batterie, et fermé en la retirant. 3.
Charge de remise en condition La charge de remise en condition peut faire augmenter la durée de vie de la batterie en effectuant automatiquement une recherche du niveau de charge optimale des batteries dans toute situation. Une batterie utilisée à plusieurs reprises dans les conditions suivantes nécessitera une “charge de remise en condition” pour éviter qu’elle ne s’use rapidement. Dans ce cas, le témoin jaune s’allume. 1. Recharge de la batterie alors qu’elle est très chaude. 2.
ESPAÑOL ESPECIFICACIONES Modelo Entrada Salida Peso DC18RD 120 V 50 – 60 Hz / 50/60 Hz Para batería MAKITA 7,2 V cc / 7,2 V cc – 18 V cc Para dispositivo USB 5 V cc / 1,5 A cc 1,9 kg (4,127 lbs) • El fabricante se reserva el derecho a cambiar las especificaciones sin aviso. • Nota: Las especificaciones podrán cambiar de un país a otro. • Peso de acuerdo con el procedimiento EPTA 01/2003. INSTRUCCIONES DE SEGURIDAD IMPORTANTES PRECAUCION: 1. 2. 3. 4. 5. 6. 7. 8. 9. 10. 11. 12. 13. 14. 15. 16. 17.
Carga de baterías MAKITA Este cargador puede cargar dos baterías al mismo tiempo. 1. Enchufe el cargador en una toma de corriente de la tensión de CA apropiada. La luz de carga parpadeará en color verde repetidamente. 2. Inserte el cartucho de batería en el cargador hasta que haga tope ajustándose a la guía del cargador. La tapa del terminal del cargador se abre al insertar el cartucho de batería y se cierra al sacarlo. 3.
Carga de acondicionamiento La carga de acondicionamiento puede alargar la vida útil de la batería buscando automáticamente la condición óptima para la carga de la batería en cualquier situación. La batería empleada en las siguientes condiciones repetidamente requerirá una “carga de acondicionamiento” para evitar que su vida de servicio no se acorte rápidamente. En ese caso, se encenderá la luz amarilla. 1. Si la carga estando caliente. 2. Si la carga estando fría. 3.
Makita Corporation 3-11-8, Sumiyoshi-cho, Anjo, Aichi 446-8502 Japan 885372-949 IDE www.makita.