
Use and Care Manual


6 ENGLISH
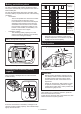
Indication lamp with multi function
1
► 1. Indicating lamp
Indication lamps are located in two positions.
— Battery cartridge replacing signal
—
When the battery power is almost used up
during operation, the red lamp lights up and the
tool stops immediately. Replace the battery with
fully charged one when the red lamp lights up.
— Accidental re-start preventive function
—
Even if the battery cartridge is inserted on the
tool with the slide switch in the "I (ON)" position,
the tool does not start. At this time, the lamp
ickers slowly and this shows that the acciden-
tal re-start preventive function is at work.
— To start the tool, rst slide the slide switch
toward the "O (OFF)" position and then slide
it toward the "I (ON)" position.
ASSEMBLY
CAUTION:
• Always be sure that the tool is switched off and
the battery cartridge is removed before carrying
out any work on the tool.
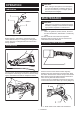
Adjusting the blade clearance
Adjust the clearance between the side blade and
the center blade according to the thickness of the
workpiece.
1
2
► 1. Hex wrench 2. Screw
First use a hex wrench to loosen the screw.
1
2
3
4
5
► 1. Center blade 2. Thickness gauge 3. Side blade
4. Hex wrench 5. Hex socket head bolt
Then use the hex wrench to adjust the clearance by
tightening or loosening the bolt. There may be a slight
difference between clearance of both sides of the center
blade.
Check the smaller clearance with the thickness gauge
and adjust it.
When using the thickness gauge to adjust the blade
clearance, refer to the table.
Workpiece thickness (mm) Marking on thickness gauge
Less than 0.8 0.5
0.8 - 1.3 1.0
More than 1.3 1.5
After adjusting the clearance, tighten the screw
securely.
Storing hex wrench
1
► 1. Hex wrench
Store the hex wrench as shown in the gure when not
in use.