
Use and Care Manual


8
English
ASSEMBLY
CAUTION:
Always be sure that the machine is switched o and the battery cartridge is removed before carrying out any work on
the machine.
CAUTION:
Make sure that the all parts are securely assembled so that the liquid does not leak when operating the machine.
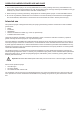
Assembly of the spray wand
Note: The items such as nozzles and cup are included in the tank.
1. Remove the cap from the handle.
2. Make sure the O-ring is in place, then thread the spray wand onto the handle and tighten it securely. Refer to
Figure 1.
1 Vertical type 2-head Nozzle 2 Spray wand 3 O-ring
4 Handle 5 Cap 6 Weedkiller nozzle
Figure 1
Carrying strap
Attach the carrying strap to the hangers of the machine and fastening hooks for the belt in position.
Slip the belt over your shoulders and adjust the length of the belt. After that, fasten the belt so that you can work
without fatigue.
To adjust belt length, pull on the two ends of the belt to shorten it or on the two belt release mechanisms to extend it.
Refer to Figure 2.
1 Hanger 2 Fastening hooks
Figure 2