EN Job Site Radio Instruction manual FRCA Radio de chantier Manuel d’instructions ESMX Radio de Trabajo Manual de instrucciones XRM05 IMPORTANT: Read Before Using. IMPORTANT : Lisez les instructions avant l’utilisation. IMPORTANTE: Leer antes de usar.
12 10 2 3 14 1 4 5 6 7 8 9 (22) (21) 13 L K A B C J PM I D 20 H E G F 11 (23) 1 2 (24)
14 15 15 11 15 15 16 2 3 17 18 19 17 18 4 5 19 19 6 19 7 3
10 25 26 8 9 10 8 9 10 4 11
ENGLISH (Original instructions) IMPORTANT SAFETY INSTRUCTIONS WARNING: When using electric tools, basic safety precautions should always be followed to reduce the risk of fire, electric shock, and personal injury, including the following: 1. Read this instruction manual and the charger instruction manual carefully before use. 2. Clean only with dry cloth. 3. Do not block any ventilation opening. Install in accordance with the manufacturer’s instruction. 4.
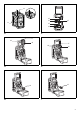
Features: • • • • • • • • • • • AM/FM-stereo PLL Synthesized Large LCD display with illumination Manual/Preset/Scan tuning Rotary tuning and volume control 5 preset stations each band Time and 2 alarm timers (radio and HWS buzzer) with Snooze Adjustable sleep (auto shut off) timer Stereo speaker for rich sound performance Ultra rugged design Water resistant to IPX 4 Powered by both Makita battery pack and supplied power adaptor Explanation of general view (Fig. 1) Controls: 1. Power and Sleep timer 2.
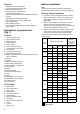
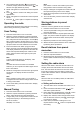
Note: Table regarding to the battery operating time above is for reference. The actual operating time may differ with the type of the battery, charging condition, or usage environment. Indicator lamps Remaining capacity Lighted Off Blinking Installing or removing Slide battery cartridge (Fig. 4 & 5) 75% to 100% • To install the battery cartridge, align the tongue on the battery cartridge with the groove in the housing and slip it into place.
3. Long press the time set button for more than 2 seconds, display will flash time set symbol and also the hour digit, followed by a beep. 4. Rotate Tuning/Volume control knob to set the required hour. 5. Press button to confirm hour setting, the minute digit will flash. 6. Rotate Tuning/Volume control knob to set the required minute. 7. Press the button again to complete clock setting. Operating the radio This radio equips with three tuning methods - Scan tuning, Manual tuning and Memory presets recall.
b. Setting radio alarmed station 1. During setting radio alarm time and radio alarm symbol is flashing, press Band button to activate the radio to select required wake-up band and station by manual tuning and recall the preset stations. Press button to complete radio alarm setting. Display will show . 2. When above radio alarm time and station are set, press and hold down radio alarm button for 2 seconds followed by a beep to switch alarm on or off. Display will show when radio alarm is set.
Dimension (W x H x D) in mm 280 x 302 x 163 (11” x 11-7/8” x 6-3/8”) Weight Battery cartridge (kg) (Without battery) BL0715 BL7010 (lbs) 4.0 8.9 4.1 9.1 4.2 9.3 4.3 9.5 4.4 9.7 4.5 10.0 4.6 10.
FRANÇAIS (Mode d’emploi original) CONSIGNES DE SÉCURITÉ IMPORTANTES AVERTISSEMENT : Lors de l’utilisation d’outils électriques, il faut toujours prendre des précautions élémentaires de sécurité, dont les suivantes, pour réduire les risques d’incendie, de décharge électrique et de blessure. 1. Lisez attentivement ce manuel d’instructions et celui du chargeur avant l’utilisation. 2. Nettoyez uniquement avec un chiffon sec. 3. Ne bloquez aucun orifice de ventilation.
Pour les États-Unis : Attention à l’intention de l’utilisateur Tout changement ou modification non expressément approuvés par la partie responsable de la conformité peut entraîner l’annulation du droit de l’utilisateur à utiliser cet appareil.
les polarités comme indiqué dans le compartiment. Remettre le couvercle. 3. Après avoir introduit les batteries de secours, mettre les batteries principales dans la radio. Les batteries compatibles pour cette radio sont répertoriées dans le tableau suivant. Le tableau suivant indique le temps de fonctionnement par charge.
0 % à 25 % 2. A l’écran apparaît « -: - - » quand les batteries de secours sont installées. 3. Appuyer sur le bouton de réglage de l’heure plus de 2 secondes. Le symbole clignote à l’écran, ainsi que le chiffre des heures, suivi d’un bip. 4. Tourner le bouton de commande Réglage/Volume pour sélectionner l’heure. 5. Appuyer sur le bouton pour confirmer. Le chiffre des minutes clignote. 6. Tourner le bouton de commande Réglage/Volume pour sélectionner la minute. 7.
2. Sélectionner la bande de fréquence en appuyant sur le bouton de fréquence. Régler l’antenne comme indiqué ci-dessus. 3. Une simple rotation du bouton de commande Réglage/Volume modifiera la fréquence : FM : 50 ou 100 kHz AM (MW) : 9 ou 10 kHz Remarque : Si le volume de la radio est préréglé, appuyer sur le bouton de réglage pour avoir un nouveau statut. 4. Tourner le bouton de commande Réglage/Volume jusqu’à ce que la fréquence requise apparaisse sur l’écran. 5.
Fonction « Sieste » 1. Quand l’alarme fonctionne, appuyer sur n’importe quel bouton, sauf le bouton de mise en marche, pour arrêter l’alarme. L’alarme radio ou le buzzer reste silencieux par intervalle de 5 minutes. 2. Le symbole « sieste » et le symbole d’alarme clignotent à l’écran. La fonction « sieste » peut être active pendant une heure. Fonction « Sommeil » La fonction de sommeil arrête automatiquement la radio en fonction de l’heure choisie pour l’arrêt. 1.
Poids Batterie (kg) (lbs) (sans batterie) 4,0 8,9 4,1 9,1 4,2 9,3 4,3 9,5 4,4 9,7 4,5 10,0 4,6 10,2 BL0715 BL7010 BL1014 BL1016 BL1021B BL1415 BL1415N BL1041B BL1815 BL1815N BL1820 BL1820B BL1430 BL1430B BL1440 BL1450 BL1460B BL1830 BL1830B BL1840 BL1840B BL1850 BL1850B BL1860B 17
ESPAÑOL (Instrucciones originales) INSTRUCCIONES IMPORTANTES DE SEGURIDAD ADVERTENCIA: Cuando utilice herramientas eléctricas, deberá tomar siempre precauciones de seguridad básicas, incluyendo las siguientes, para reducir el riesgo de incendios, descargas eléctricas y heridas personales: 1. Lea este manual de instrucciones y el manual de instrucciones del cargador con cuidado antes de usar. 2. Limpie sólo con un paño limpio. 3. No obstruya ninguna apertura de ventilación.
Para Estados Unidos: Precauciones para el usuario Los cambios o modificaciones que no hayan sido expresamente autorizados por la entidad responsable por el cumplimiento de las regulaciones podrían anular la autoridad del usuario de utilizar este equipo.
2. Retire la cubierta del compartimento para pilas de respaldo e inserte 2 pilas nuevas UM-3 (tamaño AA). Asegúrese de colocar las pilas con la polaridad correcta como se indica adentro del compartimento. Vuelva a colocar la cubierta de batería. 3. Una vez colocadas las pilas de respaldo, inserte el paquete de baterías principal que alimentará la radio. Los paquetes de baterías adecuados para esta radio se listan en la tabla que se muestra a continuación.
Luces indicadoras Capacidad restante Encendidas Apagadas Parpadeando 75% a 100% 50% a 75% 25% a 50% 0% a 25% Recargue la batería. Puede que haya habido un mal funcionamiento de la batería. 2. La pantalla mostrará “-: - -” cuando al colocar las pilas de respaldo. 3. Presione prolongadamente el botón para el ajuste hora durante más de 2 segundos, la pantalla mostrará el símbolo de ajuste , así como el dígito para la hora seguido de un pitido. 4.
5. Para apagar la radio, presione el botón encendido. La pantalla mostrará “OFF”. Sintonía manual 1. Presione el botón de encendido de la radio para encenderla. 2. Seleccione la banda de frecuencia requerida al presionar el botón para la banda de frecuencia. Ajuste la antena como se describe anteriormente. 3.
El pitido de la alarma se acortará cada 15 segundos durante un minuto seguido de un minuto de silencio antes de que el ciclo se repita. La alarma de timbre HWS continuará sonando durante una hora, salvo que sea apagada mediante el botón de encendido. Al presionar el botón de encendido mientras la alarma se encuentra sonando cancelará su funcionamiento por un periodo de 24 horas. 1. La alarma de timbre HWS puede ajustarse ya sea con la radio encendida o apagada. 2.
Terminal de entrada 3,5 mm de dia.
DC18RA DC18RC Fast Charger Chargeur rapide Cargador rápido Symbols The followings show the symbols used for the charger and battery. Be sure that you understand their meaning before use. Symboles Nous donnons ci-dessous les symboles utilisés pour le chargeur et la batterie. Assurez-vous que vous en avez bien compris la signification avant d’utiliser l’outil. Símbolos A continuación se muestran los símbolos utilizados con el cargador y la batería. Asegúrese de que entiende su significado antes de usarla.
• Do not short batteries. • Ne jamais court-circuiter les bornes d’une batterie. • No provoque un cortocircuito en las baterías. IMPORTANT: Read Before Using. IMPORTANT : Lire ce qui suit avant d’utiliser cet outil. IMPORTANTE: Leer antes de usar.
ENGLISH Specifications Model DC18RA Input DC18RC A.C. 120 V 50 – 60 HZ Output Weight D.C. 7.2 V – 18 V 0.88 kg (1.94 lbs) 0.77 kg (1.70 lbs) • Manufacturer reserves the right to change specifications without notice. • Note: Specifications may differ from country to country. • Weight according to EPTA-Procedure 01/2003. IMPORTANT SAFETY INSTRUCTIONS CAUTION: 1. 2. 3. 4. 5. 6. 7. 8. 9. 10. 11. 12. 13. 14. 15. 16. 17.
5. With finish of charge, the green light remains lit with the red light going out and the melody sound preset at the insertion of battery cartridge or buzzer sound (a long beep) comes out to notify completion of charge. (In selected silent mode, no sounds come out.) 6. Preset melody sound remains stored even when the charger is unplugged. NOTE: • The battery charger is for charging Makita-battery cartridge. Never use it for other purposes or for other manufacturer’s batteries.
FRANÇAIS Spécifications Modèle Entrée DC18RA DC18RC C.A. 120 V 50 – 60 Hz Sortie Poids C.C. 7,2 V – 18 V 0,88 kg (1,94 lbs) 0,77 kg (1,70 lbs) • Le fabricant se réserve le droit de modifier sans avertissement les spécifications. • Remarque : Les spécifications peuvent varier selon les pays. • Poids selon la procédure EPTA 01/2003. LES CONSIGNES DE SECURITE IMPORTANTES ATTENTION : 1. 2. 3. 4. 5. 6. 7. 8. 9. 10. 11. 12. 13. 14. 15. 16. 17.
Changer la mélodie de charge terminée 1. Lorsque vous insérez la batterie dans le chargeur, le chargeur émet la dernière courte mélodie préréglée d’indication de charge terminée. 2. Si vous retirez et réinsérez la batterie dans les cinq secondes qui suivent cette action, la mélodie changera. 3. Chaque fois que vous retirez et réinsérez la batterie dans les cinq secondes par la suite, la mélodie change dans l’ordre préétabli. 4.
Tension 9,6 V 12 V 14,4 V Nombre de cellules 8 10 12 Cartouche de batterie au Ni-MH Capacité (Ah) Temps de charge (en minutes) 20 — — — 1,7 BH9020A — — 2,0 20 — BH1220/C BH1420 2,0 15 20 — — — 2,7 BH9033A — — 3,3 30 — BH1233/C BH1433 3,3 22 Tension 14,4 V 18 V 14,4 V 18 V Nombre de cellules 4 5 8 10 Cartouche de batterie au Li-ion BL1415 BL1815 — — 15 — — BL1430 BL1830 22 Temps de charge (en minutes) Note : • La charge complète peut prendre jusqu’
ESPAÑOL Especificaciones Modelo DC18RA 120 V Entrada Salida Peso DC18RC 50 – 60 Hz 7,2 V cc – 18 V cc 0,88 kg (1,94 lbs) 0,77 kg (1,70 lbs) • El fabricante se reserva el derecho a cambiar las especificaciones sin aviso. • Nota: Las especificaciones podrán cambiar de un país a otro. • Peso de acuerdo con el procedimiento EPTA 01/2003. INSTRUCCIONES DE SEGURIDAD IMPORTANTES PRECAUCION: 1. 2. 3. 4. 5. 6. 7. 8. 9. 10. 11. 12. 13. 14. 15. 16. 17.
Cambio de la melodía de carga terminada 1. 2. 3. 4. Al insertar el cartucho de batería en el cargador se emite el último sonido de melodía breve programado. El sonido de melodía puede cambiarse extrayendo y reinsertando antes de cinco segundos el cartucho de batería. Cada vez que se extraiga y reinserte antes de otros cinco segundos, el sonido de melodía cambiará en orden. Cuando se emita el sonido de melodía deseado, deje el cartucho de batería insertado y comenzará la carga.
Tensión 9,6 V cc 12 V cc 14,4 V cc Número de celdas 8 10 12 Capacidad (Ah) Cartucho de batería Ni-MH Tiempo de carga (minutos) — — — 1,7 Ah 20 min BH9020A — — 2,0 Ah 20 min — BH1220/C BH1420 2,0 Ah 15 min — — — 2,7 Ah 20 min BH9033A — — 3,3 Ah 30 min — BH1233/C BH1433 3,3 Ah 22 min Tensión 14,4 V cc 18 V cc 14,4 V cc 18 V cc Número de celdas 4 5 8 10 Cartucho de batería Li-ion BL1415 BL1815 — — 15 min — — BL1430 BL1830 22 min Tiempo de carga (min
11
Makita Corporation 3-11-8, Sumiyoshi-cho, Anjo, Aichi 446-8502 Japan 884676H946 IDE www.makita.
GB F LS Cordless LED Flashlight Instruction manual Lampe Torche LED Manuel d’instructions Linterna LED Inalámbrica Manual de instrucciones DML807 IMPORTANT: Read Before Using. IMPORTANT : Lire avant usage. IMPORTANTE: Lea antes de usar.
6 5 3 2 1 4 1 2 7 8 3 2 4
ENGLISH Diagram Legend 1. 2. 3. 4. 5. 6. Battery Battery release button Red indicator Switch Main LED (20 pcs.) Sub LED (1 pc.) 7. 8. Metal hook USB power supply port SPECIFICATIONS Model DML807 Major Features Voltage DC 14.4 V/18 V Main LED 0.5 W x 20 pcs. LED USB power supply Sub LED 2.0 W x 1 pc. Port USB A type Output voltage DC 5 V Output current Standard battery cartridge Operating time (approximately) 2.1 A Main LED (20 pcs.) when lit Main LED (10 pcs.) when lit Sub LED (1 pc.
8. Do not touch the inside of the flashlight head with tweezers, metal tools, etc. 9. Under abusive conditions, liquid may be ejected from the battery, avoid contact. If contact accidentally occurs, flush with water. If liquid contacts eyes, additionally seek medical help. Liquid ejected from the battery may cause irritation or burns. 10. Do not short the battery cartridge: (1) Do not touch the terminals with any conductive material.
Press the switch as shown below to change modes. Main LED (20 pcs.) light up • Shoulder strap • Makita genuine battery and charger NOTE: • Some items in the list may be included in the luminaire package as standard accessories. They may differ from country to country. Main LED (10 pcs.) light up* Sub LED (1 pc.) light up OFF * The LEDs of the two rows on the opposite side of the switch light up. Metal hook (Fig. 3) Pivot the metal hook upright before using it. The hook can be turned at 360° and removed.
FRANÇAIS Légende du schéma 1. 2. 3. 4. 5. Batterie Bouton de dégagement de la batterie Indicateur rouge Interrupteur DEL principale (20 unités) 6. 7. 8. DEL secondaire (1 unité) Crochet métallique Port d’alimentation USB SPÉCIFICATIONS Modèle DML807 Caractéristiques principales Tension 14,4 V/18 V c.c. DEL principale 0,5 W x 20 unités DEL Alimentation USB DEL secondaire 2,0 W x 1 unité Port USB Type A Puissance de sortie 5 V c.c.
objets métalliques, conducteurs potentiels entre une borne et une autre. Un court-circuit entre les bornes de la batterie peut provoquer des étincelles, des brûlures ou un incendie. 7. Après la charge ou avant un entretien ou un nettoyage, débranchez le chargeur de la source d’alimentation. 8. Ne touchez pas l’intérieur de la lampe torche avec des brucelles, des outils métalliques, etc. 9.
• Ne forcez pas sur la batterie pour l’installer. Si la batterie ne glisse pas facilement, c’est qu’elle n’est pas insérée correctement. Actionnement de l’interrupteur (Fig. 2) ATTENTION : • Ne regardez pas la lampe à DEL et n’observez pas la source de lumière directement. Appuyez sur l’interrupteur de la façon illustrée ci-dessous pour changer le mode.
ESPAÑOL Leyenda del diagrama 1. 2. 3. 4. 5. 6. Batería Botón de liberación de la batería Indicador rojo Interruptor LED principal (20 piezas) LED secundario (1 pieza) 7. 8.
6. Cuando no se esté usando el cartucho de batería, manténgalo alejado de otros objetos metálicos, como sujetapapeles (clips), monedas, llaves, clavos, tornillos u otros objetos pequeños de metal, los cuales pueden actuar creando una conexión entre las terminales de la batería. Si ocasiona un cortocircuito uniendo los terminales de la batería puede provocar, chispas, quemaduras o un incendio. 7.
Para colocar el cartucho de batería, alinee la lengüeta sobre el cartucho de batería con la ranura en la carcasa y deslice en su lugar. Inserte por completo hasta que se fije en su lugar con un pequeño clic. Si puede ver el indicador rojo del lado superior del botón, esto indica que no ha quedado fijo por completo. PRECAUCIÓN: • Introduzca siempre completamente el cartucho de batería hasta que el indicador rojo no pueda verse.
Makita Corporation 3-11-8, Sumiyoshi-cho, Anjo, Aichi 446-8502 Japan DML807-NA3-0815 ALA www.makita.
GB L.E.D. Flashlight Instruction manual F Lampe Torche à L.E.D.
2 3 4 1 1 2 5 6 3 4 5 6 5 2
ENGLISH (Original instructions) Explanation of general view 1. 2. Battery cartridge Red indicator 3. 4. Button Switch 5. 6. Strap hook Ring SPECIFICATIONS Model DML802 LED 3.2 W x 1 pc Standard battery cartridge BL1415 Voltage BL1440 BL1815 BL1815N 14.4 V Operating hours (approx.) 4 L Dimensions (with battery) BL1430 256 mm (10-1/8”) 9 14 272 mm (10-3/4”) W BL1840 6 7.5 256 mm (10-1/8”) 13 20 272 mm (10-3/4”) 79 mm (3-1/8”) H Net weight BL1830 18 V 99 mm (3-7/8”) 0.
10. If any problem develops, consult your nearest Makita Service Center or dealer. To maintain product safety and reliability, repairs, maintenance or adjustment should be carried out by Makita Authorized Service Center. Battery protection system SAVE THESE INSTRUCTIONS. The protection system is equipped, which automatically cuts off the output power for its long service life. The light goes off during operation when the remaining battery capacity gets low.
FRANÇAIS (Mode d’emploi original) Explication de la vue générale 1. 2. Batterie Témoin rouge 3. 4. Bouton Interrupteur 5. 6. Crochet de bandoulière Anneau CARACTÉRISTIQUES TECHNIQUES Modèle DML802 LED 3,2 W x 1 unité Batterie standard BL1415 Tension BL1440 BL1815 BL1815N 14,4 V Heures de fonctionnement (Environ) Dimensions (incluant la batterie) BL1430 L. 4 9 256 mm (10-1/8 po) 14 6 272 mm (10-3/4 po) P.
d’entretien ou d’une réparation. Un remontage incorrect peut entraîner une décharge électrique ou un incendie. 7. N’utilisez les outils qu’avec leurs batteries spécifiques. D’autres batteries risqueraient de vous blesser ou de provoquer un incendie. 8. Cessez immédiatement l’utilisation si le temps de fonctionnement devient excessivement court. Il existe un risque de surchauffe, de brûlures, voire d’explosion. 9. N’utilisez pas une batterie si elle est endommagée. 10.
ESPAÑOL (Instrucciones originales) Explicación de vista general 1. 2. Cartucho de batería Indicador rojo 3. 4. Botón Interruptor 5. 6. Gancho de la correa Anillo ESPECIFICACIONES Modelo DML802 INDICADOR LUMINISCENTE 3,2 W x 1 pza. Cartucho de batería estándar BL1415 Tensión BL1440 BL1815 BL1815N 14,4 V Horas de operación (Aprox.
4. No exponga la luz de manera continua a los ojos. Esto podría lastimarlos. 5. No cubra ni obstruya la herramienta encendida con trapos, cartones, etc. Cubrirla u obstruirla puede encender en fuego. 6. No desarme el cargador ni el cartucho de la batería; acuda a un técnico de servicio calificado cuando se requiera de servicio o reparación. Un ensamblado incorrecto podría resultar en riesgo de descarga eléctrica o incendio. 7.
ACCESORIOS OPCIONALES PRECAUCIÓN: Estos accesorios o aditamentos están recomendados para utilizarse con su herramienta Makita especificada en este manual. El empleo de cualquier otro accesorio o aditamento puede conllevar el riesgo de lesiones personales. Los accesorios o aditamentos deben solamente ser utilizados para el propósito con el que fueron hechos.
10
11
Makita Corporation 3-11-8, Sumiyoshi-cho, Anjo, Aichi 446-8502 Japan DML802-NA3-1113 ALA www.makita.