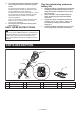
INSTRUCTION MANUAL MANUAL DE INSTRUCCIONES Cordless Multi Function Power Head Herramienta Multifuncional Inalámbrica XUX01 IMPORTANT: Read Before Using. IMPORTANTE: Lea antes de usar.
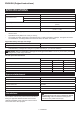
ENGLISH (Original instructions) SPECIFICATIONS Model: No load speed (without attachment) XUX01 Low 0 - 5,700/min Medium 0 - 8,200/min High 0 - 9,700/min Overall length 1,011 mm (39-3/4″) Rated voltage D.C. 36 V Net weight • • • 4.1 kg - 7.7 kg (8.9 lbs - 17.0 lbs) Due to our continuing program of research and development, the specifications herein are subject to change without notice. Specifications may differ from country to country.
Personal Safety 1. Stay alert, watch what you are doing and use common sense when operating a power tool. Do not use a power tool while you are tired or under the influence of drugs, alcohol or medication. A moment of inattention while operating power tools may result in serious personal injury. 2. Use personal protective equipment. Always wear eye protection.
. 5. 6. 7. 8. 9. Service 1. Have your power tool serviced by a qualified repair person using only identical replacement parts. This will ensure that the safety of the power tool is maintained. 2. Never service damaged BATTERY packs. Service of BATTERY packs should only be performed by the manufacturer or authorized service providers. 3. Follow instruction for lubricating and changing accessories.
10. 11. The contained lithium-ion batteries are subject to the Dangerous Goods Legislation requirements. For commercial transports e.g. by third parties, forwarding agents, special requirement on packaging and labeling must be observed. For preparation of the item being shipped, consulting an expert for hazardous material is required. Please also observe possibly more detailed national regulations.
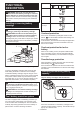
FUNCTIONAL DESCRIPTION Status Indicator lamps On Off Blinking Overload WARNING: Always be sure that the tool is switched off and the battery cartridge is removed before adjusting or checking function on the tool. Failure to switch off and remove the battery cartridge may result in serious personal injury from accidental start-up. Overheat Installing or removing battery cartridge Over discharge CAUTION: Always switch off the tool before installing or removing of the battery cartridge.
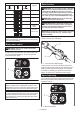
Indicator lamps Lighted Off Switch action Remaining capacity WARNING: For your safety, this tool is equipped with lock-off lever which prevents the tool from unintended starting. NEVER use the tool if it runs when you simply pull the switch trigger without pressing the lock-off lever. Return the tool to our authorized service center for proper repairs BEFORE further usage. Blinking 75% to 100% 50% to 75% WARNING: NEVER tape down or defeat purpose and function of lock-off lever.
Indicator Electronic torque control function Mode High The tool electronically detects a sudden drop in the rotation speed which may cause a kickback. In this situation, the tool automatically stops to prevent further rotation of cutting tool. To restart the tool, release the switch trigger. Clear the cause of sudden drop in the rotation speed and then turn the tool on. Medium NOTE: This function is not a preventive measure for kickbacks.
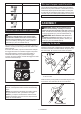
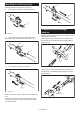
Mounting the attachment pipe 1 Mount the attachment pipe to the power unit. 1. Turn the lever toward the cutting attachment. 3 2 1 Fig.12 ► 1. Release button 2. Lever 3. Pipe Adjusting the handle/hanger position ► 1. Lever Adjust the handle and hanger position to obtain confortable handling of the tool. 2. Align the pin with the arrow mark and insert the attachment pipe until the release button pops up. Loosen the hex socket head bolt on the handle.
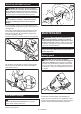
Attaching shoulder harness WARNING: Be extremely careful to maintain control of the tool at all times. Do not allow the tool to be deflected toward you or anyone in the work vicinity. Failure to keep control of the tool could result in serious injury to the bystander and the operator. 1 CAUTION: Always use the shoulder harness attached. Before operation, adjust the shoulder harness according to the user size to prevent fatigue.
TROUBLESHOOTING Before asking for repairs, conduct your own inspection first. If you find a problem that is not explained in the manual, do not attempt to dismantle the tool. Instead, ask Makita Authorized Service Centers, always using Makita replacement parts for repairs. State of abnormality Probable cause (malfunction) Remedy Motor does not run. Battery cartridge is not installed. Install the battery cartridge. Battery problem (under voltage) Recharge the battery.
ESPAÑOL (Instrucciones originales) ESPECIFICACIONES Modelo: XUX01 Velocidad sin carga (sin el accesorio) Bajo 0 r/min - 5 700 r/min Medio 0 r/min - 8 200 r/min Alto 0 r/min - 9 700 r/min Longitud total 1 011 mm (39-3/4″) Tensión nominal 36 V c.c. Peso neto • • • 4,1 kg - 7,7 kg (8,9 lbs - 17,0 lbs) Debido a nuestro continuo programa de investigación y desarrollo, las especificaciones aquí incluidas están sujetas a cambio sin previo aviso. Las especificaciones pueden variar de país a país.
5. ADVERTENCIAS DE SEGURIDAD Advertencias generales de seguridad para herramientas eléctricas 6. ADVERTENCIA: Lea todas las advertencias de seguridad, instrucciones, ilustraciones y especificaciones suministradas con esta herramienta eléctrica. El no seguir todas las instrucciones indicadas a continuación podría ocasionar una descarga eléctrica, incendio y/o lesiones graves. Conserve todas las advertencias e instrucciones como referencia en el futuro.
8. 9. No permita que la familiaridad adquirida debido al uso frecuente de las herramientas haga que se sienta confiado e ignore los principios de seguridad de las herramientas. Un descuido podría ocasionar una lesión grave en una fracción de segundo. Utilice siempre gafas protectoras para proteger sus ojos de lesiones al usar herramientas eléctricas. Las gafas deben cumplir con la Norma ANSI Z87.1 en EUA.
10. Símbolos A continuación se muestran los símbolos utilizados para la herramienta. volts o voltios corriente directa o continua Instrucciones importantes de seguridad para el cartucho de batería 1. 2. 3. 4. 5. 6. 7. 8. 9. 11. Antes de utilizar el cartucho de batería, lea todas las instrucciones e indicaciones de precaución en el (1) el cargador de batería, (2) la batería, y (3) el producto con el que se utiliza la batería. No desarme el cartucho de batería.
DESCRIPCIÓN DE LAS PIEZAS 1 2 3 4 8 9 12 10 5 6 11 7 1 Cartucho de batería 2 Palanca de desbloqueo 3 Gatillo interruptor 4 Colgador 5 Mango 6 Botón de liberación 7 Traba (específica del país) 8 Indicador de velocidad 9 Luz de alimentación 10 Botón de encendido principal 11 Botón de inversión 12 Arnés para hombro DESCRIPCIÓN DEL FUNCIONAMIENTO 2 3 1 ADVERTENCIA: Asegúrese siempre de que la herramienta esté apagada y que el cartucho de batería haya sido extraído antes de real
Protección en caso de sobredescarga PRECAUCIÓN: Introduzca siempre completamente el cartucho de batería hasta que el indicador rojo no pueda verse. Si no, podría accidentalmente salirse de la herramienta y caer al suelo causando una lesión a usted o alguien a su alrededor. Cuando la capacidad de la batería sea baja, la herramienta se detendrá automáticamente y el indicaparpadeará. dor Si la herramienta no funciona aun con los interruptores activados, retire las baterías de la herramienta y cárguelas.
Para evitar que el gatillo interruptor sea jalado accidentalmente, se proporciona una palanca de desbloqueo. Interruptor de encendido principal ADVERTENCIA: Desactive siempre el interruptor de encendido principal cuando no vaya a utilizar la herramienta. 1 Para poner la herramienta en modo de espera, oprima el botón de encendido principal hasta que la luz de alimentación principal se encienda. Para apagar la herramienta, vuelva a oprimir el botón de encendido principal. 2 ► 1.
Botón de inversión para la eliminación de residuos MONTAJE ADVERTENCIA: Asegúrese siempre de que la herramienta esté apagada y que el cartucho de batería haya sido extraído antes de realizar cualquier trabajo en la herramienta. El no seguir esta indicación de apagar y quitar el cartucho de batería puede ocasionar lesiones personales graves debido al encendido accidental.
Ensamble del aditamento del tubo 1 Ensamble el aditamento del tubo en la unidad motorizada. 1. Gire la palanca hacia el accesorio de corte. 3 2 Fig.12 ► 1. Botón de liberación 2. Palanca 3. Tubo 1 Ajuste de la posición del mango/ colgador ► 1. Palanca Ajuste la posición del mango y del colgador para poder manipular de manera cómoda la herramienta. 2. Alinee el pasador con la marca de flecha e inserte el aditamento del tubo hasta que el botón de liberación aparezca.
Colocación del arnés para hombro Almacenamiento de la llave Allen (hexagonal) ADVERTENCIA: Sea extremadamente cuidadoso en mantener el control de la herramienta en todo momento. No permita que la herramienta se desvíe hacia usted ni hacia otra persona alrededor. El no mantener el control de la herramienta podría ocasionar lesiones graves a las personas alrededor y al operador. PRECAUCIÓN: Tenga cuidado de no dejar la llave hexagonal insertada en el cabezal de la herramienta.
1 ► 1. Protector de la batería Para mantener la SEGURIDAD y FIABILIDAD del producto, las reparaciones, y cualquier otra tarea de mantenimiento o ajuste deberán ser realizadas en centros de servicio autorizados o de fábrica Makita, empleando siempre repuestos Makita. RESOLUCIÓN DE PROBLEMAS Antes de solicitar alguna reparación, primero realice una inspección por su cuenta. Si detecta algún problema que no esté explicado en el manual, no intente desensamblar la herramienta.
ACCESORIOS OPCIONALES PRECAUCIÓN: Estos accesorios o aditamentos están recomendados para utilizarse con su herramienta Makita especificada en este manual. El empleo de cualquier otro accesorio o aditamento puede conllevar el riesgo de lesiones personales. Utilice los accesorios o aditamentos solamente para su fin establecido. Si necesita cualquier ayuda para más detalles en relación con estos accesorios, pregunte a su centro de servicio local Makita.
< USA only > WARNING Some dust created by power sanding, sawing, grinding, drilling, and other construction activities contains chemicals known to the State of California to cause cancer, birth defects or other reproductive harm. Some examples of these chemicals are: • lead from lead-based paints, • crystalline silica from bricks and cement and other masonry products, and • arsenic and chromium from chemically-treated lumber.