
Use and Care Manual

8 ENGLISH
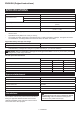
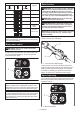
Indicator Mode
High
Medium
Low
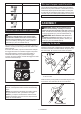
Reverse button for debris removal
WARNING: Switch off the tool and remove
the battery cartridge before you remove entan-
gled weeds or debris which the reverse rotation
function can not remove.Failuretoswitchoffand
removethebatterycartridgemayresultinserious
personalinjuryfromaccidentalstart-up.
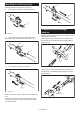
Thistoolhasareversebuttontochangethedirectionof
rotation.Itisonlyforremovingweedsanddebrisentan-
gled in the tool.
Toreversetherotation,tapthereversebuttonandpull
thetriggerwhenthetool’sheadisstopped.Thepower
lamp starts blinking, and the tool's head rotates in
reversedirectionwhenyoupulltheswitchtrigger.
Toreturntoregularrotation,releasethetriggerandwait
until the tool's head stops.
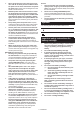
1
►1. Reverse button
NOTE: During the reverse rotation, the tool operates
onlyforashortperiodoftimeandthenautomatically
stops.
NOTE: Once the tool is stopped, the rotation returns
toregulardirectionwhenyoustartthetoolagain.
NOTE:Ifyoutapthereversebuttonwhilethetool's
head is still rotating, the tool comes to stop and to be
readyforreverserotation.
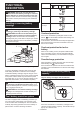
Electronic torque control function
Thetoolelectronicallydetectsasuddendropintherotation
speedwhichmaycauseakickback.Inthissituation,thetool
automaticallystopstopreventfurtherrotationofcuttingtool.
Torestartthetool,releasetheswitchtrigger.Clearthecause
of sudden drop in the rotation speed and then turn the tool on.
NOTE:
Thisfunctionisnotapreventivemeasureforkickbacks.
ASSEMBLY
WARNING: Always be sure that the tool is
switched off and battery cartridge is removed
before carrying out any work on the tool.Failureto
switchoffandremovethebatterycartridgemayresult
inseriouspersonalinjuryfromaccidentalstart-up.
WARNING: Never start the tool unless it is
completely assembled. Operation of the tool in a
partiallyassembledstatemayresultinseriousper-
sonalinjuryfromaccidentalstart-up.
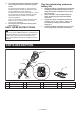
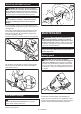
Mounting the handle
Attachthehandlewithsuppliedclampsandbolts.Make
sure that the handle is located between the spacer and
the arrow mark. Do not remove or shrink the spacer.
4
2
3
1
3
5
►1. Handle 2.Hexsocketbolt3. Clamp 4.Spacer
5.Arrowmark
Attachthebarrier(countryspecic)tothehandleusingthescrew
on the barrier. Once assembled, do not remove the barrier.
1
2
►1. Barrier 2.Screw