
User's Manual
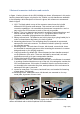


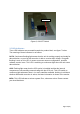


Table Of Contents

4.2 Data acquisition
For simplicity we here only describe the 2D project data collection scheme, which is
perhaps the most general. In figure 11 below the menu is shown, and in the following
a brief description is given.
All MALA systems are configured with the most useful and common acquisition
parameters when delivered. Hence, the only thing one will have to do form the menu
below is to hit the “New” control, in order for data acquisition to commence.
A few comments on the menu below:
To the right two indicators are shown, the yellow circle indicates that the in-build GPS
has locked on satellites, the color yellow indicates normal mode. Whenever
differential correction becomes available, it will switch to green.
At the bottom a few information fields are shown: the file name refers to the file which
will be written, when the data acquisition commences. The GPS coordinates are
presented in the Lat-Long format, for the current position and the soil velocity is
shown for information only, it has no effect on the data acquisition whatsoever, but it
controls the depth scale.
Once the “New” control is activated the data will show up on the screen and the user
will have the option of enter markers and control the gain as well as zooming in on
data, on the fly.
Whenever the operator chose the Quit control, the antenna will be powered off. To
start a new project, the operator must manually switch the antenna on again, with the
on/off button on the antenna.
Figure 11, data collection menu for 2D-Projects
Page 14 (16)