
Instruction Manual

Parts List:
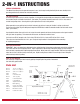
Lubricate inside jaws
Lubricate
Lubricate under
Adjustment nut
ER-45 1/8 in. nosepiece
ER-46 5/32 in. nosepiece
ER-44 3/16 in. nosepiece
HR-2 Sleeve
HR-3 Collet Retainer
ER-41 Jaws (1 pair)
HR-5 Collet Expander
HR-6 Collet Spring
HR-7 Adjustment Rod
HR-8 Main Spring
HR-9 Frame Assembly
HR-10 Adjustment Wheel
HR-11 Movable Handle
HR-12 Handle Pivot Bolt
ER-41
ER-45
ER-46
ER-44
HR3-7
Replacement Assembly
GENERAL INFORMATION
This Malco Rivet Gun gives the operator two guns in one. Just change handle pivot bolt (do not move handle) to the
operating position best suited to the rivet being installed.
THE TWO POSITIONS
All rivets will pull much easier in the No. 2 position. In this position the pivot bolt goes through the LOWER holes in both
the movable handle and handle frame block. (See below.) This position should be used for all 3/16 in. rivets and all
smaller hard pulling rivets. Several pulls may be required to set rivets in this position.
When operator has easy pulling rivets to install and wants to set them in one pull, the No. 1 setting can be used.
For the one pull setting, the pivot bolt goes through the UPPER holes in both the movable handle and the handle frame
block. (See below.)
Care should be taken after each rivet is set to turn the nozzle upward and release hand pressure so that spent mandrel
will eject from rear opening. This movement will become an automatic motion of user.
It is best to use ER-45 nosepiece for 1/8 in. rivets, ER-46 for 5/32 in. rivets and ER-44 for 3/16 in. rivets.
These sizes are furnished with the 2-in-1 gun. It helps to keep handles in closed position when removing
or installing nosepieces.
RIVET GUN ADJUSTMENT
IMPORTANT - Gun is in approximate adjustment when adjusting wheel is turned onto adjustment rod until the adjustment
rod is flush with the back of adjusting wheel. Proper adjustment is obtained by moving the proper size rivet mandrel
back and forth in opening while tightening adjustment wheel. When jaws start to grip mandrel, STOP and turn adjusting
wheel back 1/2 to a full turn freeing rivet from jaws. Slight handle pressure holds rivet and keeps it from falling out
while inserting in hole for pulling.
CARE OF RIVETING GUN
It is necessary to regularly oil this riveter by putting a drop of light oil on points of movement.
See lubricating points below.
www.malcotools.com
2-in-1 inSTRUCTiOnS
SL15645A