
Installation Guide


Page 6 of 10
Contact Customer Service Toll Free at 844-658-4700 with all your Technical Questions
Floating Installation
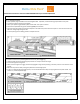
Step 1 – Install the First Row
•
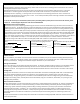
When possible, begin installation from the straightest wall. If possible, install the flooring perpendicular to the joists.
•
Cut off the tongue from the first row planks.
•
Allow 1/2” expansion gap between plank and the walls. Use spacers or board.
•
Place the first plank with the groove side facing away from the walls.
•
Place the upper drop-lock end of the second plank on the lower drop-lock end of the first plank. The ends do not click lock.
Maintain
straight edge along the rows.
•
Continue placing the succeeding planks to complete the row.
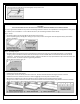
Step 2 – Install the Second and Remaining Rows
•
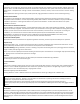
Cut off a section the first plank lengthwise to ensure 6” joints staggering.
•
Hold the plank with the tongue facing the previous row. Keep it at about 30° angle.
•
Insert the tongue into the groove.
•
Make sure the tongue are snuggly and securely engaged in the groove by exerting a constant pressure in the direction of the
groove.
•
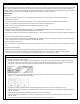
Maintain the pressure while pressing the plank flat to lock the edge joints.
•
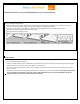
If there is a slight gap along the edge joints, it can be eliminated with the help of a tapping block and a plastic mallet. Use
caution to
prevent impact damage.