
Installation Guide


Malibu Wide Plank T&G Install Instructions Page 4 of 8
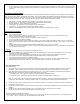
Note: Only use flooring stapler that are fully adjustable and that engage the top profile over the tongue at the
appropriate angle. Make sure that the flooring stapler is in good working condition and seats properly against the
board to prevent top edge and surface dimple damage. Any damage caused by fasteners or nailers is not covered
by the warranty.
For products over 5” in width use the glue assist method when using the nail/staple down method. Refer to the NWFA
Technical Manual – Section V. for complete details.
NAILDOWN INSTRUCTIONS
[CAUTION]: Nail flooring in good lighting. After nailing 100 sq ft, stop and inspect the installed floor for any defects or damages.
Stop at 20 sqft for installation under 100sqft. Make adjustments as needed. If satisfied, continue with the installation. When top
nailing pre-finished flooring (the first and last rows, stair treads, and risers) it is recommended to pre-drill and hand nail using a
3/32” drill bit and 6d finish nails. Pneumatic 16ga. finish nail or 18ga. brad nail guns can be used to secure the first and last rows,
but improper use can easily damage the board or finishes. When installing over crawl spaces, basements, or garages use an asphalt
saturated paper as a minimum to provide protection against moisture vapors.
INSTALLATION PREP
Use a manual or electric jamb saw to undercut all door jambs/casing to allow enough clearance for the wood flooring to easily slide
underneath. A credit card thick gap between the top of the wood flooring and bottom of the door jamb is acceptable. Sand down high
areas of the subfloor. Correct low areas (See subfloor prep). Sweep or vacuum the subfloor clean of dust and debris. Install moisture
retardant underlayment, and staple it down to prevent movement/sliding(See underlayments).
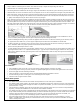
STEP 1: THE FIRST THREE ROWS
• Determine the starting wall, usually the longest or outside foundation wall. At the two opposite ends of this wall, measure
out the width of the board including the tongue, plus the expansion space, and place a mark. An expansion gap must be
left around the perimeter and at all vertical obstructions. This gap will be the same as the thickness of the new flooring.
For example; 1/2” flooring requires 1/2” expansion gap.
• Snap a chalk line connecting the two marks. Align the tongue side of the first row of boards on the chalk line with the
groove side towards the starting wall, maintain the expansion space.
• Install the flooring with the tongue side facing away from the starting wall(Use long straight planks for first two rows).
• Pre-drill and top nail the first row of boards using a 3/32” drill bit and 6d finishing nails about an 1” from the back edge.
Pneumatic finish nail guns or brad nail guns can also be used. If hand nailing countersink the finish nail using a nail punch
and fill with close matching wood filler. Blind nail the 2
nd
and 3
rd
rows using the flooring stapler, and seat the staples slightly
above the tongue.
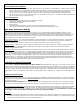
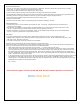
STEP 2: LOOSE LAY (Rack) THE FLOORING
After installation of the first three rows, loose lay about 100sqft of flooring about 4” or 5” away from the last secured row. Pull from
several boxes to mix board color and sizes to create a random look. Visually inspect flooring for defects while racking. Stagger boards
randomly as possible, avoid creating patterns. See picture for proper layout guidance.
Correct Board Stagger Incorrect Stagger circled