
Use and Care Manual


Page 8 of 10
Contact Technical Support Toll Free at 800-928-6168 with all your Technical Questions
Finishing Touches
•
Clean the floor.
•
Use matching putty where necessary.
•
Install or reinstall all wall trim pieces. Nail them through the wall, but not to the subfloor to avoid restricting the expansion gap.
•
Install transition trim pieces. Nail them to the subfloor, not the flooring.
•
At doorways, transitions should be used to protect the edges of the floor and to provide a decorative transition from one floor
type to
another.
•
If the floor is to be covered, use a breathable material such as cardboard. Do not cover with plastic. Do not apply any tape to the
face of the product for protection or any other reasons. Finish damage that may occur is the responsibility of the person
applying the tape
and is not covered under terms of the warranty.
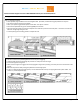
Step 4 – Install the remaining Rows
Spread another section of glue. Never spread more that can be covered before the adhesive is set. If adhesive is set and
will not transfer to the back of the plank, scrape off the adhesive and apply fresh adhesive.
Continue to install the next rows. Make sure there is a random staggering at the end joints of at least 6” apart.
Maintain 1/2” expansion gap between floor and the walls.
Repeat the process for additional rows.
Make sure that there is 100% contact between the wood floor and the adhesive.