
Installation Guide


Malibu Wide Plank T&G Install Instructions Page 3 of 8
HELPFUL TOOLS
• Pencil
• Chalk line
• 6’ level or 10’ level
• Miter saw
• Table saw
• 60 tooth carbide tip saw blades
• Broom
• Jamb saw
• Eye protection
• Dust Mask
• Gloves
• Engineered Floor Stapler
• Floor fasteners
• Hygrometer (test home temperature and humidity)
• Blue painters tape (2080)
• PVA wood glue
• Air Compressor with regulator
• Air hose
• Drill bit set
• Hammer
• Tape measure
• Moisture meter (wood)
• Calcium chloride moisture test (concrete)
• Approved adhesive remover (glue down installs)
• Cloth rags
• Nail set
• Drill
• 6d finish nails
• Jig saw
• Ear protection
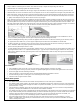
STAPLE DOWN OVERVIEW
[NAILING TIPS]:
• Test nailing a couple of planks in a well lit area, near a window.
• Place fasteners on tongue side that runs the length of the planks. Do not place fasteners into the groove.
• If the staples do not go in far enough raise the air pressure on the compressor up slightly and re-test until staples sit flush
into the wood above the tongue.
• If the staples go in too deep lower air pressure until staples sit flush above the tongue. Some floor staplers have the ability to
adjust the depth of the fastener. This may need to be adjusted for the staples to seat correctly.
• Tongue fractures can be reduced by lowering the compressor’s PSI and using the recommended floor stapler.
• Dimples can be reduced by seating the floor staplers correctly on the board or using thinner gauge fasteners like 20 gauge
staples. Make sure the staples are sitting flush in the wood or dimples can occur. Adjusting the depth of the stapler to seat
fasteners a bit deeper can help minimize dimples.
• Only use pneumatic nail guns designed for engineered wood flooring. Norge 4 n 1 floor stapler, Stanley Bostich, Powernail,
and similar engineered flooring staplers are acceptable.
• Check for squeaks after nailing. Squeaks can occur due to tongue fracture, uneven subfloor, improper fasteners, or improper
fastener spacing. Squeaks can be corrected or minimized by adding a PVA floating floor wood glue to the tongue and groove
of the plank before nailing.
• If stapler will not shoot staples, check for air leaks, jammed staples, staple size, and compressor air pressure.
• Its best to pre-drill and hand nail the first row using a 3/32” drill bit and 6d finish nail. This will help prevent finish chipping
due to pneumatic finish or brad nailers.
• If dimpling still occurs switch to a floating or glue down installation. We do not recommend the use of water base adhesives.
ENGINEERED WOOD RECOMMENDED FASTENER SELECTION
3/8’’, 1/2”, 9/16”
18 , 19, or 20 gauge engineered flooring staples
1-1/4” or 1 -1/2” long
FASTENER SPACING
Spacing of fasteners should be as follows - Staples should be placed every 3" - 4" and cleats should be placed every 4" - 6".
All fasteners should be placed within 1" -2" of end joints.
1/2" crown - 15
1
/
2
-gauge staples typically used for solid wood flooring should not be used as they may damage the
flooring.
Important: Set air compressor to 70-80 PSI. Test and adjust air pressure to ensure proper setting of fasteners. Make sure that the
fastening machine is fully adjustable, is in good working condition, is at the appropriate angle and seats properly against the tongue
of the board to prevent top edge and surface dimple damage.