USER MANUAL TABLE OF CONTENTS A Precautions.....………………………………………………...............………………...2 B Check List.…………...................................……….................…..........................3 C Component Diagram.……………........………….................….............………..4 D LCD Monitor Menu and Function.............................................................5 E Technical Specifications ..............................................................................
A. PRECAUTIONS 1. 2. 3. 4. 5. 6. 7. 8. 9. 10. 11. 12. 13. 14. Do not strip the yellow paper on the glass sheet, it is for anti-slip printing. Do not strip the wrapper which wrap up the nozzles, it is for holding nozzle temperature. Use this printer under right power and follow all local laws. Be ware of hot heat blocks, nozzles, extruded filament and heating plate. Do not wear gloves when operating or repairing to avoid entanglement. Do not leave the machine unattended when it is in operation.
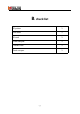
B.
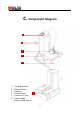
C. Component Diagram 1. 2. 3. 4. 5. 6.
D.
E. TECHNICAL PARAMETERS Product Usage FDM Desktop 3D Printer Rapid Prototyping, print 3D models, samples, parts, toys... Construction ABS with power-coated steel reinforcement Extruder Single Nozzle diameter 0.4 mm (0.015 in) Positioning Precision XY 11 microns (0.0004 in), Z 2.5 micron (0.0001 in) Layer Resolution 100 micron (0.0039 in) Input Power 100-240V, Max:120W Platform heating 60℃ for printing ABS, N/A for PLA Nozzle heating 230℃ for printing ABS, 190℃ for PLA Filaments 1.
F. INSTALLATION HARDWARE INSTALLATION ON PRINTER 1 Adjusting platform Heating platform has been adjusted strictly leveling before leaving factory, but it may be a little deviation during transport, and affect the printing quality. So need to adjust again now. Adjust the platform height by hexagon wrench which come with machine. Rotating the platform screw Clockwise, increase the distance between the platform and the nozzle.
stick plate will happen easily when printing. • If the heating plate is too close to the nozzle, it will directly affect the nozzle spinning, this could also make the heating plate be damaged.
3 Install the filament rack on the left side of the machine and hang the filament up. 4 When the temperatures are ready, cut the top of filament to sharp, and then press the feeding handle, thread and push the filament through to feed mouth, stop pushing when the filament come out from the nozzle.
G . SOFTWARE INSTALLATION ON PC Install the right version modified Cura and Repetier-Host from our supplied SD card. 1.1 Cura Operation instructions Overview We recommend that new users start with Cura as it includes a slicing engine. Slicers These programs take the M200 model (typically STL/OBJ) and determine the 3d printer tool path based on the options selected.
as shown below: After pressing next the next screen will ask you to choose the component and the formats you would like to open in Cura. Make the selection as bellow and press next.
Now press next to complete the installation Now press finish button to finish the process: - 12 -
Now you will see the front screen of Cura with all the options as shown below: Now to print with our machine go to machine option in the header and select add new machine option.
Now select the radio button with the option as follows: Other(Ex: RepRap, MakerBot, Witbox) and press next button. Then choose Custom and click next.
Then modify the parameters. Now press Finish and you will be redirected to the below screen: Now load the object with the load file button as shown below and make the changes in the parameters as shown in the image.
1.3 Quick Print Settings After setting up Cura for the first time, you will be shown the main interface screen. Selecting a Quick Print Profile The print quality settings can be found in the top left-hand corner of the window. For most filaments, there will be High Quality, Normal Quality, or Fast Quality options. Some of the more exotic filaments may only have a Normal Quality profile. High Quality Designed to give greater detail and finer objects.
Fast Quality Designed for the fast prints, where overall model finish is not of concern. Most commonly used for quick iteration of designs found in rapid prototyping. Material Selection Choose your desired filament. The Malyan M200 ships with a 5 meter sample of PLA, that should be used in your first print. Printing Support Material The Malyan 3d printer is able to print models that have angles and overhangs, even without support material depending on the overhang distance and angle.
Rotate The Rotate button will give you the ability to orient your model in along all three axes. Once you click the rotate button, three circles will surround your model. The red circle will allow you to rotate around the Z axis. The Yellow circle will rotate around the Y axis. The Green circle will rotate around the X axis. Lay Flat The Lay Flat button will ensure that the flat portion of your print is securely attached to the bed.
Reset The Reset button will return your model to the original orientation as defined by the CAD program used to create the model. Scale The Scale button displays the model dimensions, along with the ability to scale along the X Y or Z axes. Anything below the number 1.0 will reduce the objects size, while anything above the number 1.0 will increase the objects size. As a default, it will be set to uniform scaling.
Overhang Overhang mode shows where your model may need support material. In Fig. 1.6, page 16 the red highlighted areas show overhangs and more severe angles and areas where support material is recommended. Ghost Ghost view mode makes the model translucent to allow you to see what is behind it.
Xray Xray is very similar to Ghost mode. It will allow you to see into objects, ensuring that inner details are correct. Layers To view the tool path of your print head and to ensure no skipped layers or gaps use this option. Use the slide bar on the right had side of the window to move up and down through the tool path layers.
1.5 Starting Your First Print Once you have your model, profile, and filament loaded, it is time fo your first print! 1.6 Removing Your First Print After your first print has finished, you need to wait for the part to cool down. Your parts will be easier to remove if your allow your heated bed to cool down to optimal temperature. This will allow the plastic to contract, making it easier to remove. Your print bed will move forward once it is ready to be removed.
1.7 Full Settings Full settings should not be used until enough experience with 3d printing has been gained to feel comfortable with all aspects of the printer and its operation. The simple settings will provide good results for most models. The first time Cura is launched it will default to the Quick Print interface. In order to have more control of your slicing and G Code generation, switch to Full Settings. Select Expert>Switch to full settings.
Shell Thickness This defines the number of vertical walls that comprise the outside of your model. We recommend keeping this set to multiples of your nozzle width. Your Mini 3D printer is equipped with 0.4mm nozzle. Enable Retraction Retraction tells your printer to pull filament out of the hot end upon travel moves. Travel moves are when your print head moves from one area of the print, to another without laying down filament.
Your overall printing speed can be adjusted here. If no other speeds are determined in the later sections your printer will automatically default to this speed. This speed will be different, depending on what type of filament your are using. Printing Temperature When using different filament materials you'll need to update the desired hot end and heated bed temperature. Any temperatures specified here will be used to automatically set both the hot end and heated bed.
Platform Adhesion Type Some models have a small surface area contacting the plate. This can create adhesion issues causing your part to pop off at some point during the print. To fix this, use either Brim or Raft. Raft is better used when a model has small heated bed contact points and overhangs. Brim Brim will created a single layer of filament, contracting and surrounding your model.
going to be near 2.9mm+/- 0.1mm, You will want this to be an accurate average, as it will allow your printer to correctly calculate how much filament it is pulling into the hot bed. Filament Flow This controls how much filament your printer is extruding in relation to speed. This setting is mainly used to adjust for filament density variations. Leave this value at 100% as changing it can lead to surface quality issues. 1.9 Advanced Tab Options Nozzle Size(mm) This defines your nozzle size.
Initial Layer Line Width This will control how wide your first extruded filament path is for the initial layer. A wider line width will help with bed adhesion. We have found 125% to be a good starting place. For models with moving printed in place parts. A smaller initial layer line width is recommended. Travel Speed This setting will determine how fast your print head moves while not extruding filament. A normal travel speed of 180mm/s is recommended.
laying down each layer. If your layer print time falls below this your printer will automatically slow down to reach this time before moving onto the next layer. Tweaking this can help get cleaner, crisper prints. Enable Cooling Fan Enables operation of your extruder’s active cooling fan. The fan settings can be adjusted in the Expert Settings options. 1.10 Plugins Plugins are custom settings which will alter your print at specific points.
and print speeds. Fine turning these for specific STL files, can produce cleaner prints. Pause at Z height Pause your print at a specified height. You can also specify where to move the print head and how much filament to retract. This will prevent “lobs” from accumulating on your print while paused. This setting is most commonly used when switching colors of filaments in the middle of a print. 1.11 Start and End G Code Settings Custom G Code allows for complex automatic printer movements and operations.
1.13 Retraction Retraction pulls filament out of your nozzle when it is not extruding to prevent your print head from dripping on your object. This section is where you will control how your extruder retracts its filament. Minimum Travel This sets the minimum travel distance of your print head in order to retract. If your print head is not moving this far during travel moves, it will not retract. Combing This option prevents your print head from traveling over holes in the X/Y plane when printing.
Start Distance This will define the distance away from your model that the skirt will be created. If using as a envelope to prevent drafts, it is recommended to be closer to your object. Minimal Length This will define the minimum extruded line length for the skirt. This will over ride your line count, producing as many lines as required to reach the minimal length. 1.15 Cool This section will define how your extruder cooling fan will operate during the print.
1.16 Support You define how your support material is generated here. You must have some form of support turned on in the basic settings in order for these settings to have an effect. Structure Type You can choose between a Grid or a line pattern for your support material. The grid will be a checkerboard pattern in the X and Y direction. The line option will produce lines in along the Y axis for support. The grid will provide stronger support than the line option, but will be harder to remove.
but makes it harder to remove. 1.17 Black Magic This section allows you to transform your model into a hollow shell, a single layer thick. Spiralize the outer contour this causes your Z axis to be constantly moving upward as printing your single outer wall shell. The results are no layer change lines, giving a much smoother surface. This setting is typically only used for artistic objects as they will be fragile.
Brim Line Amount This will determine the distance the brim will cover around the outside of your object. The more brim used, the better your part will adhere to the plate. 1.19 Raft Raft is a platform built underneath your object, designed to help adhesion and prevent warping.It will lay down support material, and then a platform on top of the supports. Your model will be built on top of this platform. The bottom surface of your printed part will not be as clean or as even when using this option.
Base Thickness This defines how thick your raft will be. Base line Width This will define how wide your ”support” material is for the raft. This setting will determine how well the surface layers of the raft print. Interface Thickness This will determine how thick the surface layers of the raft are. The surface layers are the platform that is built upon the supports. Interface Line Width This will determine how wide the top layers of the platform will be.
your raft. If you have a wide line spacing, you may want to increase this number to ensure a solid platform. 1.20 Fix Horrible These are some of the more advanced and experimental options. They are designed to help repair models with errors to make them suitable for 3D printing. They do not always work. Please be cautions when using these options as they can have unintended effects on your print quality.
Extensive Stiching This causes Cura to automatically add triangle meshes in an attempt to fix manifold errors. This algorithm will greatly increase GCode generation time and may end up adding in un-intended meshes. It is recommended that you repair your model through Meshlab or your CAD program before attempting this option.
H.PRINTING SD PRINTING (RECOMMENDED) We uploaded sample x3g files in our supplied SD card, you can insert it to printer, click “Print from SD” on LCD, choose the file and print. You can also download (from www.thingiverse.com etc) or create 3D STL files, enable our Cura, generate to G Code then G Code and save to SD card and print.
I. Troubleshooting 1. Nozzle seems blocked: Please clean the nozzle carefully with tools, check and make sure the extruder motor is rotating and pulling filament and that temperatures are right. 2. Software prompts timeout, no response while operating: Please close software, restart the printer, then reconnect to PC printing. 3.
J. Maintenance 1. Clean extruder and nozzle frequently 2. Oil the X/Y/Z axis occasionally. 3. Preheat extruder properly before loading filament. 4. Calibrate extruder and platform every time before printing. 5. Keep platform clean and empty when idle. 6. Keep printer away from dust and grime. 7. Keep printer clean and dry. 8. Keep printer in comfortable room temperature. ZHANGZHOU ChangFeng Computer Equipment Co.,Ltd ADDR.:No.437, Shengli Rd .