Preface Congratulations on your purchase of the Mamiya 645 AFD Camera. 1 2 3 4 5 Mamiya pioneered the 645 SLR system camera three decades ago and the Mamiya 645 AFD , with its TTL auto-focus, auto-exposure, auto-flash and auto-film winding features is the latest Mamiya masterpiece and reflects its long tradition of medium format camera expertise.
Names of Parts and Functions Exposure compensation dial lock release button (page 63) Hot shoe (page 80) Diopter adjustment lens (standard accessory) (page 22) Exposure mode dial lock release button (page 53 to 60) Eyepiece shutter lever (page 74) Exposure compensation dial (page 63) Main LCD (page 5) Dark slide storage pocket (page 34) Exposure mode setting dial (page 53 to 60) Memo clip (page 101) Auto focus assist infrared light emission window (page 50) Self timer lamp (page 73) Screw cap for ba
Each Liquid Crystal Display (LCD) Main LCD Viewfinder with LCD read-outs on bottom Program shift indicator Program mode mark Auto focus area frame Shutter speed (second)/Calendar AE lock mode mark Custom function mode mark Aperture/Calendar User function mode mark Multiple exposure mode mark Exposure compensation mode mark Flash auto adjustment mode mark AF area mark Battery power indicator Exposure compensation value display Self timer mode mark Manual focus mode Superimpose mode shooting data Su
Electronic Dial Operations / Liquid Crystal Display Electronic Dial Operation Front dial Position Exposure mode Rear dial P Program shift (PH P PL) Av Aperture adjustment Tv Shutter speed adjustment Shutter speed adjustment M X Multiple exposure button Aperture adjustment Aperture adjustment displayed Auto-bracketing button displayed SET button displayed Number of additional exposure Specify the auto bracketing width Select the number of frames for auto bracketing Turn the auto bracket O
Content Preface ........................................................................................................... 1 to 2 Names of Parts and Functions .................................................................... 3 to 4 Each Liquid Crystal Display (LCD) ............................................................. 5 to 6 Electronic Dial Operation/Liquid Crystal Display ...................................... 7 to 8 Camera Operation Test ........................................................
Camera Operation Test This is a simple way to test the camera and auto focus without film. “P” Mode is the easiest. You may use any mode but “CF”. “A-S” Mode is the easiest. You may use any mode. Before Taking Photographs Preparation before taking photographs 1. Set the shutter release mode selector lever to “S” (to turn the power on). 3. Open the back cover. 2. Remove the Dark Slide from the magazine. 5. Release the shutter. 4. Set the auto focus mode selector lever to “S”.
The camera will not operate Inserting the Batteries ( without batteries Checking the Battery Power ) Be sure to turn the switch of the Shutter Release Button to “L” as shown in the top illustration, to turn the power off. This prevents electrical damage to the circuits. Set the shutter release mode selector lever to “L” (to turn the power off). Use six “AA” alkaline or lithium batteries. 1. Lift the battery case lock lever, turn it counter clockwise and pull out the battery holder.
Installing the Battery in the Magazine The button battery supplies power to the magazine's LCD when the film magazine is detached from the camera. When the film magazine is attached to the camera body, it is powered by the camera's batteries. 1. Remove the battery compartment cover screw. Use a coin or suitable screw driver and turn it counter clockwise. Batteries Care 1. Life of the batteries that come with the camera body is subject to storage conditions. 2.
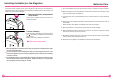
Attaching / Removing Lens M Tv Av Align the white alignment dot of the lens (on the shiny flange) with the camera's white dot, fit the lens into the camera and rotate it clockwise until it clicks into place. P L 22 11 5 4 LE 4 M N S M A D E IN JAPA 11 2 S AF C ft m N 1. Remove the front body cap, just like you would remove a lens, by pushing backward the lens release button and then turn the front body cap or the lens itself counter clockwise and lift out. 2.
Attaching / Detaching the Magazine 3. Then you move them together like you close a book until they lock and you hear the focal plane shutter open. Installation and removal of the magazine and its dark slide Unless the dark slide is inserted in the magazine, you cannot install and remove the magazine. When the camera batteries are low or they are not installed, the dark slide cannot be removed although the magazine can be mounted or removed. Before installation 1. Remove the magazine protection cap.
Diopter Adjustment Replacing the Diopter Correction Lens Look through the viewfinder and make sure that the focus frame (Rectangle with Circle) is in sharp focus. If it is not, turn the diopter adjustment dial in the “–” direction if you are nearsighted, in the “+” direction if you are farsighted. If this is not sufficient you may require an optional diopter correction lens. See below. 1. Remove the lens supplied with the finder by pulling it downward. A A-S AUTO S N E IN JAPA MAD 2.
Setting the Index Number The index number consists of 4 digits (0000 to 9999). The index number is stored in the camera body so that when replacing a series of roll film holders, the camera will superimpose sequential index numbers on exposures. This is effective when exposing and managing a large number of rolls of different types of film. 6. After the index number is specified, press the set button second to store the setting.
Setting Date and Time 5. Turn the front and back dials to set the date and time. Turn the front dial to select "month-date-year" or "hour-minutes-seconds" and change the value by turning the rear dial. 1. Turn on the power. Set the shutter release mode selector lever to “S” or “C.” 2. Hold down the exposure mode dial lockrelease button and turn the exposure mode dial to the CF position. 3. Turn the front dial to select custom number C35. The display will immediately show C-35. 6.
Strap Put the neck strap through the camera’s strap lugs as shown on the diagram and tighten it. For safety, check that the strap is securely fastened to the strap mount. For safety, pull the strap strongly to check if it is secured to the strap mounts. Basic Operation This section describes basic camera operations, how to load film and basic full automatic photography.
Attaching the Lens and Magazine Attaching the lens 1. Attach the lens. Setting the Film Speed The film speed (ISO sensitivity value) is the reference for all exposure and must be set correctly. If the set value differs from the actual value of the film in use, under- or overexposure may occur. 22 Align the white alignment dot of the lens (on the shiny flange) with the camera's white dot , fit the lens into the camera and rotate it clockwise until it clicks into place. 1. Press the (up) button.
Loading Film in the Magazine A roll of film can be inserted into the magazine whether the magazine is installed onto the camera body or not. 1. Open the back cover of the magazine. When the pressure plate (120/220) is set erroneously: Plate Setting 120 Loaded Film 220 type Hold down the button and press the button to the right. 220 120 type Result - Inaccurate focusing. - Film winding after 16 exposures. - Inaccurate focusing.
6. Attach the leader paper of the film to the empty spool. 8. Close the back cover. Push in the upper part of the back cover firmly to close it. As shown in the figure left, gently insert the leader paper tip into the groove on the empty spool that is on the “SPL” side, and turn the spool one or two turns to wrap the leader tape around it. It is not necessary to finely adjust the position of the film’s starting edge manually as the film will be wound into the correct position automatically.
Taking Photos in the Full Automatic Mode 3. Set the exposure mode selector dial to “P” (program auto exposure). X CF Tv Av UP C There are four exposure modes: “P” (program AE), “Av” (aperture priority AE), “Tv” (shutter priority AE) and “M” (manual mode). M. There are two shutter release modes: “S” (single-frame advance mode) and “C” (continuous advance mode). (See page 46.) When set to “L,” the power is turned off. M 1.
Shutter Release Button / Holding the Camera 5. Focus Shutter Release Button 1. Aim the camera so that the subject is within the focus frame . The shutter release button has a two-step action. When pressed lightly it stops at a certain point. In this manual this position is called the “half-press” position. When you “half-pressed” this button, camera functions are activated. Normal Half-press Release position Holding the Camera 2.
Removing a Partially Exposed Roll of Film 1. Insert the dark slide in the magazine. 6. Unloading the exposed film. When the roll of film is completely exposed, the camera automatically advances the film completely to the end. The LCD panel displays “End.” 1. Open the back cover. Hold down the button to the right. and press the button 2. Remove the roll-film insert. 10 Pinch the knobs of the roll-film insert in the film chamber with your fingers and take out the roll-film insert. X M P M.
Applied Photography and Various Functions This chapter describes various functions of the camera.
Focus Modes Single focus mode (S) Focus Area This mode uses the focus-priority mechanism. The shutter can be released when the focus mark in the viewfinder is lit. This mode is suited for still subjects. Focus is locked when the focus mark lights in the viewfinder’s LCD. With custom functions (C-03 on page 88) you can select a focus area that suits the subject. Normal focus area Position the subject within frame in the focus fame in the viewfinder.
Manual Focus Mode (M) Lenses with the focus mode selector The auto focus function can be cancelled, and you can focus manually. 1. Switch to “M” (manual focus mode). Turn the focus mode selector lever and set it to “M” (manual focus mode). appears on the external LCD panel. 2. Manual Focus Operation for Telephoto and Zoom lenses. All Mamiya 645 AF Telephoto and Zoom lenses can be switched from Auto Focus to Manual Focus by sliding the focusing ring on the lens FORWARD until it clicks.
When Auto Focus is Failed Manual focusing using the focus mark (Focus confirmation method) With this camera, the focus mark lights in the viewfinder’s LCD when the picture is in focus. With the shutter release button half-pressed, turn the lens focusing ring to focus mark lights in the focus on the subject. When the subject is in focus, the viewfinder’s LCD. If is lit in the viewfinder’s LCD, the camera is focused on a point behind the object.
Using the Focus Lock Function AF Assist Infrared Light If the object that you want to focus on is not in the focus frame , the camera focuses on the background at the center. In such cases use the focus lock function to lock the focus before releasing the shutter. 1. Set the focus mode selector lever to “S” or “C.” Put the subject in the focus frame press the shutter release button.
Shutter Release Modes Single-Frame Mode Electrical Contacts The film is advanced by one frame at time the shutter is released. Set the shutter release mode selector lever to “S”. ft m C S L Continuous Mode Photographs are taken continuously as long as the shutter release button is pressed. Set the shutter release mode selector lever to “C”. Photographs are taken continuously at a rate of about 1.2 frames per second.
Exposure Modes Program AE (P) Program Shift (PH/PL) The aperture and shutter speed are determined automatically for the optimum exposure, according to the existing ambient light. This mode is best suited for general photography, allowing the user freedom to concentrate on the subject. You can change the shutter speed and aperture by turning the front and rear dials in the “P” (Program AE) mode.
Aperture Priority AE (Av) Shutter Priority AE (Tv) Set the desired aperture, and the camera selects the optimum shutter speed accordingly. Use the Av mode to maintain specific control over depth of field, i.e. taking portraits or landscapes. Set the desired shutter speed and the camera selects the optimum aperture accordingly. Fast shutter speed can be used to freeze motion, and slow shutter speed can be used to blur motion on purpose. 1.
Manual Mode (M) This mode is used to set both the aperture and shutter speed for total exposure control. Shutter speeds can be selected from B (bulb), 30 seconds to 1/4000 of a second. Aperture values can be set from the open to the minimum aperture. B (bulb) can also be specified in this mode. 4. When the shutter release button is halfpressed, the difference between the present settings and the metered value is displayed in the viewfinder’s LCD panel.
X Mode (X) One-push shift function When difference between the set value and metered value is displayed on the viewfinder LCD in the Manual “M” mode, press the AEL button for approx. 1 second and the camera will automatically adjust the shutter speed to achieve the correct exposure based on the set aperture value. While the difference between the set value and the metered value is displayed on the viewfinder LCD, press the AEL button for approximately one second.
Exposure Metering Modes How to change to the Exposure Metering Modes While pressing the exposure metering mode selector lever lock release button in, turn the exposure metering mode selector lever up or down. Average/spot auto switching exposure metering mode (A-S AUTO) (Set the exposure metering mode selector lever to “A-S”.) If a polarizing filter is necessary, use a circular polarizing filter. A linear polarizing filter is not compatible with the Mamiya 645 AFD and its operations.
Exposure Compensation In some situations, such as a great difference between the subject and background brightness or overall subject tones that will not meter correctly because they are all black or white, the resulting photograph may be under- or overexposed. When this occurs, use the exposure compensation function. Exposure compensation can also be used when you want to intentionally create overexposed or underexposed pictures. Turn the rear dial left to increase the compensation.
AE Lock Mode The AEL button will lock the Auto-exposure value as the photo is being recomposed. 1. Turn the shutter release mode selector lever to “S” or “C.” 2. Turn the exposure mode setting dial and select any of “P,” “Av,” or “T”. 3. Focus on the subject for metering exposure, and press the AEL button on the rear of the grip. will appear on the viewfinder LCD, indicating that the exposure value is locked.
Auto-Bracketing Mode With auto exposure bracketing, you can bracket the exposure automatically for three (or two) successive frames, when it is difficult to determine an exposure compensation value. 1. Turn the shutter release mode selector lever to the “S” or “C” position. When set at the “S” position, you can shoot one frame with each press of the shutter release button. In the “C” mode, the camera takes three (or two) frames successively with one press of the shutter release button. 2.
Multiple Exposure Mode Using the multiple exposure mode, you can expose several shots on the same frame. To cancel the Multiple Exposure Mode Make sure to pull the dark slide out. And hold the emergency film winding button and halfpress the shutter release button. The camera advances the film by one frame and then exits from the multiple exposure mode. X M P M.U CF 1. Turn the shutter release mode selector to the “S” or “C” position. Tv Av P T SE X L M P M.U CF AE Tv Av 2.
Taking Photos with the Mirror Up This function prevents mirror-caused vibrations which may blur the image in close-up photography, when shutter speed is slow, when a telephoto lens is used, or when photographing a poster or another picture. When using the mirror-up, Electromagnetic Cable Release RE401 (optional) is recommended. Turn the shutter release mode selector to the “C” position and set the auto bracketing before starting the mirror-up shot.
Self Timer Mode Eyepiece Shutter With this function, under the default setting the shutter is released 10 seconds after the shutter release button is pressed. The self timer lamp flashes slowly for the first 7 seconds, then flashes quickly for the last 3 seconds before the shutter is released. Use this function to take group photos or to photograph yourself. 1. Mount the camera to a tripod.
Extended Exposure Modes (Bulb Modes) To expose film longer than 30 seconds, adjust the shutter speed to “B” (bulb). In order to prevent camera shake, use an electromagnetic shutter release and tripod. 1. While pressing the unlock button, turn the exposure mode dial and set it to “M” (manual mode). Backlight Button To see the main panel at night or in dark places, press the backlight button / . The backlight will go on approximately 10 seconds and go off unless there is another operation. 2.
Front / Rear Dial Lock Mechanisms When the Electronic Dial Lock is “On,” all currently set values in “Av” (Aperture Priority AE), “Tv” (Shutter Priority AE) and “M” (Manual mode) cannot be adjusted with the front or rear dials. This prevents accidental change of shutter speed or aperture values. 1. Set the shutter release mode selector lever to “S” or “C” (to turn the power on). 2.
Flash Photography Infrared Photography When taking photos using infrared film, the position at which the subject is in focus is slightly different than that of regular films. This is because the infrared rays have a longer wavelength and the image converges behind the film plane of regular film. Use the procedure described below when taking photos using infrared film. 1. Set the focus as usual. Read the point on the distance scale matching the center index of the depth scale. 2.
Flash Compensation Settings For example: (1) When the size of the subject you want to light with the flash is relatively small within the picture (2) When the background behind the subject is extremely bright or when there is a strongly reflective object in the background (3) When the background behind the subject is extremely dark (outdoors at night, etc.) (4) For flash photography with a narrow film latitude By combined use of a Metz flash and the SCA3952 adapter, the camera adjusts for flash.
External LCD Panel (normal display) 4. Half press the shutter release button, the “ ” (when positive adjustment) or “ ” (when negative adjustment) displays. Flash Photography with electronic flash models other than Metz 1. To use a grip type flashguns or a strobe with other electric contacts than X contact, connect the sync. cord to the camera’s sync. terminal. (See note below about flashes designed exclusively for other camera makes.) Viewfinder LCD read-outs.
Superimposing Data This is a function to allow various pieces of shooting information to be superimposed on the edge of the film. The info that is superimposed can be selected from the following three modes. To specify this function, use the Custom settings (C-04 on page 88). This section describes the details of the information that can be superimposed.
Types of Custom Functions Setting Custom Functions The custom functions allow you to change the method for using or accessing the camera functions as you like. Take photographs the way you are most comfortable with. The custom functions can store separate settings for 3 users. You can preset the functions for indoor, outdoor or portrait photographs and for other conditions.
Types of Custom Functions C-05: Select a way of setting aperture after changing lenses. The aperture is set to the same. After replacing the lens, After replacing the lens, The camera stores the the aperture is always the aperture is always number of steps from set to the open. set to the minimum. the open. C-06: Select an amount of time until the camera enters sleep mode.
Types of Custom Functions C-16: Select a way for the program shift. Shift along the program line Shift by putting priority on the aperture value C-21: Select whether or not to display the exposure meter difference in the M mode. Shift by putting priority on the shutter speed Displayed * The rear dial has the same function as the front dial. When electronic dial exposure compensation is selected, the rear dial is dedicated to control of the exposure compensation.
Types of Custom Functions C-26: Select a way of setting shutter speed when using the dedicated flash (in the P and Av modes). * Dedicated flash: Metz flash and SCA3952 adapter Auto setting between 1/125 or faster (operate 1/60 and 1/125 seconds in the exposure meter mode) Common setting items C-31 to C-36 are common settings. Each of these settings is reflected in other users. Therefore, these items cannot be set differently for each user.
Types of Custom Functions C-35: Adjust the date and time. Press the set button Select the month (M), date (D), year (Y), hour, or minute using the front dial. The selected item will blink. Change the value using the rear dial. Press the set button for one second to store the settings C-36: Set the index number Press the set button Set the index number Select the digit to change using the front dial. The selected digit will blink. Change the value using the rear dial.
Changing the Focusing Screen 1. Remove the lens. 2. Pull the Focusing Screen Release lever forward, as illustrated as shown, with the tweezers to let the Focusing Screen down. Caution Since the Focusing Screens' surfaces are soft and easily damaged, handle them carefully. Never touch the surface with bare fingers. Should dust settle on it, merely blow away by using a blower. If the Focusing Screen needs cleaning, send it to the nearest authorized Mamiya service center.
Using the M645 Manual Focus Lenses When using the MAMIYA M645 manual focus lens, mount the focusing screen for manual focus lenses (sold separately). 1. Mount the M645 lens on the camera body, turn the A/M lever on the lens to the "M" position. Set the lens to maximum aperture compose and focus. You may use the focus mark to adjust focus. External Battery Socket When using the camera at cold temperatures where the battery capacity may drop, use a External Battery Case PE401 (sold separately; PE401). 1.
Tripod/Electronic Shutter Release Contact/Memo Clip Using a Tripod When using a tripod with 3/8 inch screw thread (instead of 1/4 inch screw thread) remove the small screw from the tripod screw hole on the bottom of the body using a plus screwdriver, then use a coin to remove the tripod screw adapter bushing . When You Think Something Might Be “Faulty” In the conditions below or when the LCDs display the items listed in pages 103 and 104, they are not necessarily faults.
When Any of These Displays Appear The camera caution mark will blink when the dark slide has not been pulled out, no film is present, or when the camera detects an abnormality.
Specifications Camera Type : 6x4.5cm format, electronically controlled focal-plane shutter, TTL multiple mode AE, AF single lens reflex Auto bracket shot : Enable with auto bracket button (2 frame shots, or 3 frame shot with auto bracketing). Specify 1/3, 1/2, 2/3 or 1EV steps. Actual Image Size : 56x41.
Common Sense Camera Care and Practice Maintenance and check of the camera After-Sale Servicing • Read instructions before using camera. • Protect camera against shocks and falls. Use the neck strap supplied with it, whenever possible. • Check the battery frequently and always carry spares. The sealed battery supplied with the camera may have been subject to storage conditions which have reduced its service life. • Be sure to wipe battery contacts before installation and watch correct polarity.
MEMO 109 110
Printed in Japan 100% Recycled Paper 320100-EH-01E Instructions