Leaf Credo Digital Back with Mamiya 645DF+ System Quick Guide 1
Quick Guide Contents 1. Contents of Kit...............................................................3 2. Overview........................................................................4 3. Before You Start.............................................................6 4. Mounting the Leaf Credo Back....................................12 5. Getting Started.............................................................14 6. Using the Soft Buttons.................................................16 7.
1. Contents of Kit • Leaf Credo digital back • Charger for Leaf Credo battery • 12 V Power adapter and regional adapters • Two Li-Ion 7.2V 2900 mAh batteries • USB 3.0 cable (3 m) • FireWire 800-800 cable (4.
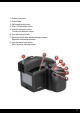
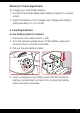
2. Overview 2 1. Eyepiece shutter lever 2. Hot shoe 3 1 3. Exposure mode dial 4. Mirror (do not touch) 5. Electronic contacts 6. Lens mount alignment mark 7. Depth of field preview button 8. Drive dial 13 12 11 9. Shutter release button 10. Front dial 10 11. Rear dial 9 12. Strap lug 13. Main LCD 8 5 7 6 1. Diopter adjustment dial 2. Strap lug 4 1 2 3. Synchro terminal 4. Electronic shutter release contact 5. Lens release button 6. Focus mode selector lever 7. AF lock button 8.
1. Rubber eye piece 2. Digital Back 3. Self timer/interval button 4. Main LCD backlight button 5. Multiple exposure button/ Focus point selector button 6. Auto bracketing button 7. Set button/Flash auto adjustment select button/ Exposure compensation button 8.
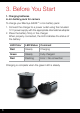
3. Before You Start 1. Charging batteries Li-Ion battery pack for camera To charge your Mamiya 645DF+ Li-Ion battery pack: 1. Connect the charger to a power outlet using the included 12 V power supply with the appropriate international adapter. 2. Place the battery firmly in the charger.
Battery for Credo digital back To charge your Leaf Credo battery: 1. Connect the Credo digital back battery charger to a power outlet. 2. Insert the battery in the charger and charge each battery (approximately 2.5 to 3 hours). 2. Inserting batteries Li-Ion battery pack for camera 1. Ensure the drive dial is set to L (off). 2. Turn the camera upside down, lift the battery case lock lever and turn it counter clockwise. 3. Pull out the AA battery holder. P M.U C S L 4.
Battery for Credo digital back 1. Open the battery compartment cover and slide the battery into the battery bay in the bottom of the digital back. 2. Close and lock the battery compartment cover. 3. Setting battery type In order to utilize the Li-Ion battery in your 645DF/645DF+ camera, you need to set your camera’s Custom Function 04 Battery Type to 2. To set the battery type, you must initiate one of the Custom Function (CF) banks, then set the battery type.
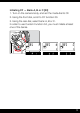
Initiating CF — Bank A, B or C [00] 1. Turn on the camera body, and set the mode dial to CF. 2. Using the front dial, scroll to CF function 00. 3. Using the rear dial, select bank A, B or C. 1 C1 P In order to use Custom Function 04, you must initiate at least one of the banks.
Setting Battery Type [04] 1. Using the front dial, scroll to Custom Function 04. 2. Using the rear dial, select 0, 1 or 2. 0 = Standard AA alkaline batteries 1 = AA NiMh / NiCD batteries 2 = Li-Ion Rechargeable battery 1 C1 P C2 C3 CF Av Tv X M 2 On Leaf Credo digital backs this custom function can be set from within the digital back menu system when the back is connected to the camera: Camera settings > 645DF > Active Custom Set > A > Setup Custom A > Battery type.
3. Attach and remove a lens Remove the front body cap, Just like you would remove a lens, by pushing the lens release button A backward and then turn the front body cap counter clockwise and lift out. Line up the lens mount alignment mark B with mark C on the camera to fit the lens in place, then rotate it in the direction of the arrow until it clicks into place.
4. Mounting the Leaf Credo Back 1. Remove the back cover from the camera. 2. Unlock the back by sliding the back lock away from the camera. 3. While holding down the back release button, remove the sensor cover plate from the back. 4. Place the bottom part of the back in the lower locking mechanism on the back of the camera body.
5. While holding down the back release button, push the back and camera body together firmly. 2 1 6. Release the back release button. 7. Slide the back lock to the locked position (towards the camera). Note: Your back should always be protected by its sensor cover plate when it is not attached to the camera.
5. Getting Started 1. Turn on the camera Switch the drive dial to "S". Choose your preferred exposure mode using the exposure mode dial. 2. Insert a formatted CF card A CF card can formatted in either your Credo back or computer.
3. Turn on the digital back Press and briefly hold the on/off button on the Leaf Credo back. The system is ready to shoot when you hear the beep and you see the home page on the screen.
6.
7.
8.
9. Taking a Shot Press the release button to start shooting.
10. Browsing Images • Tap browse soft button to access images. • Swipe bottom to see other images. • Single tap to select an image. • Double tap on image to view in 100%. • Zoom scaling from 6% to 400% by swiping on the right margin area.
• Pan across image using bottom or left area. • Side zoom control. • Tap screen to wake up back.
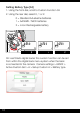
11. Evaluating your Shot • Tap small histogram. • View detailed histogram. • Tap over-exposure warnings. Tap Dynamic soft button for more options.
• Check sharpness with zoom. • Set white balance: 1. Tap on screen to access full-screen image. 2. Tap Dynamic menu soft button. 3. Tap WB icon. 4. Use picker to select neutral balance. • Tap Exposure information.
12. Editing your Images • Browse your images. • Delete an image by tapping the Dynamic button and tapping trash icon. A long tap on a thumbnail enables multiple selection.
• Rate your images. Tap Dynamic soft button for rating menu. • Tap stars to rate images.
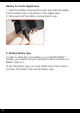
13. Changing the Focusing Screen 1. Remove the lens 2. Pull the focusing screen release lever A forward, as illustrated, with the tweezers to release the focusing screen. A 3. Remove the focusing screen from the focusing screen frame by grasping the tab on the edge of the screen with the tweezers as illustrated. * Do not touch the mirror or allow it to be damaged in any way.
4. When installing the screen, pinch the protruding part of the screen using the screen holder, and put the screen on the screen frame. 5. Push the screen frame up using the tweezers until hearing a clicking sound. The screen is now properly installed. * Never press down on other parts as this will affect the focus function. Caution • Since the focusing screen's surfaces are soft and easily damaged, handle them carefully. • Never touch the surface with bare fingers.
14. Custom Camera Functions C-00 – Select user configuration: A, B, C C-01 – TV/AV/Exp step: 1/3, 1/2 or 1 EV C-02 – Aperture setting after lens change C-03 – Time to sleep mode (def.
Words and letters on the camera’s LCD are abbreviated due to limitations of space and available letters Display examples of the main LCD Display examples in the custom function mode 29
15. Installing Software Install Capture One Capture One is supplied on a CD or you can download it from http://www.mamiyaleaf.com/downloads.
Leaf Limited Warranty Warranty Coverage Leaf warrants the digital camera back against defects in materials and workmanship for a period of one (1) year from the date of original retail purchase. Should you discover a defect, Leaf will, as its option, repair or exchange the Leaf product at no charge to you provided that you notify Leaf during the warranty period. Obtaining Warranty Service In the event that you believe the Leaf product requires service, please call your Leaf product specialist first.
http://www.mamiyaleaf.com © 2012, 2013 65300991-C – CREDO QUICK START GUIDE VER 2.