
Operating Manual


• Operating Manual
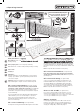
Part functions: (See gure B.)
1
Micro USB port: Used to connect Battery charging cable. Cover during
washing or rinsing.
2
Battery charging cable: Used to charge keyboard battery.
3
Port cover: Used to cover Micro USB port during washing or cleaning.
4
Power switch
5
Pairing keys
6
LED indicator:
Red: keyboard battery is charging; blinking blue or green: keyboard
is trying to pair; solid blue or green: keyboard is in paired mode and
connected to computer.
7
USB Dongle: Used when using RF connection method to transmit
keyboard USB signal to computer. Located on bottom of keyboard.
RF connected Installation:
(See gure A and E.)
Before rst installation, fully charge the battery using a 5V/1A USB
charging device and the included micro-USB cable. Place USB Dongle
(7) in computer USB port. Note that each dongle is different and is
paired with it’s own keyboard. Turn keyboard on (4). Wait for keyboard
to pair automatically.
If you are using this keyboard in combination with a Man & Machine
C Mouse Wireless you can use one USB dongle to connect both
devices. Once you have installed the rst device and let it pair
automatically, follow the pairing procedure to connect the second
device to the same dongle.
RF connected Pairing:
(See gure D and E.)
The keyboard is already paired with the USB dongle that comes with it.
To pair the keyboard with another dongle or to re-pair it with the dongle
it comes with: Make sure keyboard is on (4). Hold down ‘ESC’ and ‘M’
keys simultaneously for 3 seconds to start pairing. LED indicator (6)
will blink green when pairing. Allow 20 seconds for keyboard to pair. If
the USB dongle is plugged in, unplug the USB dongle and plug it back
in. Keep the keyboard close to the USB dongle. Once the keyboard is
paired and connected to the PC, the green LED indicator will turn solid
blue (6).
Note: The keyboard will not work if it has lost it’s pairing.
BT connected Installation:
(See gure E and F.)
Before rst installation, fully charge the battery using a 5V/1A USB
charging device and the included micro-USB cable. Turn keyboard on
(4). Pair keyboard.
BT connected Pairing:
(See gure E and F.)
To pair or to re-pair the keyboard: Make sure keyboard in on (4).
Hold down ‘BLANK’ and ‘F2’ keys simultaneously for 3 seconds to
start pairing. LED indicator (6) will blink blue when pairing. Allow
120 seconds for keyboard to pair. Once the keyboard is paired and
connected to the PC, the green LED indicator will turn solid blue (6).
Note: The keyboard will not work if it has lost it’s pairing.
Dual use: RF and BT: (See gure F and G.)
It is possible to enable RF and BT and switch between connection
methods. Follow Installation instructions for both. To switch to RF
connection, press ‘
BLANK
’ and ‘F1’ keys (See Figure G). To switch to BT
connection, press ‘
BLANK
’ and ‘F2’ keys (See Figure F)
.
Battery charging:
Use battery charging cable (2). Connect Micro USB connector to
keyboard, connect USB connector to 5V USB charging device or
powered USB computer port. LED indicator (6) will turn red when
charging. The red light will go off when fully charged.
3
C
Its Cool Flat Wireless
(Replacement drapes sold separately)
2
1
4
(See gure B.)
Used to connect Battery charging cable. Cover during
To pair the keyboard with another dongle or to re-pair it with the dongle
it comes with: Make sure keyboard is on (4). Hold down ‘ESC’ and ‘M’
keys simultaneously for 3 seconds to start pairing. LED indicator (6)
will blink green when pairing. Allow 20 seconds for keyboard to pair. If
3
C
(Replacement drapes sold separately)
Its Cool Flat Wireless
(Replacement drapes sold separately)
7
1
6
B
Its Cool Wireless Its Cool Flat Wireless
3
Before rst installation, fully charge the
battery using a 5V/1A USB charging device
and the included micro-USB cable.
5
5
5
5
BT
RF
A
USB
D
6 1
4
on
7
E
5
F
G
5
5