
User's Manual
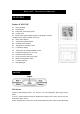


date/month and year display
4. Chn: scrolls through remote channels Outside 1, Outside 2 and outside 3); scrolls
through local and remote channels (Outside 1, Outside 2 and Outside 3) in (Max & Min)
temperature alarm mode; activates the learning procedure.
5. Snooze: Select Week/day language, toggles between 12 and 24 hour format, Alarm 1
& 2 On and Off; disables (resets) high & low temperature alarms; Alarm snooze. Select
C/F temperature display
6. Main LCD display with Green backlight.
7. House: enter House code.
8. Chn: Channel setting mode.
9. Battery compartment.
Display layout
1. Weather forecast symbol.
2. Moon phase display.
3. Weekday, date, month display.
4. Time display.
5. Alarm 1/2 icon.
6. RCC icon and zone map for USA.
7. Clock 1/2.
8. Outdoor temperature and trend.
9. Outdoor humidity and trend.
10. Remote channel 1,2,3 and 4.
11. Indoor temperature and trend.
12. Indoor humidity and trend.
POWER SUPPLY
Weather Station works with 2 AA batteries for the main unit and 2 AAA for the remote sensor (all
not included).
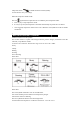
Battery installation
1. Main Unit: Use your finger to lift the battery door located at the back of the main unit. Insert
2 AA batteries according to the polarity. Close back the battery compartment.
2. Remote Sensor: Use a screwdriver to open the battery door located at the back of the remote
sensor unit. Insert 2 AA batteries according to the polarity. Close back the battery
compartment and tighten the screw.
LOW BATTERY INDICATION: If the batteries of the remote sensor are low, the following
indicator . will be displayed on the main unit. The indicator will also be displayed on the
bottom left corner of the remote sensor’s screen. When the main unit’s LCD display becomes dim,
it indicates that the batteries are low and need to be changed.