
User's Manual


Note: if the sensor is exposed to very low temperatures for an extended period of time, the
batteries may lose power which may cause the transmission range to be limited. High
temperatures also reduce the battery performance.
GETTING STARTED
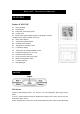
Setting the Main unit
1. Remove battery cover and insert 2xAA size batteries, ensure correct polarity + / - as shown in
the compartment, replace the cover.
SETUP
Automatic Learn Function:
Learn function executes automatically and runs for approximately 3 minutes when the batteries
are first installed in the receiver. Within these 3 minutes, the receiver picks up the temperature &
humidity signals from the remote sensor and displays the readings.
Manual-Learning (Searching for Remote Signals)
If a new remote sensor is added or if the signal is lost (outdoor display blinking), the learning
function must be executed again.
1. Press and hold CHN for 3 seconds to start.
2. A beep sound indicates that the learning function has started.
3. The 'Channel' symbol will flash and unit will beep as each remote sensor is detected.
4. Temperature & humidity readings of remote sensor are displayed on the receiver.
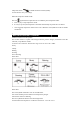
Fixing your sensor & receiver
The remote sensor has a wall mount holder. To fix it on a wall, fix the holder on a hook or nail.
The remote sensor should be fixed on a smooth surface to prevent altering the range of the date
transmission. To ensure a good transmission, the remote sensor should not install on or near a
large metal surface. Before choosing the location of the remote sensor, test that the receiver can
receive the signals. It is also recommended that the remote sensor is placed as close as possible to
the receiver to eliminate any interference. The receiver also has a wall mount holder and a stand.
To place it, use the same precautions as for the remote sensor.
Backlight:
The default state of the Backlight is Off. To turn the backlight on, press any button. It will stay on
for about 10 seconds.
CLOCK AND DATE SETTINGS
RADIO CONTROL CLOCK (WWVB---TBA)
- The WS1233 is designed to automatically synchronize its calendar clock once it is brought
within the reception range of a radio signal.
1. The clock automatically starts scanning the RF 433MHz signal after new batteries are inserted
in the main unit. When receiving radio signal, the Radio Tower symbol starts to blink. A complete
reception generally takes several minutes, depending on the strength of the radio signal. The scan
can also be triggered manually by holding the Min/- key for 3 seconds.
2. When the reception is complete, the Radio Tower symbol will stop blinking and remain solid.