
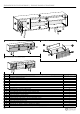
Instructions / Assembly


04
02
19
12
5
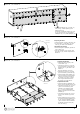
• Connect Back Panels (09), (10) and (11)
with nails (I), metallic plates (H) and
plastic profile (19).
Connectez les Panneaux arrière (09), (10)
et (11) avec des clous (I), des plaques
métalliques (H) et un profilé plastique (19).
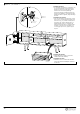
Preparing the Door:
• Insert the plastic ring (M) in the Door (12).
• Fix the hinges (J) in the Door (12) with
bolts (K), as shown in the DETAIL 2.
Préparation de la porte:
• Insérez la bague en plastique (M) dans le
trou en Porte (12).
• Fixez les charnières (J) à la Porte (12) à
l'aide des vis (K), comme indiqué dans le
DÉTAIL 2.
Preparing the Drawer:
• Insert the plastic ring (M) in the
Front drawer (13).
• Connect the parts (13), (14), and
(15) with dowels (C) and cam lock
hardware (E + F), as shown in the
DETAIL 3.
Apply the adhesive covers (G).
• Connect the parts (14), (15) and
(16) with dowels (C) and bolts (D).
• Insert the Base of the drawer (17)
into the channel in the Side Panels
(14) and (15) and in the Front of
the drawer (13), and fix it at the
lower edge of the Rear Panel of
the drawer (16) with nails (I).
Préparation du tiroir:
• Insérez la bague en plastique (M)
dans le trou en Façade de tiroir (13).
• Connectez les pièces (13), (14) et
(15) avec les chevilles (C) et le
matériel de verrouillage à came
(E + F), comme indiqué dans le
DÉTAIL 3. Appliquez les couvercles
adhésifs (G).
• Connectez les pièces (14), (15) et
(16) avec les chevilles (C) et des
vis (D).
• Insérer la Base du tiroir (17) dans
le canal des Panneaux latéraux (14)
et (15) et dans la Façade du tiroir
(13) et le fixer au du bord inférieur
du Panneau arrière du tiroir (16)
avec des clous (I).
DETAIL 2
DÉTAIL 2
09
09
11
10
13
14
15
16
17
20
STEP 4 / ÉTAPE 4
STEP 5 / ÉTAPE 5
STEP 6 / ÉTAPE 6
DETAIL 3
DÉTAIL 3
13
14