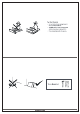
For Best Results Do not throw away packaging materials unt assembly is complete. Discernible item on 8 soft surface, such as cardboard or carpet, to protect finish. Proper assembly requires two people.
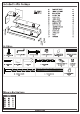
Included in this Package 01 BACK LEFT FOOT x1 02 FRONT LEF FOOT x1 03 SIDE BATTEN x1 04 BIG BATTEN x2 05 RIGHT FOOT x2 06 UPPER FOOT x2 07 SMALL BATTEN x2 08 CENTRAL TOP x1 09 TOP DIVISION x1 10 LOWER DIVISION x1 11 LOWER TOP x1 12 RIGHT SIDE x1 13 UPPER TOP x1 14 BACK x1 15 FITTINGS x1 EE 15 Fittings 21MM SCREW Fraught OGDEN A Arcadian PAD BALEEN WRENCH Crucifix SCREW D-15MM CONNECTOR COVER (Mini Fix) — Rc SUPPORT PIECE FOR :: SCREW NUT G 10X10 NAIL H WHITE GLUE | WRENCH J-7X50 SCREW SIX Sides NUT SI SIDES
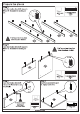
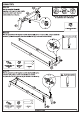
Prepare the pieces Step 1 Insert six threaded bar (V) on the A sides of the feet 01, 02, 05 and 06. THREADED BAR Step 2 Insert screw (B} into feet 01 and 02. Tighten to the limit. hh Step 3 Nail four circular pad (A) below of the feet 01, 02 and 05 using a hammer.
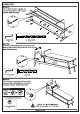
Prepare the pieces Step 4 Insert the wooden dowels (F} into parts ; i 04 and 07. Remember to use the glue Made {H}. F 6X30MM WOODEN WHITE GLUE vowel X It's important to glue the wooden dowel. Step 5 Insert the wooden dowels (F) into parts ss 09 and 12. Remember to use the glue It’s important to glue (H}. the wooden dowel. 6X30MM WOODEN H WHITE GLUE DOWEL x1 x4 Step 7 Insert four screw (C) into part 13. Tighten to the limit. Step 6 Insert the wooden dowels {F) into part 10. Remember to use the glue (H).
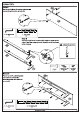
Assembly Step 8 Put the parts 08 and 09 together and use two screws {1} and the Allen wrench (B). Dy BALEEN WRENCH 17X50 SCREW x1 x2 Step 9 Fix the feet {06} to the crossbars (07) using the screw nut six sides (L) and the support piece for six sides nut (K), as shown in the drawing.
Assembly Step 11 Put the glue (H} in the wooden dowel (F) already fixed into part 10. Then put parts 10 together with part Important to gue : 7 the wooden dowel. i WHITE GLUE x1 Step 12 Use two screws {I} with the Allen wrench (B) on the sides of part 10. BALEEN WRENCH x1 17X50 SCREW x2 Step 13 Put the parts 06, 10, 11 and 12 together and use six screws (J) with the Allen wrench (B).
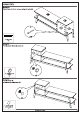
Assembly Step 14 Put the parts 01, 02 and 03 together and Insert the four mini fix connectors (D) in part 03, and rotate clockwise as shown. Tighten the mini fix up to the mit to assembly don’t be slack. 2 D-15MM CONNECTOR xe Step 15 Put the parts 04 and 06 together and fix the feet (06) in the crossbars (04), using a screw nut six sides (L) and the support piece for six sides nut (K), as shown in the drawing.
Assembly Step 17 Put the parts 04 and 11 together and use four screws (M} on each crossbar with the Allen wrench (B). B ALLEN WRENCH M 7X80MM SCREW x1 xB Step 18 Insert two screw (J) through part 12 according to the drawing using the Allen wrench (B). The screw (J) must > = fix parts 12 on the feet. % BALEEN WRENCH J-7X50 SCREW x1 p3 Step 19 insert the part 13, and Insert the four mini fix connectors (D) in parts 09 and 12, and rotate clockwise as shown. Tighten to the limit.
TAKING GOOD CARE OF YOUR FURNITURE Cleaning and caring instructions: Wipe the wood furniture down with a moist cloth to properly clean the furniture. Do not forget to dry your furniture out. Humidity can damage the finish or create mold. Chemical products are not recommended; Never clean the furniture with scouring powders, steel scrubber pads or any other product which can scratch its Furniture surfaces should not be covered with colored plastic or paper sheets.