Hi-Speed USB 2.
introduction Thank you for purchasing the MANHATTAN ® Hi-Speed USB 2.0 DVI Converter, Model 179133. This handy device helps increase productivity, improve “desktop” arrangements and extend the visual work area across dual monitors by making word processing, editing and multi-tasking more effective with less overlapped windows, fewer hidden palettes and better-organized views.
Regulatory Statements FCC This equipment has been tested and found to comply with FCC rules Part 15, Subpart B § 15.109/15.107 Class B. Operation is subject to the following two conditions: • This device may not cause harmful interference; and • This device must accept any interference received, including interference that may cause undesired operation.
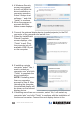
installation: Windows 2000/xp Driver Installation Installing the device driver enables your computer’s operating system to recognize the Hi-Speed USB 2.0 DVI Converter once it’s connected. Check your operating system and refer to the appropriate installation procedure to begin installing the device driver. Make sure the converter is unplugged from your PC or notebook computer before executing the setup program. 1. Insert the driver CD into the CD-ROM drive.
. With the Complete screen displayed, click “Finish” to exit the driver wizard. Plug the converter into an available USB 2.0 port of your PC or notebook computer. 6. If installing a single converter, select “Yes, I want to restart my computer now” and click “Finish” to complete the driver installation. NOTE: If installing more than one converter, proceed to Step 7. After rebooting the computer, the extended display will be shown on the second display device. 7.
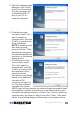
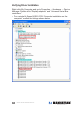
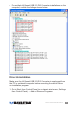
Verifying Driver Installation Right-click My Computer and go to Properties → Hardware → Device Manager. Double-click “Display adapters” and “Universal Serial Bus controllers.” • For a single Hi-Speed USB 2.0 DVI Converter installation on the computer, confirm the listings shown below.
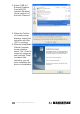
• For multiple Hi-Speed USB 2.0 DVI Converter installations on the computer, confirm the listings shown below. Driver Un-Installation Make sure the Hi-Speed USB 2.0 DVI Converter is unplugged from the PC or notebook computer before executing the device driver un-installation program. 1. Go to Start, then Control Panel (on a classic start menu, Settings then Control Panel) → Add or Remove Programs.
2. Select “USB 2.0 External Graphics Card with DVI Interface (Multiple) [driver version no.]” and click “Remove.” 3. When the Confirm Un-Install prompt displays, unplug the converter and click “OK” to continue. 4. When the InstallShield Wizard Complete screen displays, select “Yes, I want to restart my computer now” and click “Finish” to reboot. After rebooting, you will have completed the driver un-installation.
installation: Windows vista Driver Installation Installing the device driver enables your computer’s operating system to recognize the Hi-Speed USB 2.0 DVI Converter once it’s connected. Check your operating system and refer to the appropriate installation procedure to begin installing the device driver. Make sure the converter is unplugged from your PC or notebook computer before executing the setup program. 1. Insert the driver CD into the CD-ROM drive. The setup program should be launched automatically.
4. A Windows Security screen may appear, but will not affect the driver installation or converter operation. Select “Always trust software...” and click “Install” to continue. 5. Allow the program to proceed while this status screen displays... 6. Connect the external display device (monitor/projector) to the DVI connector of the converter and switch it on. 7. When the InstallShield Wizard Complete screen displays, click “Finish” to exit. Plug the converter into an available USB 2.0 port on the computer.
additional converter’s DVI connector and switch it on. Plug this additional converter into another USB 2.0 port on the computer; the driver will again proceed to install automatically. Continue connecting up to six display devices and converters as instructed above; or select “Yes, I want to restart my computer now” (as shown in Step 8) and click “Finish.” After each reboot, the extended display will be shown on the display device.
• For multiple Hi-Speed USB 2.0 DVI Converter installations on the computer, confirm the listings shown below. Driver Un-Installation Make sure the Hi-Speed USB 2.0 DVI Converter is unplugged from the PC or notebook computer before executing the device driver un-installation program.
1. Go to Start, then Control Panel (on a classic start menu, Settings then Control Panel) → Add or Remove Programs. 2. Select “USB 2.0 External Graphics Card with DVI Interface (Multiple) [driver version no.]” and click “Remove.” 3. When the Confirm Un-Install prompt displays, unplug the converter and click “OK” to continue. 4. When the InstallShield Wizard Complete screen displays, select “Yes, I want to restart my computer now” and click “Finish” to reboot.
Primary Mode The system’s main graphics adapter will automatically switch to act as the secondary graphics adapter, and the main screen will now work as the extended desktop. The monitor that’s connected to the Hi-Speed USB 2.0 DVI Converter will now act as the primary Windows desktop. USB 2.0 Graphics DEVICE-1 NOTE: Some display utilities and drivers found with certain AGP and built-in display adapters may prevent this option from working on some systems.
USB 2.0 Graphics DEVICE-1 the secondary CRT/LCD monitor. The screen resolution setting on the secondary monitor will follow the primary screen’s resolution. If the selected resolution setting is not supported by the primary screen, however, a warning dialog box will be displayed and the suggested screen resolution will be shown. Rotate Mode This feature lets you set the orientation of the secondary CRT/ LCD monitor in Extended or Primary mode: 0, 90, 180 or 270 degrees.
Resolution The resolution support ranges from 800x600x16-bit to 1920x1200x16bit. It can be selected here (from the system tray) or by going to Display Properties/Settings. Aspect ratios for each resolution setting are shown in the table below.
fAQ Following are some frequently asked questions — and answers — regarding the installation or operation of the Hi-Speed USB 2.0 SVGA Converter. Q: Why can’t I make the Hi-Speed USB 2.0 SVGA Converter the primary display? A: Some video card manufacturers include a utility that prevents other video cards from being set as the primary card. Check the bottomright corner taskbar for the utility, and disable the utility before designating the Hi-Speed USB 2.0 SVGA Converter as the primary display.
operation tips Following are some tips that may help if you are experiencing any difficulties using the Hi-Speed USB 2.0 SVGA Converter. Contact your dealer for additional assistance, if needed. • • • • • • • • • • • • • Check to make sure that all connectors are plugged in correctly. Make sure that the USB port that you are using is USB 2.0. Try a different USB 2.0 port and/or computer. Check to see that the monitor is connected correctly and the power is on.
specifications Standards and Certifications • Hi-Speed USB 2.
MANHATTAN® offers a complete line of PC Components, Peripherals, Cables and Accessories. Ask your local computer dealer for more information or visit us online at www.manhattan-products.com Copyright © MANHATTAN All products mentioned are trademarks or registered trademarks of their respective owners.