Instruction Manual (English) www.eurosat.
Thank you for your purchase of the DSM-4S, should you require further assistance with its use it is suggested that you initially contact your supplier with enquiries as many queries can be diagnosed via email or by phone.
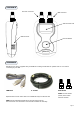
YOUR DSM-4S Receiver Connector LNB Connector 128 x 64 Pixel LCD USB Connector Function Button Manhattan ACCESSORIES Everything you need is supplied with your DSM-4S including a USB cable for updates and a F to F lead for connecting to your LNB. USB Lead F - F Lead Replacements for both these items are available directly from Eurosat Ltd. Port Savers Note: The Port Savers (fitted) must remain fitted at all times.
CONNECTIONS Your DSM-4S is ready to use straight out of the box. How to connect your meter is illustrated below. Note: Always make all of your connections prior to switching your DSM-4S on. LNB LNB IN For the easiest method of connection disconnect the cable from the LNB on your dish and connect this to the Set Top Box (receiver symbol) connector on your DSM-4S. Then use the short F cable supplied with your DSM-4S to connect your LNB (dish symbol) connector to the LNB as shown above.
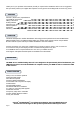
FINDING SATELLITES Now that you have connected your DSM-S4 you are ready to find some satellites. Your DSM-S4 will be pre-loaded with a selection of satellites. These selections can be changed by downloading different region packs from the Eurosat web site. In the following examples we will be looking at the European pack of satellites which comprises of the following... Astra 2A Astra 2D Astra 1 Hotbird 28.2' East 28.2' East 19.2' East 13.
IMPROVING YOUR SIGNAL Now that you have acquired your satellite follow these steps to further improve your signal. While the display is showing found move the dish very slowly off the target satellite in either a left or right direction (Azimuth adjustment) until the signal level just starts to drop away and make a mental note of the position of your dish, now move the dish back in the opposite direction watch where the signal level peaks and continue until the level just starts to drop off again.
SOFTWARE UPDATES From time to time it may be necessary to update the satellite selections on your DSM-4S satellite meter or you may wish to download an alternative satellite pack from the Manhattan web site. Before proceeding to download new or updated settings please insure that the USB drivers are correctly installed, this is usually an automatic process (as described below) but the drivers can also be manually downloaded and installed if required.
Continued... SOFTWARE UPDATES The first stage of the driver installation is now complete click “Finish” to continue the installation. The Found New Hardware Wizard will appear again to install the second driver required. Select “Install the software automatically” option and click on “Next >”. Your PC will then search for the driver required. Once this stage of the installation is complete click on “Finish” and a notice balloon will appear to inform you that your driver installation is complete.
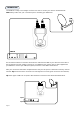
DOWNLOADS To update or load your selected satellite file to your DSM-4S meter connect your meter via USB to your PC. The USB port is located on the lower right side of the casing. Program mode On connecting the DSM-4S to your PC the LCD will flash a few times and settle into program mode after a few seconds (as shown in the diagram on the right). Double click the target style icon to open the loading program and follow the steps below.
NOTES Page 10
NOTES Page 11
LIMITED WARRANTY Eurosat will, at our option, repair or replace any Manhattan DSM-4S Digital Satellite Meter found to be defective in manufacture within the warranty period (1 year). The warranty period is determined by the date of DSM-4S purchase. Keep your receipt as proof of purchase. Otherwise the warranty is determined by date of manufacture. This warranty does not apply to damage caused by accident, misuse, or tampering with the unit or seals. This does not affect your statutory rights.