WIRELESS 150N PCI CARD USER MANUAL MODEL 525473 MH-525473-UM-0713-01
Thank you for purchasing the Manhattan Wireless 150N PCI Card, model 525473. This compact high-speed adapter allows you to connect your desktop computer towireless networks so you can transfer or receive digital images, videos and MP3 files faster than ever, connecting to the wireless network with link speeds of up to 150 Mbps using the latest in wireless technology. This adapter is also compatible with 802.11b and 802.
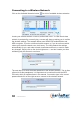
TABLE OF CONTENTS section page Installation............................................................................................................... 5 Configuration ......................................................................................................... 7 Manhattan WLAN Utility Main Screen............................................................. 8 Connecting to an Available Wireless Network................................................10 Profile List..................
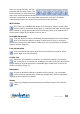
SAFETY GUIDELINES For the protection of equipment users and connected devices, follow these safety guidelines: 1. This adapter is designed for indoor use only; do not place this adapter outdoors. 2. Do not place or use this adapter in excessively hot or humid environments. 3. Do not yank any connected cables. 4. Firmly secure this device if it’s placed at any significant height to prevent damage or injury should it fall. 5. Keep this device out of the reach of children. 6.
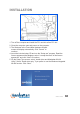
INSTALLATION 1. Turn off the computer and install the PCI card into a free PCI slot. 2. Close the computer case and power-on the computer. 3. The Welcome to the Found New Hardware Wizard screen will display automatically. Click “Cancel” to continue. 4. Insert the included setup CD and run the “Setup.exe” program. Read the license agreement that displays; select “I accept the terms of the license agreement” and click “Next” to continue. 5.
. In Windows XP, a “Microsoft Zero Configuration Tool” option displays. It’s recommended that the alternative “Manhattan Configuration Tool” option be selected, as it features more functions. Click “Next.” Choose to install... Install driver and Manhattan WLAN Utility Install driver only 7. Once the software installation is complete, select “Yes, I want to restart my computer.
CONFIGURATION The configuration utility — which displays automatically once the adapter is connected — is a useful utility that helps you configure the adapter and monitor link status and statistics during the communication process. This adapter will autoconnect to the wireless device that has the best signal strength and no wireless security setting. The configuration utility icon appears in the Windows systems tray while the adapter is running. You can open it by double-clicking on the icon.
Launch Config Utility This starts the configuration utility. It performs the same function as doubleclicking the icon. Switch to Client + AP Mode In this mode, the Manhattan Wireless 450N Dual-Band USB Adapter acts as both a wireless network adapter for your computer and an access point for other wireless devices to connect to the network. In most cases, this function is not needed and should not be activated.
After you launch the utility, you’ll be presented with the main screen. The screen provides you with information about your current wireless connection, such as the name (SSID) of the network the computer is connected to, the current data rate and the computer’s IP address. It also provides links to the various functions that the utility provides. Wi-Fi Direct Wi-Fi Direct is a standard that allows Wi-Fi devices to connect to each other with no need for a wireless access point.
Connecting to a Wireless Network Click on the Available Networks button for a list of available wireless networks. Locate your wireless network in the list, and double-click it. In case the wireless network is protected by a security key, a screen will show up asking you to confirm the wireless settings. The example below uses WPA2-PSK authentication and AES encryption.
If the information you provided turns out to be correct, you’ll see a check mark in front of the name of the network you’ve just connected to. The check mark indicates a proper connection has been established. If you entered a wrong password, the utility will not display an error message: It will instead simply not show the check mark. Another indication that something went wrong is when you click on the Link Information button and the screen displays “Status = Disconnected.
you can add that connection to a profile. To do that, open the Available Networks screen, select the active connection indicated by the check mark (circled in red below), then click on the icon (circled in green below). The next screen allows you to provide a name for the profile (for example, “work network”). The SSID (service set identifier) will show the name of the network that you’re connected to at the moment. The network type is set to the correct value by default.
On the next screen you can define the maximum translation output power (Tx Power) of the wireless adapter. While you would normally leave the setting as “Auto” or “100%” in situations where you do not want to have your signal travel so far (e.g., because you live in an apartment building), you can choose a lower value. After all, being able to receive a wireless signal is the first step in a successful attempt to break into the network.
At this point, you’re done creating and connecting the profile. To activate it, click on the icon (circled in red below). Changing an Existing Profile Click on the Profile List button to open the profile list. Select the profile you want to modify and click on the edit icon (circled). Editing the profile involves the exact same steps and screens as creating a profile, which you have seen on the previous pages.
Creating a Profile with WPS Besides adding a profile manually, you can connect to a wireless network and create a profile based on WPS technology. Wi-Fi Protected Setup, also known as Wi-Fi Simple Config, is a computing standard that attempts to allow easy establishment of a secure wireless home network. It lets you join a secure wireless network simply by pushing a button or entering a PIN code) — without entering a complicated password.
To initiate a PBC connection, you need to first press the WPS button on the router; then, within two minutes, press the WPS button on the adapter. The two devices will automatically connect to each other, and the wireless adapter will use the correct network encryption key for your wireless network. NOTE: The location of the WPS button on adapters varies. Yours may not even have a physical WPS button.
The utility will then scan for a wireless router currently accepting PBC requests. If the scan is successful, the main Profile List screen displays and the network name now has a preceding check mark. Should you instead see the screen below, something went wrong. Either the WPS button wasn’t pressed on the wireless router, or you didn’t press the Start PBC button within two minutes after the button on the wireless router was pressed.
Advanced The Advanced screen lets you configure the wireless operational mode of your adapter. Normally, there is no need to open this page and make any changes. If your wireless adapter is capable of 2.4 and 5 GHz connections, as dual-band adapters are, you can select the Wireless Mode setting here. By default, both frequency bands are enabled. The option may be grayed out or not available, depending on your wireless adapter.
The second Advanced screen is designed for network administrators and allows for the installation of 802.1x WPA Enterprise certificates. Both user and issuer certificates can be installed, though in most cases this won’t be required since the certificate will likely have already been installed through the included Windows components. About Click on the About button to view information about the utility itself, the driver installed and other things.
Wi-Fi Direct – Overview Wi-Fi Direct is a standard that allows Wi-Fi devices to connect to each other without a wireless access point. It’s become increasingly common for smartphones and portable media players to include Wi-Fi as a standard feature, and it’s even become common in feature phones. Currently, printers, cameras, scanners and many other common devices can be found with Wi-Fi in addition to other connections, like USB.
Once you’ve successfully activated Wi-Fi Direct service, the main screen will display. Depending on whether or not Wi-Fi Direct–enabled devices are found, the screen will look different: Example 1: Wi-Fi–enabled devices are found in the network. GO (Group Owner) indicates an access point or similar device. This indicates that the device is the head of one or more client devices (multiple clients belong to this GO).
Example 2: No Wi-Fi enabled devices are found in the network. Right-click the laptop icon in the lower left corner to open the menu below. Scan: Perform an active scan for available Wi-Fi Direct enabled devices. Enable Quick Connection: Enables the Quick Connection mode. Enable autonomous GO: Click to make your computer a group owner (GO), symbolized by . Once this feature is enabled, you need to set the WPA password. The default value is 12345678.
Back at the main screen, you should see a group owner (GO). , indicating that this computer is now Media Sharing: You can turn your computer into a media server for connected Wi-Fi Direct clients. Enter a server name — e.g., mymediaserver — and specify the folder on your hard drive you want to share. Click to start the service. Click to re-start the service. Click to stop the service.
After you’ve enabled the media sharing function, other computers can see the shared folder in the network environment. The example shows Ralink_Media_ Server, but it will be the name that you entered as the server name in the previous step. Double-click the server icon to open Windows Media Player, allowing users to play back the media files you shared.
Establishing a Wi-Fi Direct Connection with Another Client To establish connection with a P2P (peer to peer) device, double-click on its icon.
You’ll be prompted to select its WPS connection type: Push-Button Configuration: Select to use this method to establish a connection. Display PIN: Select to use this method to establish a connection. With this method, you’ll see an 8-digit number displayed here. Enter this number on the device you want to connect to. Enter PIN: Input the 8-digit PIN number displayed on the device you want to connect to in the Pin Code field to establish the connection. Click to establish the connection.
can only effectively be used if a second network connection, either wired or wireless, is active. Once you activate the AP mode, you’ll be asked to specify which network adapter (other than the Manhattan wireless adapter) should be used for the AP mode. If the goal is to share an existing Internet connection, then this adapter must provide an Internet connection your computer.
Access Control List Advanced settings AP Setup Connected devices Wireless signal is active Wireless connection is not encrypted AP mode is active AP Setup Now that your computer acts as a wireless access point, you can give the network a proper name so that other computers can easily find it. Enter a new name for your wireless network in the SSID field or leave the current one.
You can adjust the wireless channel on the next screen. For optimal performance, it’s best to use a channel that is furthest away from other wireless networks. For example, if there is another wireless network running on channel 8, ideally you want to use channel 2 or 1, as shown below. If you were to use a channel closer to the existing wireless network, it would still work, but the performance would be slightly diminished.
The next step is to enter the actual password, or passphrase, for the wireless network. As for the Group Rekey Interval setting, the group key (or group transient key) is a key shared among all wireless clients connected to the same AP, and is used to secure multicast/broadcast traffic. The interval defines how often the group transient key is changed. This is not the wireless password, however. This mechanism works “behind the scenes” — completely hidden from you the user.
is disabled, all wireless clients can freely communicate with each other. Choosing which option is the right one depends on your network application. • Beacon Interval (ms) — Access points broadcast traffic indication messages, or beacons, in order to synchronize wireless networks. The beacon interval specifies the duration in milliseconds between those beacon packets. The default value of “100” typically does not need to be changed.
hiding the SSID — you can make your network much more secure. Click the Access Control List icon to display the feature’s configuration screen. The MAC address is a unique hardware identification number assigned to any network adapter during production. Whether the adapter is internal to a notebook or iPad, or is a PCI network card in a desktop PC, the MAC address is unique to that device.
• MAC Address — Enter a 12-character address without no spaces, dashes or colons; e.g., 001122334455. (Media access control, or MAC, addresses used elsewhere can .appear in 00:00:00:00:00 or 00-00-00-00-00 formats.) Based on the MAC address of the wireless client, you can now decide whether to allow or deny access. • Add, Delete and Delete All — To add the currently displayed MAC address to the list, click on the “Add” icon. To remove an address from the list, select it and click on the “Delete” icon.
The utility will then deactivate ICS (Internet Connection Sharing) and return to the original mode. The message below will be shown briefly. This is completely normal and is to be expected. Client + AP Mode In this mode the Manhattan Wireless 450N Dual-Band USB Adapter acts as both the wireless network adapter for your computer and as an access point so other wireless devices can connect to the network. Click to open the access point configuration menu.
The image above shows that a) The wireless adapter is connected to the wireless network “IT_WIRELESS”; and b) The wireless adapter broadcasts an access point signal as “SoftAP-66,” which uses WPA2 encryption. Any wireless client that connects to “SoftAP-66” will get Internet service via the IT_WIRELESS network.
SPECIFICATIONS NOTE: Specifications are subject to change without notice. Standards • IEEE 802.11a (54 Mbps Wireless LAN) • IEEE 802.11b (11 Mbps Wireless LAN) • IEEE 802.11g (54 Mbps Wireless LAN) • IEEE 802.11n (450 Mbps Wireless LAN) • IEEE 802.11e (QoS Enhancement WMM) General • Interface: Hi-Speed USB 2.0 • Chipset: Ralink RT3573 • Frequency band: - 2.400 – 2.483 GHz (Industrial Scientific Medical Band) - 5.150 – 5.825 GHz (Industrial Scientific Medical Band) • Modulation technologies: - 802.
- 11n 20 MHz: -69 dBm +/- 2 dBm - 11a: -70 dBm +/- 2 dBm • Antennas: 3T3R mode, 2 printed antennas, 1 external antenna • Certification: FCC Class B, CE LEDs • Link/Activity Environmental • Dimensions: 18 (H) x 26.6 (W) x 87.1 (L) mm (0.7 x 1.0 x 3.4 in.) • Weight: 0.16 kg (0.4 lbs.) • Operating temperature: 0 – 40°C (32 – 104°F) • Operating humidity: max. 90% RH, non-condensing • Storage temperature: -20 – 60°C (-4 – 149°F) System Requirements • Windows XP/Vista and Windows 7/8 • Available Hi-Speed USB 2.
WASTE ELECTRICAL & ELECTRONIC EQUIPMENT Disposal of Electric and Electronic Equipment (applicable in the European Union and other European countries with separate collection systems) This symbol on the product or its packaging indicates that this product shall not be treated as household waste. Instead, it should be taken to an applicable collection point for the recycling of electrical and electronic equipment.
COMPLIANCE STATEMENTS FCC Class B This equipment has been tested and found to comply with the limits for a Class B digital device, pursuant to Part 15 of Federal Communications Commission (FCC) Rules. These limits are designed to provide reasonable protection against harmful interference in a residential installation.
© IC Intracom. All rights reserved. Manhattan is a trademark of IC Intracom, registered in the U.S. and other countries.