Hi-Speed USB Analog TV/FM Radio Stick user manual Model 161251 MAN-161251-UM-0910-01
Introduction Thank you for purchasing the MANHATTAN® Hi-Speed USB Analog TV/FM Radio Stick, Model 1612512. This device supports most worldwide analog television formats and FM radio to notebook and desktop computers, allowing you to transform your computer into a multimedia center. Advanced features like Multi-Channel Preview and Digital Personal Video Recording capture and directly save programs to the hard drive for replay or transfer to CD and other portable media devices.
hardware Installation 1. Connect the analog input jack to the analog source. Protective cap USB connector Analog input 2. With the protective cap removed from the Analog Stick, plug the USB connector into a USB port on the PC — directly or by using the included USB extension cable. Windows will identify the device and automatically launch the New Hardware Device wizard. 3. When prompted, click “Cancel” to complete the Hardware Installation procedure.
software and driver Installation 1. Insert the Software/Driver CD. Windows should run the setup program automatically; if it doesn’t, browse to the CD and select “USB_TV_Stick.exe.” 2. Choose the setup language. 3. When prompted to install Windows Media Format9, click “Yes.” 4. Click “Next” to run the InstallShield wizard. 5. Choose the installation path by selecting “Browse,” or click “Next” to use the recommended default path. 6. Choose the components to install and click “Next.” 7.
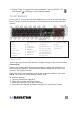
10. Select “Finish” to complete the driver installation. Icons for MYGICA TV and FM radio will display on the Windows desktop. TV interface Click on the TV icon on the desktop to display the on-screen controls described below. See the Remote Control section for a separate list of functions and their controls. 1. 2. 3. 4. 5. 6. 7. 8. 9. Record Play Pause Stop Reverse Fast forward Hue Status window Minimize 10. Full-screen window & video desktop switch 11. Exit 12. Channel up 13.
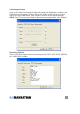
Auto Scan To fine tune a channel: 1. Click on a channel to highlight it. 2. Slide the Fine Tune control left or right to adjust. NOTE: Normally, the program automatically provides the best quality possible. To activate or skip a channel: 1. Click on a channel to highlight it. 2. Click the box in the “Index” column (as shown in the screen image above) to keep the channel on the active list; click a box with a check mark (thereby removing the check mark) to skip that channel in the list.
Color/Image Control Click on the Video ProcAmp tab to adjust the settings for Brightness, Contrast, Hue, Saturation and Sharpness. Simply click on the slider control and move it left or right to suit your preferences. Click “Default” to return to the original settings. NOTE: If the TV screen goes blank or black during an adjustment, click “Default.” Recording Options Click on the Record tab to select a recording format: DVD, VCD, SVCD, MPEG4, AVI, WMV, MP3 or WMA.
NOTE: TV standards and their control vary by country/region. NTSC (National Television Systems Committee): America, Taiwan, Canada, Japan and Central and South America. PAL (Phase Alteration Line): Europe, China, Central Africa, Australia and South Africa. SECAM: France, Africa and the Middle East. The recording size can be from 352 x 240 to 720 x 480 (NTSC) or 352 x 288 to 720 x 576 (PAL). Keep in mind that larger audio and video bit rates use more disk space, but provide better audio and video quality.
Desktop mode: Displays the TV image on the computer desktop. Video input: Presents three options: TV Tuner (default), Composite and S-video. Video standard: Changes the video format to PAL/NTSC/SECAM. The default is PAL-BDGHI. Color adjust: Adjusts the color and brightness. Capture: Takes a single-frame snapshot. The default format saves the image as a .bmp file. Channel list: Lets you edit the channels. For details, see Channel Edit above.
recording duration period. Click “Schedule Recording” (see Page 5) to display the “Schedule” screen, which features the following options buttons. New: Lets you add a new Schedule Recording task (details below). Modify: Lets you make changes to a selected task. Delete: Lets you delete the selected task. OK: Activates the status of all Schedule Recording tasks that’ve been entered. With the Add Task screen displayed, you have the following options.
Click “Next” to display the Time Setting screen, which presents these options. Only once: Limits the task to a one-time recording. Every week: Repeatedly records each week as scheduled. Every day: Repeatedly records each day as scheduled. NOTE: Time of day is a 24-hour (vs. 12-hour) format. When finished, click “Next” to activate the Schedule Recording settings and display the After Task Completed screen. This presents three courses of action once the recording task is complete.
Snapshot To capture a picture while watching TV (and save it as a .bmp file), click on the “Snapshot” button (see Page 5). Save the image when prompted, and double-click on the image to perform edits. If you don’t wish to save the image, click on “Delete.” TV Channel Preview Complete the channel scan before previewing. Most channel preview/selection functions are controlled with standard keys and buttons.
Click on the “Time-shift” button to active it (see Page 5). A time monitoring bar will appear, informing you how much of the Time-shift buffer is in use. You can also use your mouse to drag the Time Control Shuttle to jump to a specific time. To exit Time-shift, click on the “Stop” button (see Page 5). remote control With the included CR2025 battery installed, press the Turn On/Off button. (Replace battery as needed.) 1. Mute 2. Input source: TV, Composite, S-Video 3. FM: Switch to FM 4.
specifications Standards and Certifications • CE • FCC • RoHS • WEEE • USB 2.
FEDERAL COMMUNICATIONS COMMISSION REGULATORY STATEMENT FCC Class B This equipment has been tested and found to comply with the limits for a Class B digital device, pursuant to Part 15 of Federal Communications Commission (FCC) Rules. These limits are designed to provide reasonable protection against harmful interference in a residential installation.
WASTE ELECTRICAL & ELECTRONIC EQUIPMENT Disposal of Electric and Electronic Equipment (applicable in the European Union and other European countries with separate collection systems) ENGLISH This symbol on the product or its packaging indicates that this product shall not be treated as household waste. Instead, it should be taken to an applicable collection point for the recycling of electrical and electronic equipment.
Italiano Questo simbolo sui prodotto o sulla relativa confezione indica che il prodotto non va trattato come un rifiuto domestico. In ottemperanza alla Direttiva UE 2002/96/EC sui rifiuti di apparecchiature elettriche ed elettroniche (RAEE), questa prodotto elettrico non deve essere smaltito come rifiuto municipale misto. Si prega di smaltire il prodotto riportandolo al punto vendita o al punto di raccolta municipale locale per un opportuno riciclaggio.
WARRANTY INFORMATION english: For warranty information, go to www.manhattan-products.com/warranty. deutsch: Garantieinformationen finden Sie unter www.manhattan-products.com/warranty. ESPAñOL: Si desea obtener información sobre la garantía, visite www.manhattan-products. com/warranty. FRANçAIS: Pour consulter les informations sur la garantie, visitez www.manhattan-products. com/warranty. Polski: Informacje dotyczące gwarancji znajdują się na stronie www.manhattan-products. com/warranty.
MANHATTAN® offers a complete line of PC Components, Peripherals, Cables and Accessories. Ask your local computer dealer for more information or visit www.manhattan-products.com. All products mentioned are trademarks or registered trademarks of their respective owners. MANHATTAN® bietet ein vollständiges Sortiment an PC-Komponenten, Peripherie, Kabel und Zubehör. Weitere Informationen erhalten Sie von Ihrem Händler oder auf www.manhattan-products.com.
Copyright © MANHATTAN