
Install (Multi) User Manual

MAN-432351-QIG-ML1-0613-03-0
LCD WALL MOUNT
INSTRUCTIONS
MODEL 432351
• Bevor Sie mit der Montage beginnen, prüfen Sie sorgfältig, dass die
Packung alle oben abgebildeten Teile enthält.
• Trennen Sie vor der Montage sämtliche Kabel, die den Zusammenbau
der Komponenten beeinträchtigen können. Achten Sie darauf, dass alle
Schrauben fest angezogen sind, um Schaden an Ihrem Bildschirm oder
Ihrer Einrichtung zu vermeiden.
• Prüfen Sie nach der Montage sorgfältig, dass alle Teile fest verschraubt
sind und sich nicht lösen können, um Schaden an Ihrem Bildschirm oder
Ihrer Einrichtung zu vermeiden.
1 Verwenden Sie die kleine Wasserwaage (B) wie dargestellt, platzieren
Sie die Wandhalterung (D) an einer vertikalen Oberfläche und markieren
Sie die Positionen der beiden Halterungslöcher. Bohren Sie die beiden
Löcher und verwenden Sie dann entweder die beiden Dübel oder
Schrauben (A), um die Halterung an der vertikalen Oberfläche zu fixieren.
2
Richten Sie die Löcher aus und verwenden Sie die vier Montageschrauben
(C), um die Wandhalterung (E) am Bildschirm zu befestigen.
3
Schieben Sie die Wandhalterung auf die Halteklammer, drehen Sie dann
die Rändelschraube (G) in der Mitte der Wandhalterung fest.
4 Positionieren Sie den Bildschirm wie gewünscht, entfernen Sie dann
die Abdeckungen auf den Schrauben und ziehen Sie diese mit dem
Schraubenschlüssel (F) fest.
Die Spezifikationen finden Sie auf manhattan-products.com.
manhattan-products.com
Important: Read before use.
Importante: Leer antes de usar.
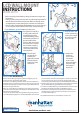
1 Using the mini-level (B) as
shown, position the wall
bracket (D) against the
vertical mounting surface
and mark the positions of
the two bracket holes.
Punch or drill starter holes,
if needed, then use either
the 2 bracket-mounting
anchors or screws (A) to
secure the bracket to the
vertical surface.
2 Align the holes and
use the 4 mounting
screws (C) to attach
the wall mount (E)
to the monitor.
• Before assembly, check that the package contains the components
shown here.
• During assembly, disconnect any cords or cables that could interfere
with the placement of the components. Make sure that all screws
are tightened to prevent damage to the monitor or nearby items.
• After assembly, periodically check the fittings to ensure no slippage
or loosening has occurred that could result in monitor damage.
For specifications, go to manhattan-products.com.
3 Slide the wall
mount into the
bracket, then
tighten the bracket
knob (G) into the
center hole of the
wall mount.
4 Position the
monitor as
desired, then
remove the
covers on the
bolts and tighten
the joints using
the included
wrench (F).
B
42
4
D
E
C
x 4
F
A
x 2
1
A
B
D
2
E
C
DEUTSCH LCD - Wandhalterung
æ
3
G
E
D
4
F
DEUTSCH LCD - Wandhalterung