
User Manual

Part Number 020003996 3/15 21
Section 2 Installation
Step by Step Installation
GENERAL
S/SV/SVI/NGF Series dispensers have a stainless steel
cabinet and lighted merchandiser standard.
Beverage valves, coldplate connections, drain connections
and electrical components are front serviceable.
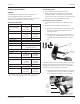
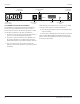
SPECIFICATIONS CHART
Min. Max
Water pressure
(Incoming from Water
Main)
40 psi
(2.76 BAR
275,790 Pa)
55 psi
(3.79 BAR
379,211 Pa)
Ambient temperature 40°F (4°C) 105°F (41°C)
CO
2
pressure 40 psi
(2.76 BAR
275,790 Pa)
50 psi
(3.44 BAR
344,738 Pa)
Electrical 115V/60 Hz/1 230V/50-60 Hz/1
Pre-mix pressure
Normal 60 psi * (4.13 BAR, 413,685 Pa)
Diet 40 psi * (2.76 BAR, 275,790 Pa)
B-I-B 60 psi or according to line run
(4.13 BAR, 413,685 Pa)
Carbonation
Cold 75 psi (5.17 BAR, 517,106 Pa)
Ambient 90 psi
(6.205 BAR
620,528 Pa)
100 psi
(6.89 BAR
689,475 Pa)
Quickdraw CO
2
supply 75 psi (5.17 BAR, 517,106 Pa)
Quickdraw regulator
valve
40 psi
(2.76 BAR
275,790 Pa)
50 psi
(3.44 BAR
344,738 Pa)
Quickdraw Carbonation
Cold 75 psi (5.17 BAR, 517,106 Pa)
Ambient 90 psi
(6.205 BAR
620,528 Pa)
100 psi
(6.89 BAR
689,475 Pa)
* This is the optimal pressure. When the foam is too high, decrease the
pressure; when spitting/popping is an issue, increase the pressure.
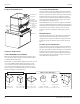
UNIT INSTALLATION
1. Place the dispenser in the desired location.
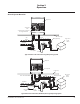
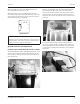
2. Run the beverage lines and water lines; make sure
to install the water connections to the proper inlets.
Connection “A” comes from the brass carbonator pump
and connection “B” is your plain water supply.
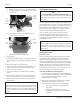
Install Plumbing Drains & Insulate
3. Connect Drain Kit to drain pan (see Drains on page
20).
4. Extended splash panel units do the following:
A. Remove the extended splash panel from the unit
by removing the two (2) Phillips head screws
holding it in place.
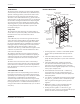
B. Determine drain setup and screw either the 90°
or straight line drain fittings into the collector box
included with the drain kit (see Drains on page
20).
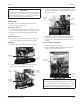
Collector
Box
Drain Line
Fittings
Straight
Fittings
90°
Fittings
NOTE: Depending on the drain setup, connect the straight
fittings to the collector box if the drain lines are to run
straight back underneath the unit or the 90° fittings if the
drain lines run down through the countertop.
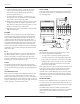
C. Using the provided radiator clamps connect and
secure the drain lines to the collector box fittings
with a standard screwdriver or 5/16 nut driver.
Drain
Line
Drain Line
Fitting
Collector
Box