
Owner's Manual


Location
ArcticPure
®
water filtration systems should be located on the
incoming cold water line and preferably away from heavy traffic areas.
The system should be mounted on a wall or structure that will support
the weight of the system when filled with water.
NOTE: This product is designed for cold water use only (less than
100°F/38°C). Passing hot water through this product may seriously
damage filter housings and/or cartridges and affect warranty
coverage.
ArcticPure
®
systems may be used with metal or non-metallic piping
systems.
NOTE: Any non-metallic fittings used in the installation must be of
adequate rating for the line pressure.
Water Service
All ArcticPure
®
systems come with 3/8" John Guest connections on
the inlet and outlet ports.
John Guest connections are suitable for use with the following
tubing:
• Polyethylene • Nylon
• Polyurethane • Seamless Brass (soft)
• Seamless Copper (soft) • Seamless Mild Steel (soft)
Assembly - AR-10000/AR-20000
NOTE: The head/bracket will be packed separately from the filter
cartridge in the product box.
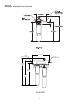
1. Locate position to mount the filter system. Be sure to leave
enough clearance (a minimum of 2" beneath the filter cartridge
length is recommended) to allow for cartridge changeout.
2. Mark and drill mounting holes.
3. Mount filter head, using key hole slots in the mounting bracket.
4. Remove the protective cap from the cartridge.
5. Inspect the cartridge and o-rings for damage. See Replacement
Parts list if replacement is required.
6. Lubricate o-rings with food grade lubricant.
7. With the product label facing to the left, insert the cartridge into
the filter head. Rotate 1/4 turn to the right to secure. Product
label will face forward.
Assembly - AR-40000
NOTE: The manifold cover will be packed separately from the
manifold. The filter cartridges will be packed separately in the
product box.
Locate position to mount the filter system. Be sure to leave enough
clearance (a minimum of 2" beneath the filter cartridge length is
recommended) to allow for cartridge changeout.
1. Use a level under the mounting bracket to be sure that the
system hangs evenly.
2. Mark and drill the top and bottom mounting holes.
3. Install bottom mounting fasteners and mount the manifold,
using the key hole slots in the mounting bracket.
4. Install top mounting fastener.
5. Install manifold cover, using the 4 sheet metal screws provided.
6. Remove the protective cap from each cartridge.
7. Inspect each cartridge and all o-rings for damage. See
Replacement Parts list if replacement is required.
8. Lubricate o-rings with food grade lubricant.
9. With the product label facing to the left, insert a cartridge into
the filter head. Rotate 1/4 turn to the right to secure. Product
label will face forward. Repeat for the remaining cartridge.
DO NOT use with hard metal tubing such as:
• Stainless steel
• Chrome plated copper
• Hard metal polished tubing
DO NOT use petroleum jelly.
Section 2
7