
Owner's Manual


Installation - AR-Pre
NOTE: If the AR-Pre is being retrofitted to an existing ArcticPure
®
system, shut off the incoming water supply, relieve the filter
pressure by removing the existing filter cartridge(s), and disengage
the water inlet line. A small quantity of water will be vented directly
behind the cartridge body.
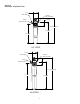
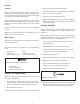
1. Draw a minimum 8" (20.3 cm) level line to the left of the
primary filter system bracket from the center of the lower left
mounting screw.
• For installation to an AR-10000/AR-20000 system, mark the
first hole for the AR-Pre on the level line 4.5" (11.4 cm) from
the center of the lower left mounting fastener on the primary
system.
• For installation to an AR-40000 system, mark the first hole
for the AR-Pre on the level line 5.5" (13.9 cm) from the
center of the lower left mounting screw on the primary
system.
2. Mark and drill the mounting holes for the AR-Pre.
3. Insert the precut copper tubing into the outlet fitting of the
AR-Pre head.
4. Insert opposite end of the tubing into the inlet fitting of the
primary filter assembly.
5. Pull on the tubing to be sure it is secure. If the tubing releases,
refer to the Troubleshooting section of this manual (page 11) to
reinstall.
6. Align the prefilter mounting keyhole slots with the predrilled
holes.
7. Install mounting screws and tighten.
8. Insert incoming water line into the inlet port of the AR-Pre.
Follow notes and steps 1-3 on page 8 under “Installation -
AR-10000/AR-20000/AR-40000”.
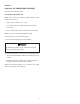
8. Remove the protective cap from the cartridge.
9. Inspect the cartridge and o-rings for damage. See Replacement
Parts list if replacement is required.
10. Lubricate o-rings with food grade lubricant.
11. With the product label facing to the left, insert the cartridge into
the filter head. Rotate 1/4 turn to the right to secure. Product
label will face forward.
The fitting will grip before it seals. Tubing must be pushed into
the tube stop to prevent leaks.
DO NOT use petroleum jelly.
9