
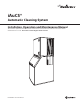
User Manual


Part Number 000009036 8/13 9
Section 2 Installation
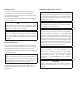
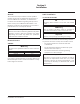
4. Remove the backing from the adhesive bumpers.
Attach bumpers to the mounting bracket directly
above the AuCS® control box. This eliminates upward
movement and stops the tabs from disengaging the
key slots.
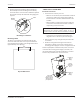
Bumper
Mounting
Bracket
Gasket
Mounting to Ice Machine
Mounting to Wall
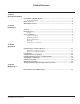
The AuCS® is mounted to the wall using the two key
slots in the back wall of the accessory. Screw fasteners
(not supplied) must hold the entire weight of the AuCS®
(approximately 10 lbs. [4.5 kg]).
6.56"
(16.6 cm)
Key Slot Dimensions
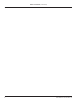
CONNECTION TO ICE MACHINE
Electrical Connections
1. Check electrical code for your area.
• When local code allows, the included wire and strain
relief can be used for line voltage wiring. Remove
knockout from ice machine and install strain relief
and wire.
• When conduit is required, remove strain relief and
ice machine electrical knockout. Install conduit as
required by your electrical code.
n
Warning
Disconnect the electrical power supply to the ice
machine at the electrical disconnect before proceeding.
• Connections on ice machines vary. Refer to the
diagram for the ice machine you are working on.
2. Remove the front, top, and right side panels from the
ice machine.
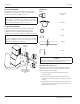
3. Route line voltage wires through control box line
voltage Heyco fitting. Connect line voltage wires to
incoming power supply of contactor and ground screw.
NOTE: On QuietQube Ice Machines the power connection
is made at the incoming power supply (L1 and L2). Cut-
off yellow terminal (L2) and purple terminal (L1) on AuCS
harness. Strip insulation back 1/2" and connect.
Connect to
incoming power
supply of contactor
observing proper
polarity for 115V
Low Voltage
Heyco
Fittings
Connect
ground wire
to ground
screw
Line Voltage
Heyco
Fittings