
User guide


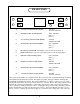

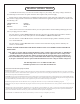


FRONT PANEL
E E
A B C D F G F H C B A
A GAIN Adjusts the gain of that audio channel. Unity gain is about the seventh marking,
or 1 o’clock. Limiting usually requires some additional “make-up” gain to compare IN /
BYPASS. The Gain control can also be used as the level to tape.
B IN / BYPASS. Audio still flows through the tubes in BYPASS but at Unity Gain. Switch-
ing to IN provides the Limiting controls and functions. Use this switch to verify that the
limiting is not messing up the original sound but enhancing it or at least leveling the
volume.
C REDUCTION Adjusts the amount of limiting in that channel. This could also be called
“threshold”. Turning this clockwise introduces limiting.
D STEREO LINK / NORMAL Switching the toggle UP provides the STEREO LINK. It is
used on stereo tracks so that when either channel is called to limit, both channels reduce
the same amount at the same time. This prevents image shifts and an instrument should
stay where you panned them. Limiting individual sounds is usually done with the switch
down where each side is independent of the other.
E METER Shows the amound of gain reduction in dB from the 0 dB mark. Functions
as a high quality VU meter when the switch is set to METER OUTPUT. Note that VU
meters and PEAK meters rarely agree and that digital recorders use peak meters - Rely on
those for clean recording. VU meters are standard with analog machines and big consoles
because they correspond well with perceived loudness.
F METER SELECT Switch to REDUCTION to see the amount of limiting in dB. The
wider and quicker the reduction meter swings the more likely the limiting will be audible.
Switch to OUTPUT to show the output level as a conventional VU meter.
G POWER SWITCH Switch up to turn the unit ON. Both meters will illuminate when the
power is on.
H SIDECHAIN FILTER Allows you to limit only the frequencies above the one selected.
Useful if you want to let the bass come through full-force, but limit everything else.
4