I M P O R TA N T H O M E O W N E R I N F O R M AT I O N RESTORE™ ACR LUXURY WALK-IN BATHTUB Installation, Use and Care Guide
SAVE THESE INSTRUCTIONS WA R N I N G INSTALL TO PERMIT ACCESS FOR SERVICING. INSTALL THIS UNIT IN ACCORDANCE WITH THE LOCAL ELECTRICAL CODE. (Canadian electrical code, part 1, for Canada). NOT APPLICABLE IF UNIT IS SUPPLIED WITH AN ELECTRIC PLUG. DANGER: RISK OF ELECTRICAL SHOCK. (Consult local electrical sub code official). Use this unit only for its intended use as described in this manual. Do not use attachments not recommended by the manufacturer. For indoor use only. Grounding is required.
I M P O R TA N T S A F E T Y I N S T R U C T I O N S CO N T I N U E D WARNING: RISK OF HYPERTHERMIA AND POSSIBLE DROWNING; WATER TEMPERATURE IN EXCESS OF 104°F or 38°C MAY BE INJURIOUS TO YOUR HEALTH. CHECK AND ADJUST WATER TEMPERATURE BEFORE USE and AVERTISSEMENT. RISQUE D’HYPERTHERMIE ET DE NOYADE. UNE TEMPERATURE D’EAU SUPERIEURE A 38° C PEUT PRESENTER UN RISQUE POUR LA SANTE. VERIFIER ET REGLER LA TEMPERATURE DE L’EAU AVANT D’UTILISER LA CUVE. 13.
U N PA C K I N G T H E WA L K-I N T U B NOTE: UPON DELIVERY THE CUSTOMER MUST NOTE ANY APPARENT OUTER CARTON DAMAGE ON THE DRIVER’S PAPERWORK. BEFORE UNPACKING, THE INSTALLER SHOULD CAREFULLY INSPECT THE OUTER CARTON AND WOOD CRATE FRAME FOR DAMAGE. THE INSTALLER SHOULD IMMEDIATELY NOTIFY THE DELIVERY COMPANY AND THE SUPPLYING DEALER IF ANY APPARENT OUTER CARTON DAMAGE IS FOUND.
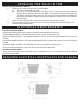
L E V E L I N G T H E WA L K-I N T U B BEFORE Installing the Walk-in Bathtub 1. Check the floor area where the tub is to be installed. (a) Clean area of any debris or trash. (b) Use a 5’ or 6’ level and determine if the floor is level. If the floor is not level, adjust all levelling feet to perfectly level the tub. Note: It is important that all levelling feet are completely touching the floor and level.
I N S TA L L AT I O N I N S T R U C T I O N S WARNING: When using electrical products, basic precautions should always be followed, including the following: 1. DANGER: RISK OF ELECTRIC SHOCK. Connect only to a circuit protected by a ground-fault circuitinterrupter. 2. Grounding is required. The unit should be installed by a qualified service representative and grounded. With a measuring tape ensure the bath will fit through all passageways and doors. 1. Remove the existing bath or shower. 2.
I N S TA L L AT I O N I N S T R U C T I O N S Important note: Under no circumstances should you use a cutter that may damage the walk-in bath outside of the cutting area. Doing so will void the warranty. 10. Measure and verify the span of the faucet assembly’s supply lines. Mark position of the holes for the faucets and ensure that your pipe work will not be obstructed by the walk-in bath’s steel frame. Double check all measurements. 11.
PANEL INSTALLATION 1. For ease of product installation, the main front panel of the tub is attached to the frame where it cannot be easily removed. To access product components and underneath the tub, there are access panels that are attached to the main front panel with magnets. These access panels are easily removed by using a non-sharp object to gently pry the panel from where it is magnetically attached. 2. One end panel is provided with the Walk-in bath.
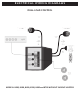
ELECTRICAL WIRING DIAGRAMS DUAL LOAD CONTROL MODELS: 8090, 8190, 8490, 8590, 8690 and 8790 WITHOUT SURFACE HEATERS
ELECTRICAL WIRING DIAGRAMS MASTER BATH CONTROL MODELS: 8090, 8190, 8490, 8590, 8690 and 8790 WITH SURFACE HEATERS
ELECTRICAL WIRING DIAGRAMS INLINE HEATER AND OZONATOR To 120V 20 AMP GFCI PROTECTED RECEPTACLE NOTE: 15 AMP FOR CANADA OZONE PIGGY BACK NEMA PLUG PRE-WIRED CORD/PLUG NOTE: DEDICATED 120V 20 AMP GFCI PROTECTED CIRCUIT IS REQUIRED WHEN INLINE HEATER IS INSTALLED PRODUC ON PRODUCT.
ELECTRICAL WIRING DIAGRAMS MICRODERM THERAPEUTIC BATH MODELS: 8890 and 8990
USE AND CARE GUIDE CHECK THE WATER WHEN YOU BEGIN FILLING TO ENSURE IT IS AT A SAFE TEMPERATURE. Congratulations on the purchase of your new walk-in tub. By carefully following your new walk-in tub’s instructions, you can benefit from the safety, dignity, independence and a tremendously improved quality of life. Please read the following instructions before using your walk-in bath and retain for future reference.
USE AND CARE GUIDE RESTORE ACR Whirlpool Bath - Model 8090 or 8190 IMPORTANT It is recommended that bathers should limit their use of the whirlpool to not more than 20 minutes in any one bathing session. OPERATION BUTTON 1, WHITE LIGHT - POWER ON/OFF The first button is the power button which will activate the keypad and illuminate in dim colors. BUTTON 2, BLUE LIGHT - PUMP Push the button once to activate blower, push again to turn off.
USE AND CARE GUIDE RESTORE ACR MicroDerm Therapeutic Bath - Model 8890 or 8990 See Soaking Tub section for instructions on entering, filling and exiting the bath. IMPORTANT It is recommended that bathers should limit their use of the air bath to not more than 20 minutes in any one bathing session. OPERATION ON/OFF BUTTON - Press button once to power on, press again to power off. NOTE: Before activating, check prime port to ensure the system is primed.
WARRANTY Mansfield Plumbing Products Bathware Restore™ ACR Walk-in Baths Residential Warranty Mansfield Plumbing Products, LLC offers the following expressed warranty to the original purchaser of any Restore ACR Walkin Bath who purchases the product for personal or single family residential use (“user”). We will repair or replace, at our sole option, the product or its equipment in accordance with the following terms and conditions.