WELCOME OF L4NTIS Here's your new TO THE WORLD GARDENTNGr. q Mantis Titler/Cuhivator . the lightweight wonder that's "Changing Americans Garden."_ the Way Unlike big tillers, your Mantis Tiller weighs only 20 pounds. So it lifts easily, handles smoothly, fills and weeds precisely. And, unlike other small tillers, it features serpentine tines that chum soil to ten inches deep. It creates a soft, smooth seed bed, even in problem soil.
SAFE_ RULES & WARNINGS ou will notice throughout this Owners Manual Safety Rules and Important derstand and obey these warnings for your own protection. I. Special Safety Notes, Make sure you Information II.
Decal Information An important part of _:hesafety system incorporated in this tiller are the warning and information decals found on various parr of the tiller. These decals must be replaced in time due to abrasion, etc. It is your responsibility to replace these decals d v! when they become hard to read. The location and part numbers (P/N) of these decals are illustrated on Page 27. P/N 488M CUTJtNGHAZARD; KEEPFEETAND HANDS AWAYFROM ROTATING TINES.
_,_ W_rnings ° Don*ts Don't use tiller with one hand eep both hands on handles with _'ingers and tlmmbs encircling the handles, while tines are moving, and engine is running. Don't overreach. Don't attempt Keep a good to clear tines Engine/Fuel Warnings Always use flesh gasoline in the fuel mixture. Stale gasoline Dan Cause damage. Always pull starter cord slowly until resistance is felt.
ASSEMBLY Your Mantis Tiller comes partially assembled. You must install only the handlebars, the carrying handle, and the tines. This will take just a few minutes if you tbltow the directions. First, take all items out of the carton. But do not remove the cardboard from around the Tiller's base. The list at the right, shows the parts that come with your tiller. Check to make sure you have them. Quantity 1 1 2 1 1 1 1 1 The bag of hardware is in the plastic bag containing the Owner's Manual and Video.
ASSEMBLY (continued) handle _OW TO ASSEMBLE LOWER HANDLES I_9 idemify part numbers, pages 6 and 27. see. 1. Use the protective cardboard sleeve to stabilize your tiller. Stand the engine assembly (#7) up, 2. Lay the handle parts within easy reach. You'll need one of the hanNe clamps (#22) and one of the lower handles (#6). Note that the lower handles have a short leg on one end. (Picture 1) 3. Fit the handle ctamp along the outside of the short leg. Line up the holes on the clamp and the leg. 4.
ASSEMBLY ¢continue ) HOW TO ASSEMBLE UPPER HANDLES & P_STIC CARR_IN G HANDLE. 1. Lightly squeeze handles (#6) toward another so that they with the two smaller the lower one line up holes on the carrying handle (#49) Then slide the carrying handle over and down the lower handles. It will rest about _mr to six inches above the engine. (Picture 1) lower handle. (Choose the lower handle you prefer, depending on which hand, right or left, you'd rather use to press the throttle.
ASSEMBLY _ssembling for Tilling €continued) the Tines 1. Remove the _:ardboard trom around your Tiller_ base. 2. Slide the tines omo the axle shafts. The "D" hole goes on the outside. 3. Make sure you've installed the tines properly [br tilling. Mixing Fuel Your Mantis Tiller is powered by a commercial two stroke, air cooled engine which requires a [:uel mixture of gasoline and lubricating oil. Use a mixm_v of 50 parts unleaded regular gasoline and 1 part two-stroke Mantis oil (50:1.
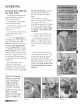
STARTING To Start the First Tiller for During cold starting, you may need to pull at least three or four times before the engine Time: .1. Fill the fuel tank with the fires. proper oiUgasoline mixture. (See preVious section.) NOTE: When closed, never pull the cord more than tbur or five dines. 2. Hand tighten the gasoline cap just until it's snug. 3. Place the start/stop into the "start" position. (Picture 1) Overpulling :may cause flooding.
STARTING }Starting (continued) a Warm clear return line. push primer bulb 3-4 rimes or untiJ fuel is visible in the line. Engine I. Slide ignition switch to START position. 4. Pul] starter rope using short pulls. 1/2 m 2/3 of the 2. Push choke bn_ton in to rope the RUN (open) p_.osition. length. 5. If engl ne fails to start 3 If there is no fuel in the pulls, ADDI ONAL use "First Time" procedure on page 10. 6.
TO DO JUST XN If you follow the normal starting procedure, you should have no problem starting your tiller. But, just in case you do have problems, here_ what m do. Make stay the start/stop switch is on "start." You'd be surprised how' many people forget to push the switch into the "start" position. Picture i If the switch was on "stop" when you pulled the cord, you may have flooded t!le engine. *First, examine the spark plug.
WHAT TO DO JUST IN CASE ¢continuea) 2. Push in the c hoke but Lon to open 3, Press few times, the the choke, plastic 4. Give the starter bubble a cord a t_w short, quick pulls. The m_gine should start and run. 5. If the engine does not start. then pull out the choke button to close the choke. Pull the starter cord four to I:ive times, The eng{ne should cough. GETTING Walk sputter 6. After the engine sputters. push the choke button in. Then pull the starter cord.
TILLING You Can Even Control Depth. Now You're Ready to Use *four Mantis Tiller. Picture 1 If you've seen your Mantis you. It tills best when backward! Tiller may Mantis For Deeper Tilling: surprise you pull it you Tiller backward, you give extra resistance to the tines, so they (Picture 1) dig deeper. What's more when you go backward, you erase footprints. So your and fluffy.
TILLING/CULTIVATING How about vegetable a family-sLze garden? Nowadays prefer especially space many small gardeners gardens in _he suburbs, is at a premmm vd rare But. if you're fortunate a large lot, you can create enough to own a bJ gger garden a half acr_ or more. Here's how: 1. First tractor worth hire someone ar big tiller with a to break [y i_westme'nt the small cos_. is a on e- _hat_ welt 2. Then. use your 1Tiller to break up any remaining clumps of soil or sod.
CULTI¥ TING Now You're Ready to Cuhivate or Weed. Guide your Tiller where you want to weed and start :it up. Pull your Tiller backward slowtF_ then let it move forward a bit. in a gentle rocking motion. Watch it slice, shred, and bury those weeds! Got tough weeds? Lighten your pressure on the throttle to slow your Tiller down. Then work back and forth until your Tiller chops up the weeds.
MAINTENANCE Check the Air Filter Often A wet or dirty air filter can affect the way your engine starts. performs, and wears. So it's a good once idea to check a ntonth_ your air filter If yon work in dust?- soil. or if you want m be on the safe side then check your filter more often {for instance, betbre each use). But be sure to replace it at least once a year. in the spring or fall. Clean or change it as needed, it is recommend{_d to change the air filter yearly. 4.
MAINTENANCE How to Check Level inside the (continued) Grease the Worm Gear Housing When we built your Mantis Tiller. we lubricated the worm gear housing thoroughly. it is imperative that you inspect the grease level once a year. Simply remove the cover plate on the worm gear housing. (Picture i) Then check _:omake sure the grease comes almost to the top of the housing. [f i_ doesn't. add lithium #0 grease (Item M9985.1 This is the only way to add grease to the worm gear housing.
(cominued) wrench or an a_ustable wrench.) Then, slide the cable down until you close the gap between the triangle and the idle screw. (Picture 1) Now, tighten the bottom nut that holds the throttle cable. What if your engine runs too fast ... or if the tines turn the instant you start the Tiller? You may need to adjust the idle screw (Key #25 under Carburetor on page 28) by itself rigbt below the H and L screws. Gently turn it counterclockwise.
MAINTENANCE How to Reseat the Flange At some point, you may {:ind that the tines won't turn when you press the throttle. This may mean the engine isn't sitting all the way down on the worm gear housing. :Perhaps you've been using your Tilter for several years. Or perhaps you've removed tile engine ibr use with our hedge trimmer attachment, then replaced it.
STORAGE Each fall -- _r before you store your Mantis Tiller for any long period be sure to take these measures: 1. Do not store your Tiller with [k_el stil! in _t. Even under ideal conditions_ stored fuel containing ethanol or MTBE can star{ to go stale in 30 days. An& since stale fuel has a high gum content, it can clog the carburetor, this, in {urn, will restrict fuel i]ow. So, en you're ready to store _r Tiller. or will not be u.
STORAGE 10. Check (continued) the grease level in the worm gear housing, described on page 18. as II. Order new parts to replace any that are badly worn or broken. Just contact your local authorized Mantis dealer. But do it early, so you'll have the parts well before the he× t gardening season starts. 12. Store you Tiller -- in an upright position it, a clean. dry place (Picture t. preceding page) 13. Do you have fuel left over [rom last season? Dispose of it properly.
TROUBLE SHOOTING Problem Tines 2. don't turn when Cause throttle is depressed Engine is not seated the gear housing. Engine Start/Stop fails to start switch properly on is in Stop position. No fuel in tank. Fuel s_rainer Fuel line clogged. clogged. Spark plug shorted or fouled. Spark plug is broken (cracked porcelain or electrodes broken) Ignition lead wire shorted. broken or disconnected from spark plug. lgnition inoperative Engine hard to star_.
TROUBLE SHOOTING Problem Re]rlTtedy 5. Engine lacks power. Air tilter clogged Carburetor out of adjustment. Mu[tler clogged. Clogged exhaust ports. -4 Clean or replace air filmr. See "Carburetor Ad}nstmenU. Clean carbon [rom nmNer. Remove muffler, rotate engine until the piston is as hop of cylinder. With a wooden scraper or blunt tool. remove aH carbon Be careful from exhaust not to scratch ports. or damage piston or c}'li ader walls.
GUXDE Maintenance Frequency Air Filter Clean Daily or every 4 hrs. use Every 3 mths, or 100 hrs, use Spark Plug Replace Clean Carburetor Replace Check / Rebuild Every 3 mths.
USING THE BORd ER Your Mantis "_Fillerhas been designed and built to accept wide range of Mantis Tiller Attachments to increase its a usefulness in your lawn and garden. And, all Mantis Tiller Attachments have been designed for quick and easy attachment to the Tiller or EDGER Some areas of your yard may harbor roots and other underground obstructions. In places like this you'll want to edge your borders shallowly (1" to 2" deep). Here's how to install the Border Edger for shallow edging: Engine, 1.
NTIS TILLER ASSEMBLY 55 P/N 438LA DIRECTION Raise_t Hub 23 Teeth a Clockwise Direction ......
S%4B1E ENGINT PARTS ASSEMBLIES CA_U_TOR KEY NO, t 2 3 4 5 g 7 8 A 9 10 AIR PART NO, DESCRIPTION KEY NO.
S%4B I E ENGINE,PARTS FUEL TANK 18 KEY NO. 19 _8 ST4RTER, PAWL 90027505015 90060300005 13100511820 13201011520 13130056430 13011106530 13131244330 3 3 1 1 1 1 1 Screws 5x15 Washers Tank,Fuel Pipe3×5×210 Valve,Check Clip, Pipe Pipe 3×5× 70 28 13211546730 1 Grommet,Fuel 24 28 13120507320 i Strainer,Fuel 29 27 13100453530 13201309820 1 1 30 13101655830 1 Cap Clip Asy,FuelTank (IncludesItem30) Gasket,Fael Cap & CATCHER KEY NO.
MANTIS D F EG-KONFORMITATS-ERKLUARUNG DECLARATION DE CONFORMITE CE E I GB NL N EC DECLARATION OF CONFORM_ITY EG CONFORMITEITSVERKLARJNG EU OVERENSSTEMMELSESERK_R_NG $ 0 F Wit Noue, Mantis 1028 Street GB NL E Southampton, PA, 18966 USA S DK N SF We, Wij, Nosotros, Noi, Vi, Vi, Vi, Me, D F GB NL Modell: Mod_le: Model: model: 7222ME, 7222ME, 7222ME, 7222ME, (E) (E) (E) (E) Seriennummer(n): Numera(s) de seire: Serial number(s): seriennummer(s): slehe euf dem Ger_t voir suri'appareil see tool z
MANTIS ® MODEL O F GB NL N 7222E, (ME) GER_,USCHEMISSION EMISSION DU BRUIT NOtSE EMISSION GELUIDSAFGIFTE LYDEM|SJON E I S EMISION DE RUIDO EM|SSmONE DI RUMORE BULLERNWA DK SF STOJEMISS|ON MELUEMISSIO D Schalldruck am Ohr des Bedieners Schalleistung 106Lw, F Pression acoustique au niveau de l'oreille de I'operateur & une charge de fonctionnement Puissance acounstique de 106Lw,_ GB Sound Pressure at operator's Sound Power 106LwA NL Geluidscruk bij her oor van de gebruiker, bij belast gebruik:
LIMITED FOR MANTIS INFORL L TION TILLER Mantis extends oMy to the original consumer purchaser a limited warranty against defects in material and workmanship for a period of two years from date of purchase. This warran V covers all portions of the MANTIS Tiller. MANTIS ,#il! repair or, at its option, replace any defective part or parts of the product tree of charge. In the event of a defect or malfunction, the purchaser must remm the product on an authorized Mantis dealer.